Asus AP1720-E2 AP1720-E2 English version manual - Page 41
Installing an internal IDE/SATA
 |
View all Asus AP1720-E2 manuals
Add to My Manuals
Save this manual to your list of manuals |
Page 41 highlights
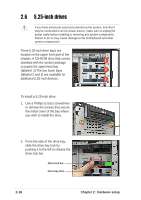
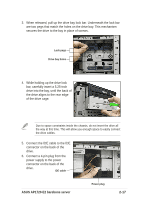
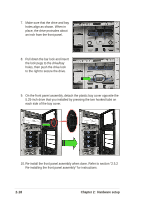
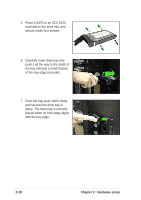
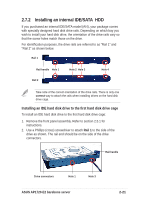
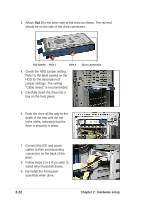
2.7.2 Installing an internal IDE/SATA HDD If you purchased an internal IDE/SATA model (AI4), your package comes with specially designed hard disk drive rails. Depending on which bay you wish to install your hard disk drive, the orientation of the drive rails vary so that the screw holes match those on the drive. For identification purposes, the drive rails are referred to as "Rail 1" and "Rail 2" as shown below. Rail 1 Rail handle Hole 1 Rail 2 Hole 2 Hole 3 Hole 4 Take note of the correct orientation of the drive rails. There is only one correct way to attach the rails when installing drives on the hard disk drive cage. Installing an IDE hard disk drive to the first hard disk drive cage To install an IDE hard disk drive to the first hard disk drive cage: 1. Remove the front panel assembly. Refer to section 2.5.1 for instructions. 2. Use a Phillips (cross) screwdriver to attach Rail 1 to the side of the drive as shown. The rail end should be on the side of the drive connectors. Rail handle Drive connectors Hole 1 Hole 3 ASUS AP1720-E2 barebone server 2-21
-
 1
1 -
2
-
3
-
4
-
5
-
6
-
7
-
8
-
9
-
10
-
11
-
12
-
13
-
14
-
15
-
16
-
17
-
18
-
19
-
20
-
21
-
22
-
23
-
24
-
25
-
26
-
27
-
28
-
29
-
30
-
31
-
32
-
33
-
34
-
35
-
 36
36 -
 37
37 -
 38
38 -
 39
39 -
 40
40 -
 41
41 -
 42
42 -
 43
43 -
 44
44 -
 45
45 -
 46
46 -
47
-
48
-
49
-
50
-
51
-
52
-
53
-
54
-
55
-
56
-
57
-
58
-
59
-
60
-
61
-
62
-
63
-
64
-
65
-
66
-
67
-
68
-
69
-
70
-
71
-
72
-
73
-
74
-
75
-
76
-
77
-
78
-
79
-
80
-
81
-
82
-
83
-
84
-
85
-
86
-
87
-
88
-
89
-
90
-
91
-
92
-
93
-
94
-
95
-
96
-
97
-
98
-
99
-
100
-
101
-
102
-
103
-
104
-
105
-
106
-
107
-
108
-
109
-
110
-
111
-
112
-
113
-
114
-
115
-
116
-
117
-
118
-
119
-
120
-
121
-
122
-
123
-
124
-
125
-
126
-
127
-
128
-
129
-
130
-
131
-
132
-
133
-
134
-
135
-
136
-
137
-
138
-
139
-
140
-
141
-
142
-
143
-
144
-
145
-
146
-
147
-
148
-
149
-
150
-
151
-
152
-
153
-
154
-
155
-
156
 |
 |
