Asus AP1720-E2 AP1720-E2 English version manual - Page 42
Hardware setup, Rail 2
 |
View all Asus AP1720-E2 manuals
Add to My Manuals
Save this manual to your list of manuals |
Page 42 highlights
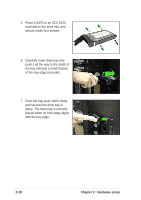
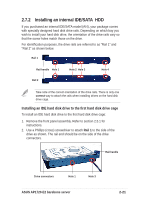
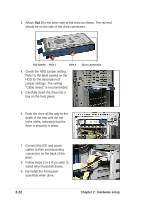
3. Attach Rail 2 to the other side of the drive as shown. The rail end should be on the side of the drive connectors. Rail handle Hole 1 Hole 3 4. Check the HDD jumper setting. Refer to the label pasted on the HDD for the description of jumper settings. The setting "Cable Select" is recommended. 5. Carefully insert the drive into a bay on the front panel. Drive connectors 6. Push the drive all the way to the depth of the bay until the rail locks clicks, indicating that the drive is securely in place. 7. Connect the IDE and power cables to their corresponding connectors on the back of the drive. 8. Follow steps 2 to 6 if you wish to install other hard disk drives. 9. Re-install the front panel assembly when done. 2-22 Chapter 2: Hardware setup
-
 1
1 -
2
-
3
-
4
-
5
-
6
-
7
-
8
-
9
-
10
-
11
-
12
-
13
-
14
-
15
-
16
-
17
-
18
-
19
-
20
-
21
-
22
-
23
-
24
-
25
-
26
-
27
-
28
-
29
-
30
-
31
-
32
-
33
-
34
-
35
-
36
-
 37
37 -
 38
38 -
 39
39 -
 40
40 -
 41
41 -
 42
42 -
 43
43 -
 44
44 -
 45
45 -
 46
46 -
 47
47 -
48
-
49
-
50
-
51
-
52
-
53
-
54
-
55
-
56
-
57
-
58
-
59
-
60
-
61
-
62
-
63
-
64
-
65
-
66
-
67
-
68
-
69
-
70
-
71
-
72
-
73
-
74
-
75
-
76
-
77
-
78
-
79
-
80
-
81
-
82
-
83
-
84
-
85
-
86
-
87
-
88
-
89
-
90
-
91
-
92
-
93
-
94
-
95
-
96
-
97
-
98
-
99
-
100
-
101
-
102
-
103
-
104
-
105
-
106
-
107
-
108
-
109
-
110
-
111
-
112
-
113
-
114
-
115
-
116
-
117
-
118
-
119
-
120
-
121
-
122
-
123
-
124
-
125
-
126
-
127
-
128
-
129
-
130
-
131
-
132
-
133
-
134
-
135
-
136
-
137
-
138
-
139
-
140
-
141
-
142
-
143
-
144
-
145
-
146
-
147
-
148
-
149
-
150
-
151
-
152
-
153
-
154
-
155
-
156
 |
 |
