Asus CUWE CUWE User Manual - Page 29
Interrupt Request Table
 |
View all Asus CUWE manuals
Add to My Manuals
Save this manual to your list of manuals |
Page 29 highlights
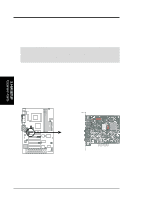
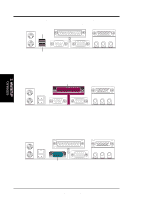
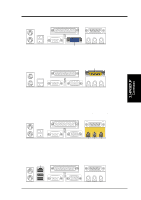
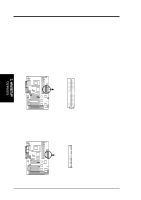
3. HARDWARE SETUP Interrupt Request Table PCI slot 1 PCI slot 2 PCI slot 3 PCI slot 4 PCI slot 5 PCI slot 6 Onboard VGA Onboard audio/AMR/SMBus Onboard LAN USB INT-A shared ---shared -shared ---- INT-B -- shared -------- shared --- INT-C --- shared --- shared --- shared -- INT-D ---- shared ------ shared 3. H/W SETUP Expansion Cards IMPORTANT: If using PCI cards on shared slots, make sure that the drivers support "Share IRQ" or that the cards do not need IRQ assignments. Conflicts will arise between the two PCI groups that will make the system unstable or cards inoperable. Both ISA and PCI expansion cards may require IRQs. System IRQs are available to cards installed in the ISA expansion bus first, then any remaining IRQs are available to PCI cards. Currently, there are two types of ISA cards. The original ISA expansion card design, now referred to as "Legacy" ISA cards, requires that you configure the card's jumpers manually and then install it in any available slot on the ISA bus. To see a map of your used and free IRQs in Windows 98, the Control Panel icon in My Computer, contains a System icon, which gives you a Device Manager tab. Double-clicking on a specific hardware device gives you the Resources tab which shows the Interrupt number and address. Double-click Computer to see all the interrupts and addresses for your system. Make sure that no two devices use the same IRQ or your computer will experience problems when those two devices are in use at the same time. To simplify this process, this motherboard complies with the Plug and Play (PnP) specification which was developed to allow automatic system configuration whenever a PnP-compliant card is added to the system. For PnP cards, IRQs are assigned automatically from those available. If the system has both Legacy and PnP ISA cards installed, IRQs are assigned to PNP cards from those not used by Legacy cards. The PCI and PNP configuration of the BIOS setup utility can be used to indicate which IRQs are being used by Legacy cards. For older Legacy cards that does not work with the BIOS, you can contact your vendor for an ISA Configuration Utility. An IRQ number is automatically assigned to PCI expansion cards after those used by Legacy and PnP ISA cards. In the PCI bus design, the BIOS automatically assigns an IRQ to a PCI slot that has a card in it that requires an IRQ. To install a PCI card, you need to set something called the INT (interrupt) assignment. Since all the PCI slots on this motherboard use an INTA #, be sure that the jumpers on your PCI cards are set to INT A. ASUS CUWE User's Manual 29
-
 1
1 -
2
-
3
-
4
-
5
-
6
-
7
-
8
-
9
-
10
-
11
-
12
-
13
-
14
-
15
-
16
-
17
-
18
-
19
-
20
-
21
-
22
-
23
-
 24
24 -
 25
25 -
 26
26 -
 27
27 -
 28
28 -
 29
29 -
 30
30 -
 31
31 -
 32
32 -
 33
33 -
 34
34 -
35
-
36
-
37
-
38
-
39
-
40
-
41
-
42
-
43
-
44
-
45
-
46
-
47
-
48
-
49
-
50
-
51
-
52
-
53
-
54
-
55
-
56
-
57
-
58
-
59
-
60
-
61
-
62
-
63
-
64
-
65
-
66
-
67
-
68
-
69
-
70
-
71
-
72
-
73
-
74
-
75
-
76
-
77
-
78
-
79
-
80
-
81
-
82
-
83
-
84
-
85
-
86
-
87
-
88
-
89
-
90
-
91
-
92
-
93
-
94
-
95
-
96
-
97
-
98
-
99
-
100
-
101
-
102
-
103
-
104
-
105
-
106
-
107
-
108
-
109
-
110
-
111
-
112
-
113
-
114
-
115
-
116
-
117
-
118
-
119
-
120
-
121
-
122
-
123
-
124
-
125
-
126
-
127
-
128
-
129
-
130
-
131
-
132
-
133
-
134
-
135
-
136
 |
 |