Asus ESC500 G2 User Manual - Page 132
Flash, Auto Tune, Booting Preview
 |
View all Asus ESC500 G2 manuals
Add to My Manuals
Save this manual to your list of manuals |
Page 132 highlights
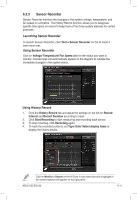
3. Do any of the following: • Click Auto Tune to adjust the image size or the image resolution. • Click Booting Preview to preview the boot image. 4. Click Next. 5. Click Flash to update the boot logo. 6. When prompted, click Yes to reboot the system. You will see the new boot logo the next time you start up the system. Ensure to enable the Full Screen Logo in BIOS to use this feature. 6-14 Chapter 6: Driver installation
-
 1
1 -
2
-
3
-
4
-
5
-
6
-
7
-
8
-
9
-
10
-
11
-
12
-
13
-
14
-
15
-
16
-
17
-
18
-
19
-
20
-
21
-
22
-
23
-
24
-
25
-
26
-
27
-
28
-
29
-
30
-
31
-
32
-
33
-
34
-
35
-
36
-
37
-
38
-
39
-
40
-
41
-
42
-
43
-
44
-
45
-
46
-
47
-
48
-
49
-
50
-
51
-
52
-
53
-
54
-
55
-
56
-
57
-
58
-
59
-
60
-
61
-
62
-
63
-
64
-
65
-
66
-
67
-
68
-
69
-
70
-
71
-
72
-
73
-
74
-
75
-
76
-
77
-
78
-
79
-
80
-
81
-
82
-
83
-
84
-
85
-
86
-
87
-
88
-
89
-
90
-
91
-
92
-
93
-
94
-
95
-
96
-
97
-
98
-
99
-
100
-
101
-
102
-
103
-
104
-
105
-
106
-
107
-
108
-
109
-
110
-
111
-
112
-
113
-
114
-
115
-
116
-
117
-
118
-
119
-
120
-
121
-
122
-
123
-
124
-
125
-
126
-
 127
127 -
 128
128 -
 129
129 -
 130
130 -
 131
131 -
 132
132 -
 133
133 -
 134
134 -
 135
135 -
 136
136 -
 137
137 -
138
-
139
-
140
 |
 |

6-14
Chapter 6: Driver installation
Ensure to enable the
Full Screen Logo
in BIOS to use this feature.
5.
Click
Flash
to update the boot logo.
6.
When prompted, click
Yes
to reboot the system. You will see the new boot
logo the next time you start up the system.
3.
Do any of the following:
•
Click
Auto Tune
to adjust the image size or the image resolution.
•
Click
Booting Preview
to preview the boot image.
4.
Click
Next
.