Asus NRL-LS NRL-LS User Manual - Page 32
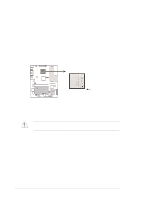
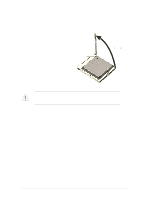
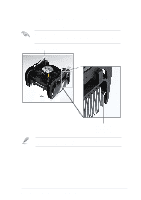
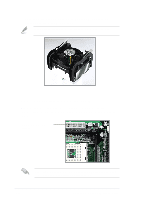
Installing the heatsink and fan
 |
View all Asus NRL-LS manuals
Add to My Manuals
Save this manual to your list of manuals |
Page 32 highlights
Take care not to scrape the motherboard surface when mounting a clampstyle processor fan, or else damage may occur. When mounting a heatsink onto your CPU, make sure that exposed CPU capacitors do not touch the heatsink, or damage may occur! Do not neglect to set the correct Bus Frequency and Multiple (frequency multiple setting is available only on unlocked processors) for your Socket 478 processor or else boot-up may not be possible. Socket 478 processors provide internal thermal sensing: a socket mounted thermal resistor is not needed. 2.4.3 Installing the heatsink and fan The Intel® Pentium4™ 478 Processor requires a specially designed heatsink and fan assembly to ensure optimum thermal condition and performance. When you buy a boxed Intel Pentium 4™ 478 Processor, the package includes the heatsink, fan, and retention mechanism. In case you buy a CPU separately, make sure that you use only Intel certified heatsink and fan. Follow these steps to install the CPU heatsink and fan. 1. Place the heatsink on top of the installed CPU, making sure that the heatsink fits properly on the retention module base. The retention module base is already installed on the motherboard upon purchase. You do not have to remove the retention module base when installing the CPU or installing other motherboard components. Your boxed Intel Pentium 4™ 478 Processor package should come with installation instructions for the CPU, heatsink, and the retention mechanism. If the instructions in this section do not match the CPU documentation, follow the latter. 2-6 Chapter 2: Hardware information
-
 1
1 -
2
-
3
-
4
-
5
-
6
-
7
-
8
-
9
-
10
-
11
-
12
-
13
-
14
-
15
-
16
-
17
-
18
-
19
-
20
-
21
-
22
-
23
-
24
-
25
-
26
-
 27
27 -
 28
28 -
 29
29 -
 30
30 -
 31
31 -
 32
32 -
 33
33 -
 34
34 -
 35
35 -
 36
36 -
 37
37 -
38
-
39
-
40
-
41
-
42
-
43
-
44
-
45
-
46
-
47
-
48
-
49
-
50
-
51
-
52
-
53
-
54
-
55
-
56
-
57
-
58
-
59
-
60
-
61
-
62
-
63
-
64
-
65
-
66
-
67
-
68
-
69
-
70
-
71
-
72
-
73
-
74
-
75
-
76
-
77
-
78
-
79
-
80
-
81
-
82
-
83
-
84
-
85
-
86
-
87
-
88
-
89
-
90
-
91
-
92
-
93
-
94
-
95
-
96
-
97
-
98
-
99
-
100
-
101
-
102
-
103
-
104
-
105
-
106
-
107
-
108
-
109
-
110
-
111
-
112
-
113
-
114
-
115
-
116
-
117
-
118
-
119
-
120
 |
 |