Asus P4P800-E DELUXE P4P800-E Deluxe user manual English version E1526 - Page 119
ASUS Instant Music
 |
View all Asus P4P800-E DELUXE manuals
Add to My Manuals
Save this manual to your list of manuals |
Page 119 highlights
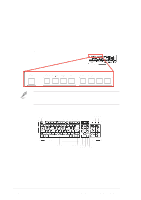
5.3.2 ASUS Instant Music The motherboard is equipped with a BIOS-based audio playback feature called Instant Music. The onboard audio AC'97 CODEC supports this feature, which requires an optical drive (CD-ROM, DVD-ROM, or CD-RW). 1. Instant Music only supports CDs in audio format. 2. Instant Music does not work if you installed and enabled an add-on sound card. 3. Instant Music only supports PS/2 keyboard. To enable ASUS Instant Music: 1. Connect the analog audio cable from the optical drive (CD-ROM, DVD-ROM, or CD-RW drive) to the 4-pin CD-In connector (labeled CD) on the motherboard. See section "2.7 Connectors" for the location. Make sure to connect the CD-ROM audio cable. Otherwise, you cannot control the audio volume using the Instant Music function keys. 2. Turn on the system and enter BIOS by pressing the Delete key during the Power On Self-Tests (POST). 3. From the BIOS screen select Advanced then Instant Music Configuration. 4. In the Instant Music Configuration menu, select the item Instant Music and set it to Enabled. See section "4.4.8 Instant Music Configuration" in the user guide. 5. The Instant Music CD-ROM Drive item appears if you enabled Instant Music. Highlight the item then press to display the CD-ROM options. 6. Save your changes and exit BIOS Setup. 1. The Scroll Lock LED is fixed to ON after enabling Instant Music. 2. The Caps Lock LED turns ON when you pause the CD playback. 3. When set to Instant Music mode, the system wake-up features (LAN, keyboard, mouse, USB) are deactivated. In this case, power up the system using the power switch. 4. If the system lost connection or did not detect any optical drive, the Instant Music feature turns OFF (disabled) automatically. A "beep" indicates this condition. ASUS P4P800-E Deluxe motherboard 5-9
-
 1
1 -
2
-
3
-
4
-
5
-
6
-
7
-
8
-
9
-
10
-
11
-
12
-
13
-
14
-
15
-
16
-
17
-
18
-
19
-
20
-
21
-
22
-
23
-
24
-
25
-
26
-
27
-
28
-
29
-
30
-
31
-
32
-
33
-
34
-
35
-
36
-
37
-
38
-
39
-
40
-
41
-
42
-
43
-
44
-
45
-
46
-
47
-
48
-
49
-
50
-
51
-
52
-
53
-
54
-
55
-
56
-
57
-
58
-
59
-
60
-
61
-
62
-
63
-
64
-
65
-
66
-
67
-
68
-
69
-
70
-
71
-
72
-
73
-
74
-
75
-
76
-
77
-
78
-
79
-
80
-
81
-
82
-
83
-
84
-
85
-
86
-
87
-
88
-
89
-
90
-
91
-
92
-
93
-
94
-
95
-
96
-
97
-
98
-
99
-
100
-
101
-
102
-
103
-
104
-
105
-
106
-
107
-
108
-
109
-
110
-
111
-
112
-
113
-
 114
114 -
 115
115 -
 116
116 -
 117
117 -
 118
118 -
 119
119 -
 120
120 -
 121
121 -
 122
122 -
 123
123 -
 124
124 -
125
-
126
-
127
-
128
-
129
-
130
-
131
-
132
-
133
-
134
-
135
-
136
-
137
-
138
-
139
-
140
-
141
-
142
-
143
 |
 |