Asus P4P800-E DELUXE P4P800-E Deluxe user manual English version E1526 - Page 137
Intel, RAID for Serial ATA configuration - user manual
 |
View all Asus P4P800-E DELUXE manuals
Add to My Manuals
Save this manual to your list of manuals |
Page 137 highlights
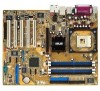
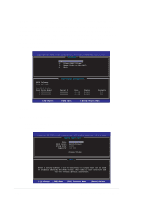
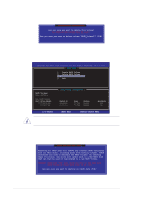
5.7 Intel® RAID for Serial ATA configuration (for Windows 2000 and Windows XP only) This motherboard supports Intel® RAID 0 and RAID 1 for Serial ATA drives through the Intel® ICH5R chipset. The Serial ATA as RAID option must be enabled in the BIOS before the system can load the Intel® RAID Option ROM code for Intel® RAID. The Intel® RAID Option ROM is a standard PnP (Plug and Play) option ROM that provides a pre-operating system user interface for the Intel® RAID implementation. It also allows the boot order to be selected from within the BIOS setup utility. For more information about the Intel® RAID for SATA configuration, refer to the Intel Application Accelerator, RAID Edition, User's manual in "\Manual\IAA RAID Manual.doc" of the support CD. 5.7.1 BIOS Configuration 1. Turn ON the system and enter BIOS by pressing the Delete key during the Power-On Self Test (POST). 2. From the BIOS screen, select the Main menu then the IDE Configuration menu. 3. If necessary, switch the Onboard IDE Operate Mode option from [Legacy Mode] to [Enhanced Mode]. 4. Switch the Configure S-ATA as RAID option to [Yes]. 5. Press to save the BIOS settings and exit the BIOS setup program. 5.7.2 Installing Serial ATA (SATA) hard disks Installing Serial ATA (SATA) hard disks requires the use of a new SATA data cable (4-conductor) which supports the Serial ATA protocol and a SATA power cable. Any end of the SATA data cable can be connected to the SATA hard disk or the SATA connector on the motherboard. 1. Both the data and power SATA cables are new cables. You cannot use the older 40-pin 80-conductor IDE or regular IDE power cables with SATA hard drives. 2. Carefully follow any technical instructions that come from the hard disk manufacturer. To install the Serial ATA cable: 1. Attach either cable end to the SATA connector on the motherboard. 2. Attach the other cable end to the SATA hard disk. 3. Connect the SATA power cables. ASUS P4P800-E Deluxe motherboard 5-27
-
 1
1 -
2
-
3
-
4
-
5
-
6
-
7
-
8
-
9
-
10
-
11
-
12
-
13
-
14
-
15
-
16
-
17
-
18
-
19
-
20
-
21
-
22
-
23
-
24
-
25
-
26
-
27
-
28
-
29
-
30
-
31
-
32
-
33
-
34
-
35
-
36
-
37
-
38
-
39
-
40
-
41
-
42
-
43
-
44
-
45
-
46
-
47
-
48
-
49
-
50
-
51
-
52
-
53
-
54
-
55
-
56
-
57
-
58
-
59
-
60
-
61
-
62
-
63
-
64
-
65
-
66
-
67
-
68
-
69
-
70
-
71
-
72
-
73
-
74
-
75
-
76
-
77
-
78
-
79
-
80
-
81
-
82
-
83
-
84
-
85
-
86
-
87
-
88
-
89
-
90
-
91
-
92
-
93
-
94
-
95
-
96
-
97
-
98
-
99
-
100
-
101
-
102
-
103
-
104
-
105
-
106
-
107
-
108
-
109
-
110
-
111
-
112
-
113
-
114
-
115
-
116
-
117
-
118
-
119
-
120
-
121
-
122
-
123
-
124
-
125
-
126
-
127
-
128
-
129
-
130
-
131
-
 132
132 -
 133
133 -
 134
134 -
 135
135 -
 136
136 -
 137
137 -
 138
138 -
 139
139 -
 140
140 -
 141
141 -
 142
142 -
143
 |
 |
