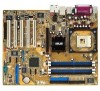
Asus P4P800-E DELUXE P4P800-E Deluxe user manual English version E1526 - Page 134
Creating a Security Array with Existing Data Drive - windows 7 drivers
 |
View all Asus P4P800-E DELUXE manuals
Add to My Manuals
Save this manual to your list of manuals |
Page 134 highlights
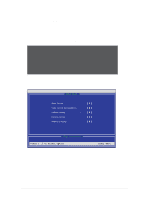
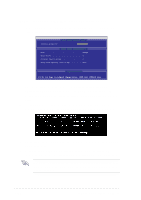
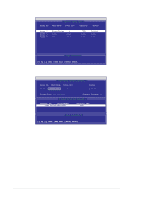
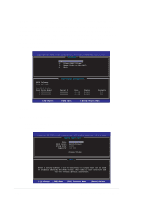
7. Use the FDISK utility and follow the format procedure for installing a new hard drive. After you have formatted the arrayed drives, install an operating system (OS). During the OS installation, the system prompts you to install third-party SCSI or RAID driver. Refer to section "5.7 Creating a floppy with RAID driver" for details. Creating a Security Array with Existing Data Drive If you would like to use an existing drive that already contains data and/or is the bootable drive in your system, make sure that the new hard drive you will use in the array has the same or larger capacity as the existing drive. Backup all important data before creating an array. 1. In the FastBuild™ utility main menu, press to select Auto Setup. 2. Use the arrow keys to move to the field Optimize Array for and select Security using the space bar. The Mode field displays Mirror. 3. Press to save your selection. The following message appears: Do you want the disk image to be duplicated to another? (Yes/No) Y - Create and Duplicate N - Create Only 5. Press to select the Create and Duplicate option. The following window prompts you to select the source drive to use. 6. Use the arrow keys to select the source drive. 7. Press to save the selection and start the duplication. The following message appears: Start to duplicate the image... Do you want to continue? (Yes/No) Y - Continue N - Abort 5-24 Chapter 5: Software support
-
 1
1 -
2
-
3
-
4
-
5
-
6
-
7
-
8
-
9
-
10
-
11
-
12
-
13
-
14
-
15
-
16
-
17
-
18
-
19
-
20
-
21
-
22
-
23
-
24
-
25
-
26
-
27
-
28
-
29
-
30
-
31
-
32
-
33
-
34
-
35
-
36
-
37
-
38
-
39
-
40
-
41
-
42
-
43
-
44
-
45
-
46
-
47
-
48
-
49
-
50
-
51
-
52
-
53
-
54
-
55
-
56
-
57
-
58
-
59
-
60
-
61
-
62
-
63
-
64
-
65
-
66
-
67
-
68
-
69
-
70
-
71
-
72
-
73
-
74
-
75
-
76
-
77
-
78
-
79
-
80
-
81
-
82
-
83
-
84
-
85
-
86
-
87
-
88
-
89
-
90
-
91
-
92
-
93
-
94
-
95
-
96
-
97
-
98
-
99
-
100
-
101
-
102
-
103
-
104
-
105
-
106
-
107
-
108
-
109
-
110
-
111
-
112
-
113
-
114
-
115
-
116
-
117
-
118
-
119
-
120
-
121
-
122
-
123
-
124
-
125
-
126
-
127
-
128
-
 129
129 -
 130
130 -
 131
131 -
 132
132 -
 133
133 -
 134
134 -
 135
135 -
 136
136 -
 137
137 -
 138
138 -
 139
139 -
140
-
141
-
142
-
143
 |
 |