Asus P4P800-E DELUXE P4P800-E Deluxe user manual English version E1526 - Page 138
Creating a RAID Volume, Creating, Deleting, and Resetting RAID Sets
 |
View all Asus P4P800-E DELUXE manuals
Add to My Manuals
Save this manual to your list of manuals |
Page 138 highlights
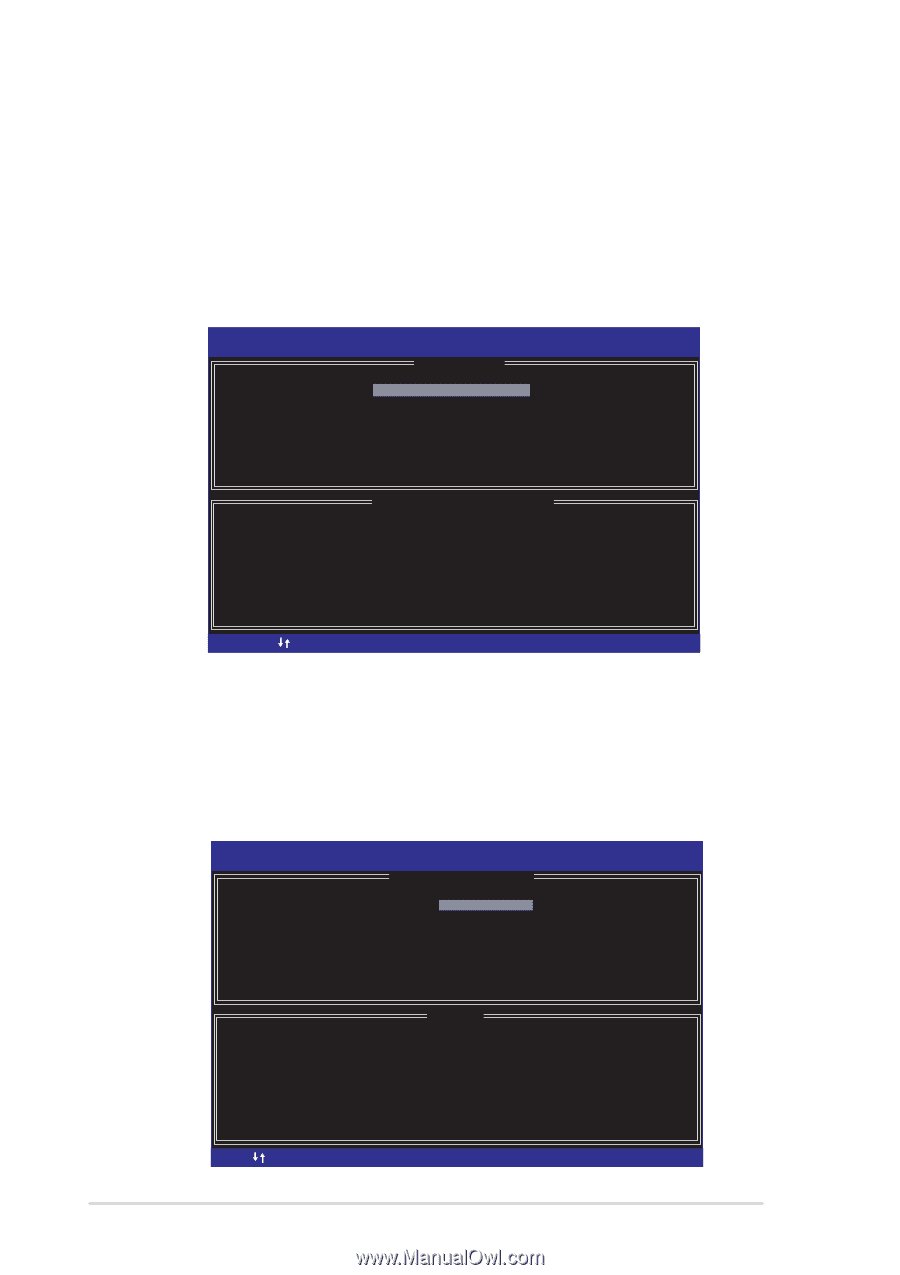
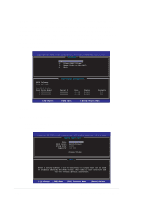
5.7.3 Creating, Deleting, and Resetting RAID Sets The Serial ATA RAID set must be configured in the RAID Configuration utility. This configuration can be done by the Intel® RAID Option ROM. During the Power-On Self Test (POST), the following message will appear for a few seconds: "Press to enter Raid Configuration Utility". When this message appears, press to launch the RAID configuration utility. Copyright(C) 2003 Intel Corporation. All Rights Reserved. v3.x.x.xxxx [ MAIN MENU ] 1. Create RAID Volume 2. Delete RAID Volume 3. Reset Disks to Non-RAID 4. Exit RAID Volumes: None defined. Non-RAID Disks: Port Drive Model 0 ST380013AS 1 ST380013AS [ DISK/VOLUME INFORMATION ] Serial # xxxxxxxx xxxxxxxx Size 74.5GB 74.5GB Status Normal Normal Bootable Yes Yes [ ]-Select [ESC] Exit [Enter]-Select Menu 5.7.4 Creating a RAID Volume To create a RAID volume: 1. Select 1. Create RAID Volume and press . The following screen appears. Copyright(C) 2003 Intel Corporation. All Rights Reserved. v3.x.x.xxxx [ CREATE ARRAY MENU ] Name: RAID Level: Strip Size: Capacity: RAID_Volume1 RAID0(Stripe) 128KB 149.0GB Create Volume [ HELP ] Enter a string between 1 and 16 characters in length taht can be used to uniquely identify the RAID volume. This name is case sensitive and can not contain special characters. [ ]-Change [TAB]-Next [ESC] Previous Menu [Enter]-Select 5-28 Chapter 5: Software support
-
 1
1 -
2
-
3
-
4
-
5
-
6
-
7
-
8
-
9
-
10
-
11
-
12
-
13
-
14
-
15
-
16
-
17
-
18
-
19
-
20
-
21
-
22
-
23
-
24
-
25
-
26
-
27
-
28
-
29
-
30
-
31
-
32
-
33
-
34
-
35
-
36
-
37
-
38
-
39
-
40
-
41
-
42
-
43
-
44
-
45
-
46
-
47
-
48
-
49
-
50
-
51
-
52
-
53
-
54
-
55
-
56
-
57
-
58
-
59
-
60
-
61
-
62
-
63
-
64
-
65
-
66
-
67
-
68
-
69
-
70
-
71
-
72
-
73
-
74
-
75
-
76
-
77
-
78
-
79
-
80
-
81
-
82
-
83
-
84
-
85
-
86
-
87
-
88
-
89
-
90
-
91
-
92
-
93
-
94
-
95
-
96
-
97
-
98
-
99
-
100
-
101
-
102
-
103
-
104
-
105
-
106
-
107
-
108
-
109
-
110
-
111
-
112
-
113
-
114
-
115
-
116
-
117
-
118
-
119
-
120
-
121
-
122
-
123
-
124
-
125
-
126
-
127
-
128
-
129
-
130
-
131
-
132
-
 133
133 -
 134
134 -
 135
135 -
 136
136 -
 137
137 -
 138
138 -
 139
139 -
 140
140 -
 141
141 -
 142
142 -
 143
143
 |
 |