Asus P4T-M P4T-M User Manual - Page 22
Step 2b: Mount Heatsink Using Separate Retaining Clips - p4t user manual
 |
View all Asus P4T-M manuals
Add to My Manuals
Save this manual to your list of manuals |
Page 22 highlights
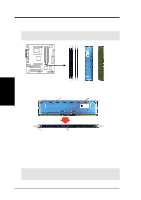
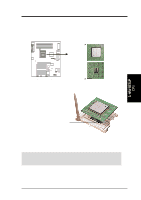
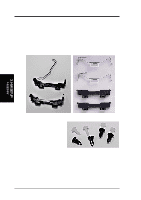
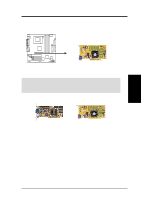
3. HARDWARE SETUP Step 2b: Mount Heatsink Using Separate Retaining Clips 1. Latch the large middle clip on the metal heatsink retainer to the central black tab on the plastic heatsink support base. 3. H/W SETUP Heatskink 2. Then latch the slotted metal tab on the heatsink retaining clip to the protruding black tab on the end of the plastic heatsink support base. 3. Push down on the levered end of the heatsink retaining clip until it locks into place. 4. Connect the CPU fan cable to the fan connector. (See 3.1 Motherboard Layout / 3.8 Connectors). 22 ASUS P4T-M User's Manual
-
 1
1 -
2
-
3
-
4
-
5
-
6
-
7
-
8
-
9
-
10
-
11
-
12
-
13
-
14
-
15
-
16
-
 17
17 -
 18
18 -
 19
19 -
 20
20 -
 21
21 -
 22
22 -
 23
23 -
 24
24 -
 25
25 -
 26
26 -
 27
27 -
28
-
29
-
30
-
31
-
32
-
33
-
34
-
35
-
36
-
37
-
38
-
39
-
40
-
41
-
42
-
43
-
44
-
45
-
46
-
47
-
48
-
49
-
50
-
51
-
52
-
53
-
54
-
55
-
56
-
57
-
58
-
59
-
60
-
61
-
62
-
63
-
64
-
65
-
66
-
67
-
68
-
69
-
70
-
71
-
72
-
73
-
74
-
75
-
76
-
77
-
78
-
79
-
80
-
81
-
82
-
83
-
84
-
85
-
86
-
87
-
88
 |
 |

22
ASUS P4T-M User’s Manual
3. HARDWARE SETUP
2.
Then latch the slotted metal tab
on the heatsink retaining clip to
the protruding black tab on the
end of the plastic heatsink
support base.
3. Push down on the levered end of
the heatsink retaining clip until
it locks into place.
Step 2b: Mount Heatsink Using Separate Retaining Clips
1. Latch the large middle clip on
the metal heatsink retainer to the
central black tab on the plastic
heatsink support base.
4. Connect the
CPU fan
cable
to the
fan connector
.
(
See
3.1 Motherboard
Layout
/
3.8 Connectors
).
3. H/W SETUP
Heatskink