Asus P4T-M P4T-M User Manual - Page 30
ASUS P4T-M User's Manual, Primary Blue / Secondary IDE Connectors, Two 40-1pin IDE, Pin 20 is - p4t motherboard specifications
 |
View all Asus P4T-M manuals
Add to My Manuals
Save this manual to your list of manuals |
Page 30 highlights
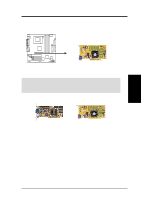
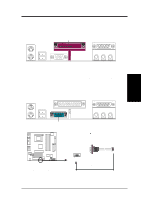
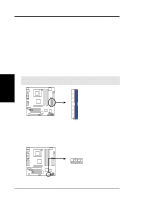
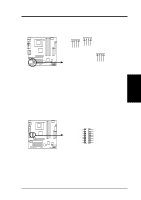
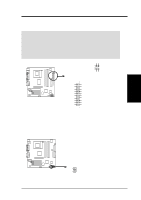
3. HARDWARE SETUP 11) Primary (Blue) / Secondary IDE Connectors (Two 40-1pin IDE) These connectors support the provided IDE hard disk ribbon cable. Connect the cable's blue connector to the motherboard's primary (recommended) or secondary IDE connector. Then connect the gray connector to your UltraDMA/100 slave device (hard disk drive) and the black connector to your UltraDMA/100 master device. It is recommended that non-UltraDMA/100 devices be connected to the secondary IDE connector. If you install two hard disks, you must configure the second drive to Slave mode. Please refer to your hard disk documentation for the jumper settings. BIOS now supports specific device bootup (see 4.6 Boot Menu). (Pin 20 is removed to prevent wrong orientations). TIP: You may configure two hard disks to be both Masters with two ribbon cables - one for the primary IDE connector and another for the secondary IDE connector. You may install one operating system on an IDE drive and another on a SCSI drive and select the boot disk through 4.6 Boot Menu. IMPORTANT: UltraDMA/100 IDE devices must use a 40-pin 80-conductor IDE cable for 100MByte/sec transfer rates. Secondary IDE Connector Primary IDE Connector 3. H/W SETUP Connectors NOTE: Orient the red markings (usually zigzag) on the IDE ribbon cable to PIN 1. P4T-M P4T-M IDE Connectors PIN 1 12) USB Headers (10-1 pin USB2) If the USB Ports on the back panels are inadequate, a USB header is available for two additional USB ports. Connect the 10-1 pin ribbon cable from the provided 2-port USB connector set to the midboard 10-1 pin USB header and mount the USB connector set to an open slot on your chassis. 10 5 USB2 6 1: USB Power 6: USB Power 2: USBP2- 7: USBP3- 3: USBP2+ 1 4: GND 8: USBP3+ 9: GND 5: NC P4T-M P4T-M USB Headers 30 ASUS P4T-M User's Manual
-
 1
1 -
2
-
3
-
4
-
5
-
6
-
7
-
8
-
9
-
10
-
11
-
12
-
13
-
14
-
15
-
16
-
17
-
18
-
19
-
20
-
21
-
22
-
23
-
24
-
 25
25 -
 26
26 -
 27
27 -
 28
28 -
 29
29 -
 30
30 -
 31
31 -
 32
32 -
 33
33 -
 34
34 -
 35
35 -
36
-
37
-
38
-
39
-
40
-
41
-
42
-
43
-
44
-
45
-
46
-
47
-
48
-
49
-
50
-
51
-
52
-
53
-
54
-
55
-
56
-
57
-
58
-
59
-
60
-
61
-
62
-
63
-
64
-
65
-
66
-
67
-
68
-
69
-
70
-
71
-
72
-
73
-
74
-
75
-
76
-
77
-
78
-
79
-
80
-
81
-
82
-
83
-
84
-
85
-
86
-
87
-
88
 |
 |
