Asus P7P55D User Manual - Page 111
Intel, Matrix Storage Manager option ROM utility, Setting the RAID item in BIOS, Installing Serial
 |
UPC - 610839172665
View all Asus P7P55D manuals
Add to My Manuals
Save this manual to your list of manuals |
Page 111 highlights
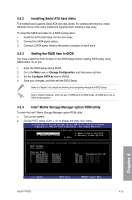
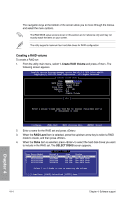
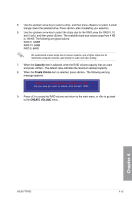
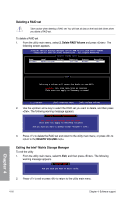
4.5.2 Installing Serial ATA hard disks The motherboard supports Serial ATA hard disk drives. For optimal performance, install identical drives of the same model and capacity when creating a disk array. To install the SATA hard disks for a RAID configuration: 1. Install the SATA hard disks into the drive bays. 2. Connect the SATA signal cables. 3. Connect a SATA power cable to the power connector on each drive. 4.5.3 Setting the RAID item in BIOS You must enable the RAID function in the BIOS Setup before creating RAID set(s) using SATA HDDs. To do this: 1. Enter the BIOS Setup during POST. 2. Go to the Main menu > Storage Configuration, and then press . 3. Set the Configure SATA as item to [RAID]. 4. Save your changes, and then exit the BIOS Setup. Refer to Chapter 3 for details on entering and navigating through the BIOS Setup. Due to chipset limitation, when set any of SATA ports to RAID mode, all SATA ports run at RAID mode together. 4.5.4 Intel® Matrix Storage Manager option ROM utility To enter the Intel® Matrix Storage Manager option ROM utility 1. Turn on the system. 2. During POST, press + to display the utility main menu. Intel(R) Matrix Storage Manager option ROM v8.9.0.1014 PCH-D wRAID5 Copyright(C) 2003-09 Intel Corporation. All Rights Reserved. [ MAIN MENU ] 1. Create RAID Volume 2. Delete RAID Volume 3. Reset Disks to Non-RAID 4. Recovery Volume Options 5. Exit RAID Volumes: None defined. Physical Disks: Port Drive Model 0 ST3160812AS 1 ST3160812AS 2 ST3160812AS 3 ST3160812AS [ DISK/VOLUME INFORMATION ] Serial # 9LS0HJA4 9LS0F4HL 3LS0JYL8 9LS0BJ5H Size 149.0GB 149.0GB 149.0GB 149.0GB Type/Status(Vol ID) Non-RAID Disk Non-RAID Disk Non-RAID Disk Non-RAID Disk Chapter 4 [↑↓]-Select [ESC]-Exit [ENTER]-Select Menu ASUS P7P55D 4-13
-
 1
1 -
2
-
3
-
4
-
5
-
6
-
7
-
8
-
9
-
10
-
11
-
12
-
13
-
14
-
15
-
16
-
17
-
18
-
19
-
20
-
21
-
22
-
23
-
24
-
25
-
26
-
27
-
28
-
29
-
30
-
31
-
32
-
33
-
34
-
35
-
36
-
37
-
38
-
39
-
40
-
41
-
42
-
43
-
44
-
45
-
46
-
47
-
48
-
49
-
50
-
51
-
52
-
53
-
54
-
55
-
56
-
57
-
58
-
59
-
60
-
61
-
62
-
63
-
64
-
65
-
66
-
67
-
68
-
69
-
70
-
71
-
72
-
73
-
74
-
75
-
76
-
77
-
78
-
79
-
80
-
81
-
82
-
83
-
84
-
85
-
86
-
87
-
88
-
89
-
90
-
91
-
92
-
93
-
94
-
95
-
96
-
97
-
98
-
99
-
100
-
101
-
102
-
103
-
104
-
105
-
 106
106 -
 107
107 -
 108
108 -
 109
109 -
 110
110 -
 111
111 -
 112
112 -
 113
113 -
 114
114 -
 115
115 -
 116
116 -
117
-
118
-
119
-
120
-
121
-
122
 |
 |