Asus ROG Swift OLED PG32UCDM User Guide - Page 26
Square, Equivalent, Pixel by pixel, Blue Light Filter, Level 1~4
 |
View all Asus ROG Swift OLED PG32UCDM manuals
Add to My Manuals
Save this manual to your list of manuals |
Page 26 highlights
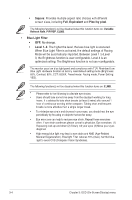
• Square: Provides multiple aspect ratio choices with different screen sizes, including Full, Equivalent and Pixel by pixel. The following function(s) will be disabled when this function turns on: Variable Refresh Rate, PIP/PBP, ELMB. • Blue Light Filter: • OFF: No change. • Level 1~4: The higher the level, the less blue light is scattered. When Blue Light Filter is activated, the default settings of Racing Mode will be automatically imported. Between Level 1 to Level 3, the Brightness function is user-configurable. Level 4 is an optimized setting. The Brightness function is not user-configurable. The monitor uses low blue light panel and compliance with TÜV Rheinland Low Blue Light Hardware Solution at factory reset/default setting mode (Brightness: 65%, Contrast: 80%, CCT: 6500K, Preset mode: Racing mode, Power Setting: YES). The following function(s) will be disabled when this function turns on: ELMB. • Please refer to the following to alleviate eye strains: • Users should take some time away from the display if working for long hours. It is advised to take short breaks (at least 5 mins) after around 1 hour of continuous working at the computer. Taking short and frequent breaks is more effective than a single longer break. • To minimize eye strain and dryness in your eyes, you should rest the eye periodically by focusing on objects that are far away. • Eye exercises can help to reduces eye strain. Repeat these exercises often. If eye strain continues please consult a physician. Eye exercises: (1) Repeating look up and down (2) Slowly roll your eyes (3) Move your eyes diagonal. • High energy blue light may lead to eye strain and AMD (Age-Related Macular Degeneration). Blue light Filter reduces 70% (max.) harmful blue light to avoid CVS (Computer Vision Syndrome). 3-4 Chapter 3: OSD (On-Screen Display) menu
-
 1
1 -
2
-
3
-
4
-
5
-
6
-
7
-
8
-
9
-
10
-
11
-
12
-
13
-
14
-
15
-
16
-
17
-
18
-
19
-
20
-
 21
21 -
 22
22 -
 23
23 -
 24
24 -
 25
25 -
 26
26 -
 27
27 -
 28
28 -
 29
29 -
 30
30 -
 31
31 -
32
-
33
-
34
-
35
-
36
-
37
-
38
-
39
-
40
-
41
-
42
-
43
 |
 |
