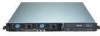
Asus RS161-E2 User Manual - Page 106
NVIDIA, RAID configurations
 |
UPC - 610839630424
View all Asus RS161-E2 manuals
Add to My Manuals
Save this manual to your list of manuals |
Page 106 highlights
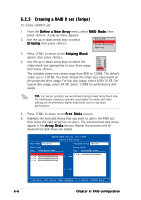
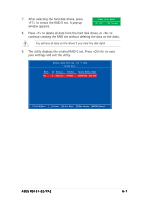
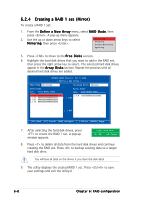
6.2 NVIDIA® RAID configurations The motherboard includes a high performance SATA RAID controller integrated in the NVIDIA® nForce Professional 2200 chip. The RAID controller supports RAID 0, RAID 1, and JBOD using the four independent Serial ATA channels or two IDE connectors, or both. 6.2.1 Setting the BIOS RAID items After installing the hard disk drives, make sure to set the necessary RAID items in the BIOS before setting your RAID configuration. To set the BIOS RAID items: 1. Enter the BIOS Setup during POST. 2. Go to the M a i n M e n u, select I D E C o n f i g u r a t i o n, then press . 3. Set the R A I D O p t i o n R O M item to [Enabled], then press . The master and slave drive list appears. 4. Enable the drives you want to set as RAID. 5. Save your changes, then exit the BIOS Setup. • Refer to Chapter 5 for details on entering and navigating through the BIOS Setup. • The RAID BIOS setup screens shown in this section are for reference only, and may not exactly match the items on your screen. 6-4 Chapter 6: RAID configuration
-
 1
1 -
2
-
3
-
4
-
5
-
6
-
7
-
8
-
9
-
10
-
11
-
12
-
13
-
14
-
15
-
16
-
17
-
18
-
19
-
20
-
21
-
22
-
23
-
24
-
25
-
26
-
27
-
28
-
29
-
30
-
31
-
32
-
33
-
34
-
35
-
36
-
37
-
38
-
39
-
40
-
41
-
42
-
43
-
44
-
45
-
46
-
47
-
48
-
49
-
50
-
51
-
52
-
53
-
54
-
55
-
56
-
57
-
58
-
59
-
60
-
61
-
62
-
63
-
64
-
65
-
66
-
67
-
68
-
69
-
70
-
71
-
72
-
73
-
74
-
75
-
76
-
77
-
78
-
79
-
80
-
81
-
82
-
83
-
84
-
85
-
86
-
87
-
88
-
89
-
90
-
91
-
92
-
93
-
94
-
95
-
96
-
97
-
98
-
99
-
100
-
 101
101 -
 102
102 -
 103
103 -
 104
104 -
 105
105 -
 106
106 -
 107
107 -
 108
108 -
 109
109 -
 110
110 -
 111
111 -
112
-
113
-
114
-
115
-
116
-
117
-
118
-
119
-
120
-
121
-
122
-
123
-
124
 |
 |