Asus RS161-E2 User Manual - Page 113
Clearing the disk data
 |
UPC - 610839630424
View all Asus RS161-E2 manuals
Add to My Manuals
Save this manual to your list of manuals |
Page 113 highlights
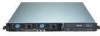
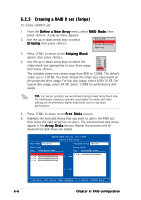
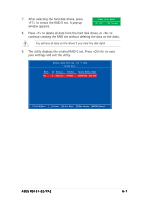
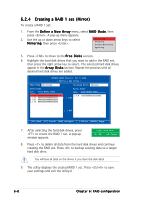
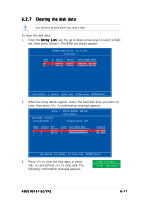
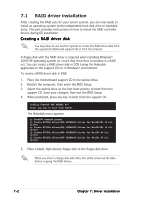
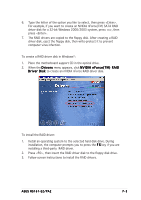
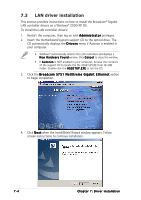
6.2.7 Clearing the disk data You will lose all data when you clear a disk! To clear the disk data: 1. From the A r r a y L i s t, use the up or down arrow keys to select a RAID set, then press . The RAID set details appear. NVIDIA RAID Utility Oct 5 2004 - Array List - Boot No No Id Status 4 Healthy 3 Healthy Vendor NVIDIA NVIDIA Array Model Name STRIPING XXX.XXG MIRRORING XXX.XXG [Ctrl-X]Exit [↑↓]Select [B]Set Boot [N]New Array [ENTER]Detail 2. When the array details appear, select the hard disk drive you want to clear, then press . A confirmation message appears. Array 1 : NVIDIA MIRROR XXX.XXG - Array Detail - RAID Mode: Striping Striping Width: 1 Striping Block: 64K Adapt Channel M/S 2 1 1 0 Master Master Index Disk Model Name 0 XXXXXXXXXXXXXXXXX 1 XXXXXXXXXXXXXXXXX Capacity XXX.XXGB XXX.XXGB [R] Rebuild [D] Delete [C] Clear Disk [ENTER] Return 3. Press to clear the disk data, or press to cancel.Press to clear disk. The following confirmation message appears. Clear disk data? [Y] Yes [N] Cancel ASUS RS161-E2/PA2 6-11
-
 1
1 -
2
-
3
-
4
-
5
-
6
-
7
-
8
-
9
-
10
-
11
-
12
-
13
-
14
-
15
-
16
-
17
-
18
-
19
-
20
-
21
-
22
-
23
-
24
-
25
-
26
-
27
-
28
-
29
-
30
-
31
-
32
-
33
-
34
-
35
-
36
-
37
-
38
-
39
-
40
-
41
-
42
-
43
-
44
-
45
-
46
-
47
-
48
-
49
-
50
-
51
-
52
-
53
-
54
-
55
-
56
-
57
-
58
-
59
-
60
-
61
-
62
-
63
-
64
-
65
-
66
-
67
-
68
-
69
-
70
-
71
-
72
-
73
-
74
-
75
-
76
-
77
-
78
-
79
-
80
-
81
-
82
-
83
-
84
-
85
-
86
-
87
-
88
-
89
-
90
-
91
-
92
-
93
-
94
-
95
-
96
-
97
-
98
-
99
-
100
-
101
-
102
-
103
-
104
-
105
-
106
-
107
-
 108
108 -
 109
109 -
 110
110 -
 111
111 -
 112
112 -
 113
113 -
 114
114 -
 115
115 -
 116
116 -
 117
117 -
 118
118 -
119
-
120
-
121
-
122
-
123
-
124
 |
 |