Asus RS161-E2 User Manual - Page 19
Installing the cover
 |
UPC - 610839630424
View all Asus RS161-E2 manuals
Add to My Manuals
Save this manual to your list of manuals |
Page 19 highlights
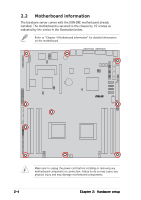
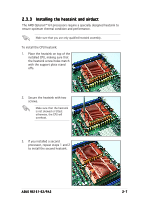
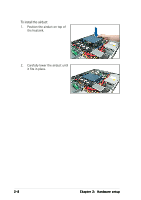
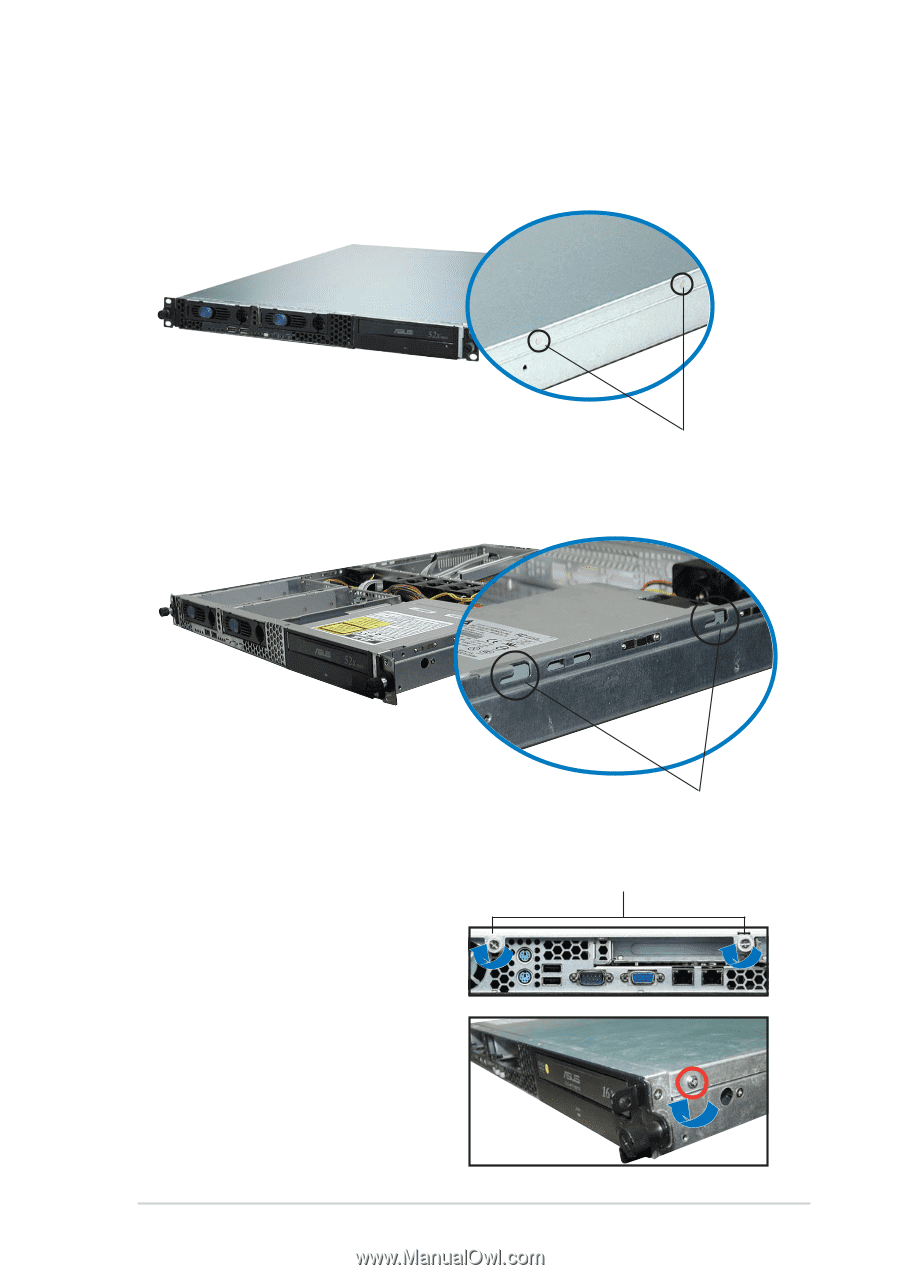
2.1.2 Installing the cover 1. Position the cover on top of the chassis with the thumbscrews on the rear, and leaving a gap of about half an inch from the front panel. Side markings 2. Make sure that the side markings on the cover (two on each side) are aligned to the grooves on the chassis. Grooves 3. Slide the cover toward the front until it snaps in place. 4. Tighten the thumbscrews on the rear to secure the cover. Thumbscrews 5. Drive in the screw on both sides of the chassis. ASUS RS161-E2/PA2 2-3
-
 1
1 -
2
-
3
-
4
-
5
-
6
-
7
-
8
-
9
-
10
-
11
-
12
-
13
-
 14
14 -
 15
15 -
 16
16 -
 17
17 -
 18
18 -
 19
19 -
 20
20 -
 21
21 -
 22
22 -
 23
23 -
 24
24 -
25
-
26
-
27
-
28
-
29
-
30
-
31
-
32
-
33
-
34
-
35
-
36
-
37
-
38
-
39
-
40
-
41
-
42
-
43
-
44
-
45
-
46
-
47
-
48
-
49
-
50
-
51
-
52
-
53
-
54
-
55
-
56
-
57
-
58
-
59
-
60
-
61
-
62
-
63
-
64
-
65
-
66
-
67
-
68
-
69
-
70
-
71
-
72
-
73
-
74
-
75
-
76
-
77
-
78
-
79
-
80
-
81
-
82
-
83
-
84
-
85
-
86
-
87
-
88
-
89
-
90
-
91
-
92
-
93
-
94
-
95
-
96
-
97
-
98
-
99
-
100
-
101
-
102
-
103
-
104
-
105
-
106
-
107
-
108
-
109
-
110
-
111
-
112
-
113
-
114
-
115
-
116
-
117
-
118
-
119
-
120
-
121
-
122
-
123
-
124
 |
 |
2-3
2-3
2-3
2-3
2-3
ASUS RS161-E2/PA2
ASUS RS161-E2/PA2
ASUS RS161-E2/PA2
ASUS RS161-E2/PA2
ASUS RS161-E2/PA2
2.1.2
2.1.2
2.1.2
2.1.2
2.1.2
Installing the cover
Installing the cover
Installing the cover
Installing the cover
Installing the cover
1.
Position the cover on top of the chassis with the thumbscrews on the
rear, and leaving a gap of about half an inch from the front panel.
3.
Slide the cover toward the front until it snaps in place.
4.
Tighten the thumbscrews on the
rear to secure the cover.
2.
Make sure that the side markings on the cover (two on each side) are
aligned to the grooves on the chassis.
Grooves
Grooves
Grooves
Grooves
Grooves
Side markings
Side markings
Side markings
Side markings
Side markings
Thumbscrews
Thumbscrews
Thumbscrews
Thumbscrews
Thumbscrews
5.
Drive in the screw on both sides
of the chassis.