Asus RS161-E2 User Manual - Page 109
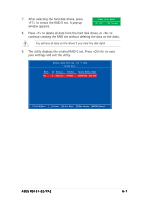
The utility displays the created RAID 0 set. Press <Ctrl+X> to save
 |
UPC - 610839630424
View all Asus RS161-E2 manuals
Add to My Manuals
Save this manual to your list of manuals |
Page 109 highlights
7. After selecting the hard disk drives, press to create the RAID 0 set. A pop-up window appears. Clear disk data? [Y] YES [N] Cancel 8. Press to delete all data from the hard disk drives, or to continue creating the RAID set without deleting the data on the disks. You will lose all data on the drives if you clear the disk data! 9. The utility displays the created RAID 0 set. Press to save your settings and exit the utility. NVIDIA RAID Utility Oct 5 2004 - Array List - Boot No Id Status 4 Healthy Vendor NVIDIA Array Model Name STRIPING XXX.XXG [Ctrl-X]Exit [↑↓]Select [B]Set Boot [N]New Array [ENTER]Detail ASUS RS161-E2/PA2 6-7
-
 1
1 -
2
-
3
-
4
-
5
-
6
-
7
-
8
-
9
-
10
-
11
-
12
-
13
-
14
-
15
-
16
-
17
-
18
-
19
-
20
-
21
-
22
-
23
-
24
-
25
-
26
-
27
-
28
-
29
-
30
-
31
-
32
-
33
-
34
-
35
-
36
-
37
-
38
-
39
-
40
-
41
-
42
-
43
-
44
-
45
-
46
-
47
-
48
-
49
-
50
-
51
-
52
-
53
-
54
-
55
-
56
-
57
-
58
-
59
-
60
-
61
-
62
-
63
-
64
-
65
-
66
-
67
-
68
-
69
-
70
-
71
-
72
-
73
-
74
-
75
-
76
-
77
-
78
-
79
-
80
-
81
-
82
-
83
-
84
-
85
-
86
-
87
-
88
-
89
-
90
-
91
-
92
-
93
-
94
-
95
-
96
-
97
-
98
-
99
-
100
-
101
-
102
-
103
-
 104
104 -
 105
105 -
 106
106 -
 107
107 -
 108
108 -
 109
109 -
 110
110 -
 111
111 -
 112
112 -
 113
113 -
 114
114 -
115
-
116
-
117
-
118
-
119
-
120
-
121
-
122
-
123
-
124
 |
 |
ASUS RS161-E2/PA2
ASUS RS161-E2/PA2
ASUS RS161-E2/PA2
ASUS RS161-E2/PA2
ASUS RS161-E2/PA2
6-7
6-7
6-7
6-7
6-7
Clear disk data?
[Y] YES
[N] Cancel
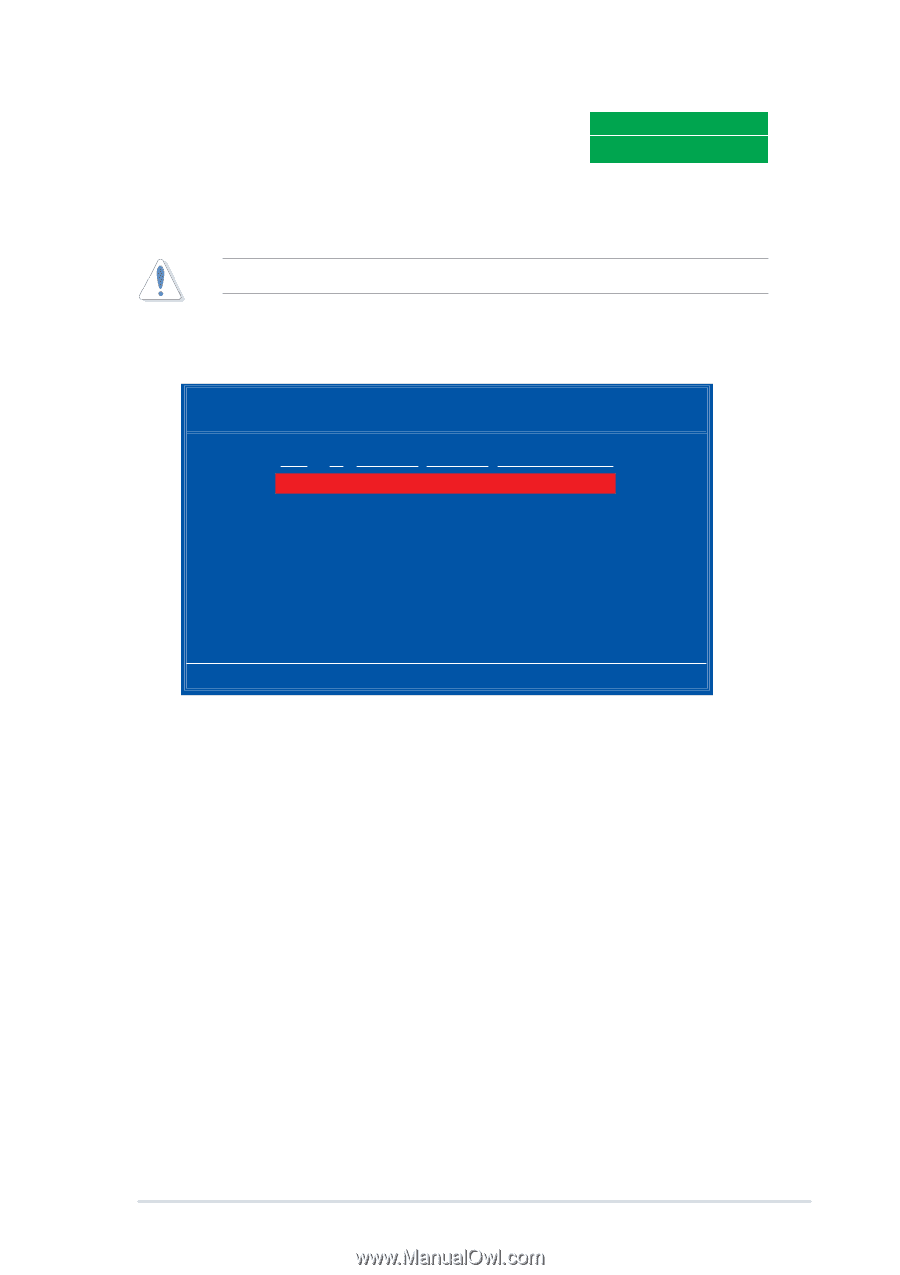
7.
After selecting the hard disk drives, press
<F7> to create the RAID 0 set. A pop-up
window appears.
8.
Press <Y> to delete all data from the hard disk drives, or <N> to
continue creating the RAID set without deleting the data on the disks.
You will lose all data on the drives if you clear the disk data!
9.
The utility displays the created RAID 0 set. Press <Ctrl+X> to save
your settings and exit the utility.
[Ctrl-X]Exit
[
↑↓
↑↓
↑↓
↑↓
↑↓
]Select
[B]Set Boot
[N]New Array
[ENTER]Detail
NVIDIA RAID Utility
Oct 5 2004
- Array List -
Boot
Id
Status
Vendor
Array Model Name
No
4 Healthy
NVIDIA
STRIPING XXX.XXG