Asus RS300-H8-PS12 User Guide - Page 34
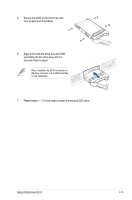
Carefully place the Serial ATA HDD on the HDD slot of the drive tray then slide
 |
View all Asus RS300-H8-PS12 manuals
Add to My Manuals
Save this manual to your list of manuals |
Page 34 highlights
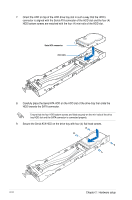
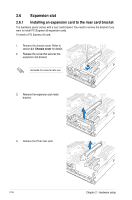
7. Orient the HDD on top of the HDD drive tray slot in such a way that the HDD's connector is aligned with the Serial ATA connector of the HDD slot and the four (4) HDD bottom screws are matched with the four (4) mini-rails of the HDD slot. Serial ATA connector mini-rails 8. Carefully place the Serial ATA HDD on the HDD slot of the drive tray then slide the HDD towards the SATA connector. Ensure that the four HDD bottom screws are fitted securely on the mini-rails of the drive tray HDD slot and the SATA connector is connected properly. 9. Secure the Serial ATA HDD on the drive tray with four (4) flat head screws. 2-12 Chapter 2: Hardware setup
-
 1
1 -
2
-
3
-
4
-
5
-
6
-
7
-
8
-
9
-
10
-
11
-
12
-
13
-
14
-
15
-
16
-
17
-
18
-
19
-
20
-
21
-
22
-
23
-
24
-
25
-
26
-
27
-
28
-
 29
29 -
 30
30 -
 31
31 -
 32
32 -
 33
33 -
 34
34 -
 35
35 -
 36
36 -
 37
37 -
 38
38 -
 39
39 -
40
-
41
-
42
-
43
-
44
-
45
-
46
-
47
-
48
-
49
-
50
-
51
-
52
-
53
-
54
-
55
-
56
-
57
-
58
-
59
-
60
-
61
-
62
-
63
-
64
-
65
-
66
-
67
-
68
-
69
-
70
-
71
-
72
-
73
-
74
-
75
-
76
-
77
-
78
-
79
-
80
-
81
-
82
-
83
-
84
-
85
-
86
-
87
-
88
-
89
-
90
-
91
-
92
-
93
-
94
-
95
-
96
-
97
-
98
-
99
-
100
-
101
-
102
-
103
-
104
-
105
-
106
-
107
-
108
-
109
-
110
-
111
-
112
-
113
-
114
-
115
-
116
-
117
-
118
-
119
-
120
-
121
-
122
-
123
-
124
-
125
-
126
-
127
-
128
-
129
-
130
-
131
-
132
-
133
-
134
-
135
-
136
-
137
-
138
-
139
-
140
-
141
-
142
-
143
-
144
-
145
-
146
-
147
-
148
-
149
-
150
-
151
-
152
-
153
-
154
-
155
-
156
-
157
-
158
-
159
-
160
-
161
-
162
-
163
-
164
-
165
-
166
-
167
-
168
-
169
-
170
-
171
-
172
-
173
-
174
-
175
-
176
-
177
-
178
-
179
-
180
-
181
-
182
-
183
-
184
-
185
-
186
-
187
-
188
-
189
-
190
-
191
-
192
 |
 |

Chapter 2:
Hardware setup
2-12
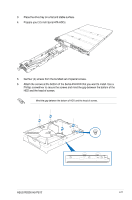
7.
Orient the HDD on top of the HDD drive tray slot in such a way that the HDD’s
connector is aligned with the Serial ATA connector of the HDD slot and the four (4)
HDD bottom screws are matched with the four (4) mini-rails of the HDD slot.
8.
Carefully place the Serial ATA HDD on the HDD slot of the drive tray then slide the
HDD towards the SATA connector.
Ensure that the four HDD bottom screws are fitted securely on the mini-rails of the drive
tray HDD slot and the SATA connector is connected properly.
9.
Secure the Serial ATA HDD on the drive tray with four (4) flat head screws.
Serial ATA connector
mini-rails