Asus RT-N13U User Guide - Page 20
Windows, Vista
 |
UPC - 610839677054
View all Asus RT-N13U manuals
Add to My Manuals
Save this manual to your list of manuals |
Page 20 highlights
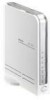
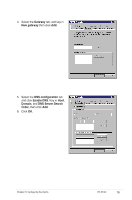
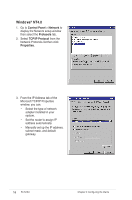
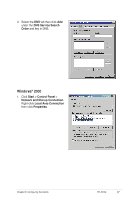
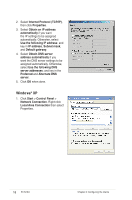
Windows® Vista 1. Go to Start > Control Panel > Network and Internet > Network and Sharing Center. Click View status > Properties > Continue. 2. Select Internet Protocol Version 4 (TCP/IPv4), then click Properties. 3. Select Obtain an IP address automatically if you want the IP settings to be assigned automatically. Otherwise, select Use the following IP address: and key in IP address and Subnet mask. 4. Select Obtain DNS server address automatically if you want the DNS server settings to be assigned automatically. Otherwise, select Use the following DNS server addresses: and key in the Preferred and Alternate DNS server. 5. Click OK when done. 20 RT-N13U Chapter 3: Configuring the clients
-
 1
1 -
2
-
3
-
4
-
5
-
6
-
7
-
8
-
9
-
10
-
11
-
12
-
13
-
14
-
 15
15 -
 16
16 -
 17
17 -
 18
18 -
 19
19 -
 20
20 -
 21
21 -
 22
22 -
 23
23 -
 24
24 -
 25
25 -
26
-
27
-
28
-
29
-
30
-
31
-
32
-
33
-
34
-
35
-
36
-
37
-
38
-
39
-
40
-
41
-
42
-
43
-
44
-
45
-
46
-
47
-
48
-
49
-
50
-
51
-
52
-
53
-
54
-
55
-
56
-
57
-
58
-
59
-
60
-
61
 |
 |

±0
RT-N13U
Chapter 3: Configuring the clients
Windows
®
Vista
1. Go to
Start
>
Control Panel
>
Network and Internet
>
Network
and Sharing Center
. Click
View
status > Properties
>
Continue
.
±. Select
Internet Protocol
Version 4 (TCP/IPv4)
, then click
Properties
.
3. Select
Obtain an IP address
automatically
if you want
the IP settings to be assigned
automatically. Otherwise, select
Use the following IP address:
and key in
IP address
and
Subnet mask
.
4. Select
Obtain DNS server
address automatically
if you
want the DNS server settings
to be assigned automatically.
Otherwise, select
Use the
following DNS server
addresses:
and key in the
Preferred and Alternate DNS
server
.
5. Click
OK
when done.