Asus Z9PH-D16 FDR Z9PH-D16 Series User Manual - Page 35
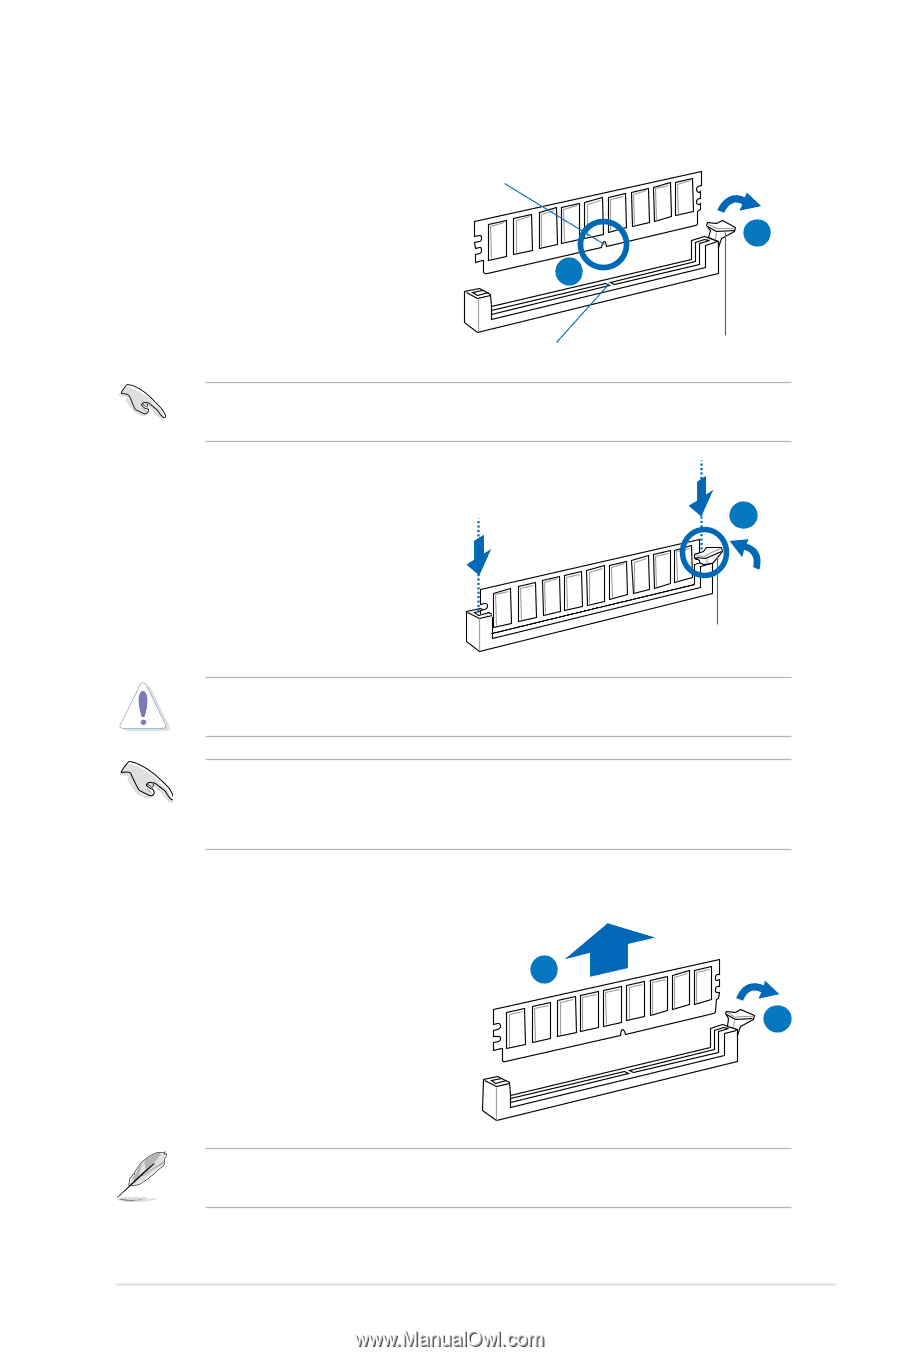
Installing a DIMM on a single clip DIMM socket, Align a DIMM on the socket
 |
View all Asus Z9PH-D16 FDR manuals
Add to My Manuals
Save this manual to your list of manuals |
Page 35 highlights
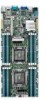
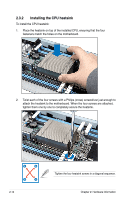
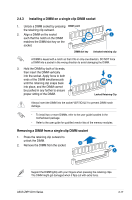
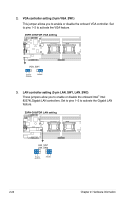
2.4.3 Installing a DIMM on a single clip DIMM socket 1. Unlock a DIMM socket by pressing DIMM notch the retaining clip outward. 2. Align a DIMM on the socket such that the notch on the DIMM matches the DIMM slot key on the 2 socket. DIMM slot key 1 Unlocked retaining clip A DIMM is keyed with a notch so that it fits in only one direction. DO NOT force a DIMM into a socket in the wrong direction to avoid damaging the DIMM. 3. Hold the DIMM by both of its ends, then insert the DIMM vertically into the socket. Apply force to both ends of the DIMM simultaneously until the retaining clip snaps back into place, and the DIMM cannot be pushed in any further to ensure proper sitting of the DIMM. 3 Locked Retaining Clip Always insert the DIMM into the socket VERTICALLY to prevent DIMM notch damage. • To install two or more DIMMs, refer to the user guide bundled in the motherboard package. • Refer to the user guide for qualified vendor lists of the memory modules. Removing a DIMM from a single clip DIMM socket 1. Press the retaining clip outward to unlock the DIMM. 2. Remove the DIMM from the socket. 2 1 Support the DIMM lightly with your fingers when pressing the retaining clips. The DIMM might get damaged when it flips out with extra force. ASUS Z9PH-D16 Series 2-17
-
 1
1 -
2
-
3
-
4
-
5
-
6
-
7
-
8
-
9
-
10
-
11
-
12
-
13
-
14
-
15
-
16
-
17
-
18
-
19
-
20
-
21
-
22
-
23
-
24
-
25
-
26
-
27
-
28
-
29
-
 30
30 -
 31
31 -
 32
32 -
 33
33 -
 34
34 -
 35
35 -
 36
36 -
 37
37 -
 38
38 -
 39
39 -
 40
40 -
41
-
42
-
43
-
44
-
45
-
46
-
47
-
48
-
49
-
50
-
51
-
52
-
53
-
54
-
55
-
56
-
57
-
58
-
59
-
60
-
61
-
62
-
63
-
64
-
65
-
66
-
67
-
68
-
69
-
70
-
71
-
72
-
73
-
74
-
75
-
76
-
77
-
78
-
79
-
80
-
81
-
82
-
83
-
84
-
85
-
86
-
87
-
88
-
89
-
90
-
91
-
92
-
93
-
94
-
95
-
96
-
97
-
98
-
99
-
100
-
101
-
102
-
103
-
104
-
105
-
106
-
107
-
108
-
109
-
110
-
111
-
112
-
113
-
114
-
115
-
116
-
117
-
118
-
119
-
120
-
121
-
122
-
123
-
124
-
125
-
126
-
127
-
128
-
129
-
130
-
131
-
132
-
133
-
134
-
135
-
136
-
137
-
138
-
139
-
140
-
141
-
142
-
143
-
144
-
145
-
146
-
147
-
148
-
149
-
150
-
151
-
152
-
153
-
154
-
155
-
156
-
157
-
158
-
159
-
160
-
161
-
162
-
163
-
164
-
165
-
166
-
167
-
168
-
169
-
170
-
171
-
172
-
173
-
174
-
175
-
176
-
177
-
178
-
179
-
180
-
181
-
182
-
183
-
184
-
185
-
186
-
187
-
188
-
189
-
190
-
191
-
192
 |
 |