Beko WDIK752451 Owners Manual - Page 38
Cleaning the loading, door and the drum, 3 Cleaning the body, and control panel, 4 Cleaning
 |
View all Beko WDIK752451 manuals
Add to My Manuals
Save this manual to your list of manuals |
Page 38 highlights
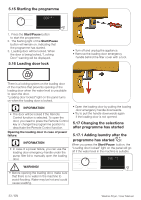
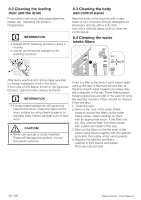
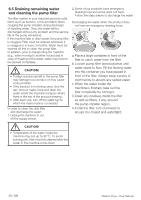
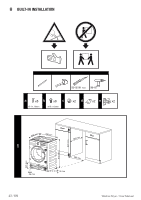
6.2 Cleaning the loading door and the drum For products with drum cleaning programme, please see Operating the product Programmes. C INFORMATION • Repeat Drum Cleaning process in every 2 months. • Use an anti-limescale suitable for the washing machines. 6.3 Cleaning the body and control panel Wipe the body of the machine with soapy water or non-corrosive mild gel detergents as necessary, and dry with a soft cloth. Use only a soft and damp cloth to clean the control panel. 6.4 Cleaning the water intake filters After every washing and drying make sure that no foreign substance is left in the drum. If the holes on the bellow shown in the figure are blocked, open the holes using a toothpick. C INFORMATION • Foreign metal substances will cause rust stains in the drum. Clean the stains on the drum surface by using cleaning agents for stainless steel. Never use steel wool or wire wool. A CAUTION! • Never use sponge or scrub materials. These will damage the painted, chrome and plastic surfaces. There is a filter at the end of each water intake valve at the rear of the machine and also at the end of each water intake hose where they are connected to the tap. These filters prevent foreign substances and dirt in the water to enter the washing machine. Filters should be cleaned if they are dirty. 1. Close the taps. 2. Remove the nuts of the water intake hoses to access the filters on the water intake valves. Clean residues on them with an appropriate brush. If the filters are too dirty, remove them from their places with a pliers and clean in this way. 3. Take out the filters on the flat ends of the water intake hoses together with the gaskets and clean thoroughly under running water. 4. Replace the gaskets and filters carefully in their places and tighten the hose nuts by hand. 38 / EN Washer-Dryer / User Manual
-
 1
1 -
2
-
3
-
4
-
5
-
6
-
7
-
8
-
9
-
10
-
11
-
12
-
13
-
14
-
15
-
16
-
17
-
18
-
19
-
20
-
21
-
22
-
23
-
24
-
25
-
26
-
27
-
28
-
29
-
30
-
31
-
32
-
 33
33 -
 34
34 -
 35
35 -
 36
36 -
 37
37 -
 38
38 -
 39
39 -
 40
40 -
 41
41 -
 42
42 -
 43
43 -
44
-
45
-
46
-
47
-
48
-
49
-
50
-
51
-
52
-
53
-
54
-
55
-
56
 |
 |
