Belkin F5D8236-4 User Manual - Page 24
Quick-Navigation Links, Help Button, Login/Logout Button, Internet-Status Indicators, Language, - firmware
 |
UPC - 722868680636
View all Belkin F5D8236-4 manuals
Add to My Manuals
Save this manual to your list of manuals |
Page 24 highlights
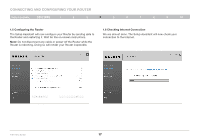
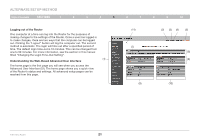
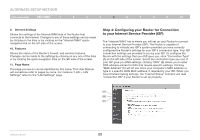
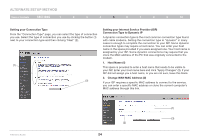
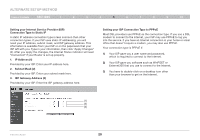
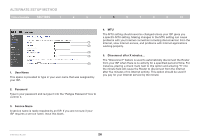
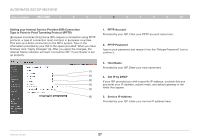
Alternate Setup Method Table of Contents sections 1 2 3 4 5 6 7 8 9 10 1. Quick-Navigation Links You can go directly to any of the Router's advanced UI pages by clicking directly on these links. The links are divided into logical categories and grouped by tabs to make finding a particular setting easier to find. Clicking on the header of each tab will show you a short description of the tab's function. 2. Home Button The home button is available in every page of the UI. Pressing this button will take you back to the home page. 3. Help Button The "Help" button gives you access to the Router's help pages. Help is also available on many pages by clicking "more info" next to certain sections of each page. 4. Login/Logout Button This button enables you to log in and out of the Router with the press of one button. When you are logged into the Router, this button will change to read "Logout". Logging into the Router will take you to a separate login page where you will need to enter a password. When you are logged into the Router, you can make changes to the settings. When you are finished making changes, you can log out of the Router by clicking the "Logout" button. For more information about logging into the Router, see the section called "Logging into the Router". 5. Internet-Status Indicators This indicator is visible in all pages of the Router, indicating the connection status of the Router. When the indicator says "Connected" in blue, the Router is connected to the Internet. When the Router is not connected to the Internet, the indicator will read "Not Connected" in RED. The indicator is automatically updated when you make changes to the settings of the Router. 6. Language Shows the active language for the Advanced User Interface. Select a desirable language by clicking one of the available languages. 7. Version Info Shows the firmware version, boot-code version, hardware version, and serial number of the Router. 8. LAN Settings Shows you the settings of the Local Area Network (LAN) side of the Router. Changes can be made to the settings by clicking on any one of the links (IP Address, Subnet Mask, DHCP Server) or by clicking the "LAN" quick-navigation link on the left side of the screen. N Wireless Router 22
-
 1
1 -
2
-
3
-
4
-
5
-
6
-
7
-
8
-
9
-
10
-
11
-
12
-
13
-
14
-
15
-
16
-
17
-
18
-
 19
19 -
 20
20 -
 21
21 -
 22
22 -
 23
23 -
 24
24 -
 25
25 -
 26
26 -
 27
27 -
 28
28 -
 29
29 -
30
-
31
-
32
-
33
-
34
-
35
-
36
-
37
-
38
-
39
-
40
-
41
-
42
-
43
-
44
-
45
-
46
-
47
-
48
-
49
-
50
-
51
-
52
-
53
-
54
-
55
-
56
-
57
-
58
-
59
-
60
-
61
-
62
-
63
-
64
-
65
-
66
-
67
-
68
-
69
-
70
-
71
-
72
-
73
-
74
-
75
-
76
-
77
-
78
-
79
-
80
-
81
-
82
-
83
-
84
-
85
-
86
-
87
-
88
-
89
 |
 |