Belkin F5D8236-4 User Manual - Page 73
Troubleshooting - install cd
 |
UPC - 722868680636
View all Belkin F5D8236-4 manuals
Add to My Manuals
Save this manual to your list of manuals |
Page 73 highlights
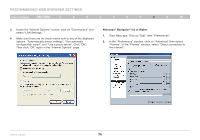
Troubleshooting Table of Contents sections 1 2 3 4 5 6 7 8 9 10 Setup Assistant CD does not automatically start. If the CD-ROM does not start the Setup Assistant automatically, it could be that the computer is running other applications that are interfering with the CD drive. 1. If the Setup Assistant Welcome screen does not appear within 15-20 seconds, open up your CD-ROM drive by double-clicking on the "My Computer" icon that is located on your desktop. 2. Next, double-click on the CD-ROM drive that the Setup Assistant CD has been placed in to start the installation. 3. The Setup Assistant should start within a few seconds. If, instead, a window appears showing the files on the CD, double-click on the icon labeled "SetupAssistant". 4. If the Setup Assistant still does not start, reference the section titled "Manually Configuring Network Settings" (page 64) of this User Manual for an alternative setup method). Setup Assistant cannot find my Router. If the Setup Assistant is not able to find the Router during the installation process, please check the following items: 1. If the Setup Assistant is not able to find the Router during the installation process, there may be third-party firewall software installed on the computer attempting to access the Internet. Examples of third-party firewall software are ZoneAlarm, BlackICE PC Protection, McAfee Personal Firewall, and Norton Personal Firewall. If you do have firewall software installed on your computer, please make sure that you properly configure it. You can determine if the firewall software is preventing Internet access by temporarily turning it off. If, while the firewall is disabled, Internet access works properly, you will need to change the firewall settings to function properly when it is turned on. Please refer to the instructions provided by the publisher of your firewall software for instructions on configuring the firewall to allow Internet access. 2. Unplug power to the Router for 10 seconds, and then plug the power back into the Router. Ensure that the Router's "router" LED is on; it should be solid BLUE. If not, check to make sure that the AC adapter is connected to the Router and plugged into a wall outlet. 3. Ensure that you have a cable connected between the network (Ethernet) port on the back of the computer and one of the "to Wired Computers" ports on the back of the Router. Note: The computer should NOT be connected to the port labeled "to Modem" on the back of the Router. 4. Try shutting down and restarting your computer, then rerunning the Setup Assistant. If the Setup Assistant is still unable to find the Router, reference the section titled "Manually Configuring Network Settings" for installation steps. N Wireless Router 71
-
 1
1 -
2
-
3
-
4
-
5
-
6
-
7
-
8
-
9
-
10
-
11
-
12
-
13
-
14
-
15
-
16
-
17
-
18
-
19
-
20
-
21
-
22
-
23
-
24
-
25
-
26
-
27
-
28
-
29
-
30
-
31
-
32
-
33
-
34
-
35
-
36
-
37
-
38
-
39
-
40
-
41
-
42
-
43
-
44
-
45
-
46
-
47
-
48
-
49
-
50
-
51
-
52
-
53
-
54
-
55
-
56
-
57
-
58
-
59
-
60
-
61
-
62
-
63
-
64
-
65
-
66
-
67
-
 68
68 -
 69
69 -
 70
70 -
 71
71 -
 72
72 -
 73
73 -
 74
74 -
 75
75 -
 76
76 -
 77
77 -
 78
78 -
79
-
80
-
81
-
82
-
83
-
84
-
85
-
86
-
87
-
88
-
89
 |
 |
