BenQ SV500 BH and S Series X-Sign Software Manual - Page 9
Setting Region Properties, Adding a text set, Click on the icon
 |
View all BenQ SV500 manuals
Add to My Manuals
Save this manual to your list of manuals |
Page 9 highlights
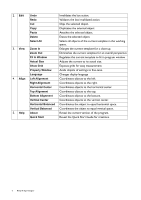
• select the effect for entering from a drop down list by the right of Enter Effect. • decide how long the effect will last by entering a number by the right of Duration of Enter Effect. • decide how long will the work last by entering a number by the right of Duration. • decide how long will the work halt before exit by entering a number by the right of Delay Duration To Exit. • set the background to be a certain color or pick your own image from a drop down list by the right of Background. Setting Region Properties Anytime you add a new object or select an object in the scene, the object should be framed in red, and you should see a region property window at the bottom right of the program. You can set the size or the position of the region by dragging the line or the point of the frame, or you can • name your region by clicking on the box of Name and input. • adjust your region width by clicking on the box of Width and input. • adjust your region height by clicking on the box of Height and input. • position your region coordinate by entering values by the right of X and Y. • set the layer depth of your region by entering a value by the right of layer. The higher the value is, the more forward the region will be. • check the box of Always repeat for infinitely looping, or set the frequency of the region being played by entering a value by the right of Repeated Count excluding time sets. Adding a text set You should notice some of the buttons on top of the program are no longer grayed and available for use. 1. Click on the icon to add a text set. You can drag the text set anywhere in the template. For more text sets, click on the icon to add. For edit functions, such as cut, copy, paste, or, delete, click on , , , or respectively. BenQ X-Sign Designer 9
-
 1
1 -
2
-
3
-
 4
4 -
 5
5 -
 6
6 -
 7
7 -
 8
8 -
 9
9 -
 10
10 -
 11
11 -
 12
12 -
 13
13 -
 14
14 -
15
 |
 |
