Beretta Stampede Old West Beretta Stampede User Manual - Page 17
Pulling Strongly On The Trigger In The Half-cock
 |
View all Beretta Stampede Old West manuals
Add to My Manuals
Save this manual to your list of manuals |
Page 17 highlights
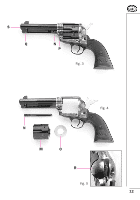
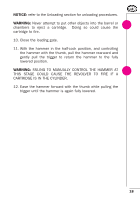
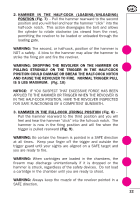
WARNING: DROPPING THE REVOLVER ON THE HAMMER OR ! PULLING STRONGLY ON THE TRIGGER IN THE HALF-COCK POSITION COULD DAMAGE OR BREAK THE HALF-COCK NOTCH AND CAUSE THE REVOLVER TO FIRE. NORMAL TRIGGER PULL IS 5 LBS MAXIMUM. (Fig. 10) NOTICE: IF YOU SUSPECT THAT EXCESSIVE FORCE HAS BEEN APPLIED TO THE HAMMER OR TRIGGER WHEN THE REVOLVER IS IN THE HALF-COCK POSITION, HAVE THE REVOLVER INSPECTED FOR SAFE FUNCTIONING BY A COMPETENT GUNSMITH. 3. Again, with your finger OFF THE TRIGGER and the barrel pointed in a SAFE direction, check to see that the cylinder rotates clockwise (as viewed from the rear). This will confirm that the firearm is in the half-cock or loading position. 4. Locate the loading gate (Fig. 1-L) on the right side of the frame, rear of the cylinder (as viewed from the rear). 5. Open the loading gate (Fig 11). The cylinder should spin freely in a clockwise direction, allowing visual and physical access to the six (6) chambers. 6. Carefully look into all six (6) chambers (visual check) to make sure they are unloaded. 7. Carefully place the tip of your finger into the mouth of all six (6) chambers (physical check) to make sure they are unloaded. 8. If the gun is confirmed to be unloaded, proceed to step 12. 9. If ammunition is found any of the six (6) chambers upon inspection, rotate the cylinder until the loaded chamber is aligned with the loading gate and remove the cartridge. If necessary, locate the ejector rod handle on the left side of the revolver, forward of the frame and below the barrel (Fig. 3-Q). Move it rearward to eject the cartridge, being careful to eject the cartridge or fired case onto an appropriate surface (so as to avoid dropping a live round on the floor). (Fig. 12) 17
-
 1
1 -
2
-
3
-
4
-
5
-
6
-
7
-
8
-
9
-
10
-
11
-
 12
12 -
 13
13 -
 14
14 -
 15
15 -
 16
16 -
 17
17 -
 18
18 -
 19
19 -
 20
20 -
 21
21 -
 22
22 -
23
-
24
-
25
-
26
-
27
-
28
-
29
-
30
-
31
-
32
-
33
-
34
-
35
-
36
-
37
-
38
-
39
-
40
-
41
-
42
-
43
 |
 |
