Beretta Stampede Old West Beretta Stampede User Manual - Page 36
Fig. 6, Warning
 |
View all Beretta Stampede Old West manuals
Add to My Manuals
Save this manual to your list of manuals |
Page 36 highlights
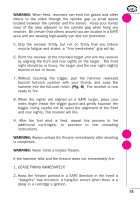
7. With the ejector rod handle in its fully lowered position, rotate the cylinder clockwise to expose another chamber and repeat the procedure. 8. When all cartridges or fired cartridge cases are ejected, rotate the cylinder and visually and physically inspect each of the six (6) chambers to ensure that all chambers are empty. 9. Close the loading gate. 10. While controlling the hammer with your thumb, pull the hammer slightly rearward and gently pull the trigger to ease the hammer forward. Once the hammer makes it past the half-cock position, release the trigger (thus disengaging the transfer-bar) and lower the hammer all the way to the fully lowered position. (Fig. 6) ! WARNING: Always unload the firearm immediately after shooting is completed. WARNING: Never store a loaded firearm. ! To disassemble your revolver for cleaning, follow the steps below: ! WARNING: The firearm should not be disassembled for cleaning beyond what is described below. Only a qualified gunsmith who is familiar with these firearms should conduct further disassembly. ! WARNING: Do not attempt to alter the internal parts of your revolver's action or firing mechanism. Alterations to the hammer, trigger, springs, sear or other internal parts can result in a very dangerous situation. ! WARNING: Altering the internal parts of your revolver's action or firing mechanism voids the manufacturer's warranty. 36
-
 1
1 -
2
-
3
-
4
-
5
-
6
-
7
-
8
-
9
-
10
-
11
-
12
-
13
-
14
-
15
-
16
-
17
-
18
-
19
-
20
-
21
-
22
-
23
-
24
-
25
-
26
-
27
-
28
-
29
-
30
-
 31
31 -
 32
32 -
 33
33 -
 34
34 -
 35
35 -
 36
36 -
 37
37 -
 38
38 -
 39
39 -
 40
40 -
 41
41 -
42
-
43
 |
 |
