Bernina 530 Manual - Page 36
Bernina 530 Manual
 |
View all Bernina 530 manuals
Add to My Manuals
Save this manual to your list of manuals |
Page 36 highlights
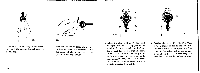
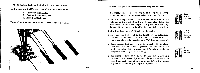
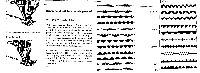
4. the buttonhole foot, marked with 3 black lines, is used. In this case also 3 different types of uttonholes can be made: a) Ordinary buttonholes, b) Braided buttonholes, and c) Raised buttonholes. Types a) and b) are obtained with normal thread tension. Tr4 Fie 45 The actual sewing of the buttonhole without using the automatic 1. Set zigzag control knob 12 (Fig.2) to No. 2; when sewing a buttonhole in knit material, select stitch width Vt. 2. Set stitch-length lever 15 so that the white line on the left side of the shaft of said lever is somewheat below the zero mark on the stitch length scale plate. This can only be done if the the screw 14 (Fig.2) is not fully turned in. 3. Set drop feed knob 17 (Fig.2) to the right. 4. Now sew the first bead to the length of the buttonhole. The last needle hole of the finished bead must be on the right, and the needle inserted only she" into the material. 5. Raise presser foot and turn cloth through 180° in clockwise direction. Then lower presser foot and allow the needle to enter cloth towards the left. Allow needle to penetrate cloth only to depth of Vs". 6. Set zigzag control knob 12 to 3,5 and sew a few end stitches. Pull material lightly towards, you to shorten the feed. Last needle hole should be on the left. Allow needle to penetrate cloth only to depth of approx. i/o". Last stitch • on right Allow needle -A to enter on left lust stitch on left 67
-
 1
1 -
2
-
3
-
4
-
5
-
6
-
7
-
8
-
9
-
10
-
11
-
12
-
13
-
14
-
15
-
16
-
17
-
18
-
19
-
20
-
21
-
22
-
23
-
24
-
25
-
26
-
27
-
28
-
29
-
30
-
 31
31 -
 32
32 -
 33
33 -
 34
34 -
 35
35 -
 36
36 -
 37
37 -
 38
38 -
 39
39 -
 40
40 -
 41
41 -
42
-
43
-
44
-
45
-
46
-
47
-
48
-
49
-
50
-
51
-
52
-
53
-
54
 |
 |
