Bernina 530 Manual - Page 45
raised
 |
View all Bernina 530 manuals
Add to My Manuals
Save this manual to your list of manuals |
Page 45 highlights
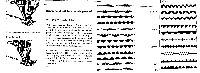
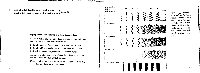
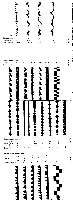
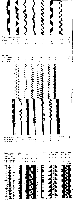
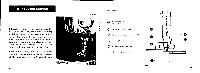
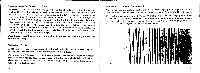
1. Adjustment for Automatic Ornamental Stitch Sewing The lever 51 for zigzag or ornamental stitches is placed at the right-hand side of the top arm (Fig, 63). It projects from the slot in the plate 52. If the machine is to be set for control by the automatic ornamental stitch device, push lever 51 backwards. Reset for zigzag stitches by pulling lever forward. At the left of the zigzag lever is placed the ornamental stitch selecting lever 54 which projects from the plate 53. This plate bears the symbols of the thirteen possible mnimental stitches. When sewing zigzag stitches, the lever 54 with its white line on the symbol side of the scale is set at zero, marked by a zigzag line, i.e. in front position. Select an ornamental stitch and set lever 54 at the correspond- fr's big symbol so that the white line thereon lines up with its mark. ea 'Mt This is effected as follows: Pull lever 54 to the right in its guiding slot, displacing it until its line and the stitch sym- bol line up and then release. It will automatically be locked and stay in this position. When dis- placing the lever, make sure that the needle is outside the fabric, i.e. in raised position. The stitch width adjusting knob 12 should be set so as to show the numeral 4 in the sight opening, i. e. to produce the largest stitch width. 84 After threading the machine, stitching can be started in the same manner as ordinary sewing. When switching back to normal zigzag stitches, place control lever in zero position as described above. Sliteh iellgth Ulla, 0 Stitch width 4 -- I- lg. 44 F La. G5 •
-
 1
1 -
2
-
3
-
4
-
5
-
6
-
7
-
8
-
9
-
10
-
11
-
12
-
13
-
14
-
15
-
16
-
17
-
18
-
19
-
20
-
21
-
22
-
23
-
24
-
25
-
26
-
27
-
28
-
29
-
30
-
31
-
32
-
33
-
34
-
35
-
36
-
37
-
38
-
39
-
 40
40 -
 41
41 -
 42
42 -
 43
43 -
 44
44 -
 45
45 -
 46
46 -
 47
47 -
 48
48 -
 49
49 -
 50
50 -
51
-
52
-
53
-
54
 |
 |
