Bernina Bernette 20 Operation Manual - Page 19
Attaching Buttons
 |
View all Bernina Bernette 20 manuals
Add to My Manuals
Save this manual to your list of manuals |
Page 19 highlights
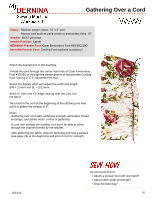
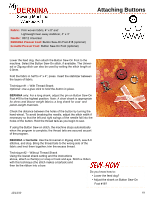
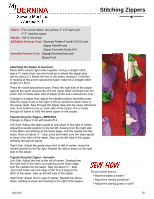
Attaching Buttons Fabric: Firm woven fabric, 4" x 8" and Lightweight tear-away stabilizer, 4" x 4" Needle: 80/12 Universal BERNINA Presser Foot: Button Sew-On Foot #18 (optional) bernette Presser Foot: Button Sew-On Foot (optional) Lower the feed dog, then attach the Button Sew-On Foot to the machine. Select the Button Sew-On stitch, if available. The Universal or Zigzag stitch can also be used by setting the stitch length at 0.0mm. Fold the fabric in half to 4" x 4"; press. Insert the stabilizer between the layers of fabric. Technique #1 - With Thread Shank Optional: Use a glue stick to hold the button in place. BERNINA only: For a long shank, adjust the pin on Button Sew-On Foot #18 to the highest position. Note: A short shank is appropriate for dress-and blouse-weight fabrics; a long shank for coat- and jacket-weight materials. Check the distance between the holes of the button by turning the hand wheel. To avoid breaking the needle, adjust the stitch width if necessary so that the left and right swings of the needle fall into the holes of the button. Hold the thread tails as you begin to sew. If using the Button Sew-on stitch, the machine stops automatically when the program is complete; the thread tails are secured as part of the program. BERNINA or bernette: Use the Universal or Zigzag stitch, sew 6-8 stitches, and stop. Bring the thread tails to the wrong side of the fabric and knot them together; trim the excess thread. Technique #2 - Without Thread Shank Using the lowest shank setting and the instructions above, attach a charm(s) or snap or hook and eye. Stitch a ribbon with this technique (the stitch makes a bartack) and then tie the ribbon into a bow. Do you know how to: ▪ Lower the feed dog? ▪ Adjust the shank on Button Sew-On Foot #18? 12/13/10 19
-
 1
1 -
2
-
3
-
4
-
5
-
6
-
7
-
8
-
9
-
10
-
11
-
12
-
13
-
 14
14 -
 15
15 -
 16
16 -
 17
17 -
 18
18 -
 19
19 -
 20
20 -
 21
21 -
 22
22 -
 23
23
 |
 |