Bernina Bernette 20 Operation Manual - Page 8
Securing Stitches
 |
View all Bernina Bernette 20 manuals
Add to My Manuals
Save this manual to your list of manuals |
Page 8 highlights
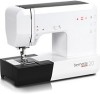
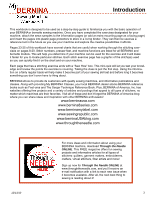
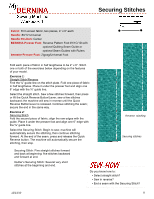
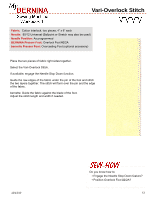
Securing Stitches Fabric: Firm woven fabric, two pieces, 4" x 6" each Needle: 80/12 Universal Needle Position: Center BERNINA Presser Foot: Reverse Pattern Foot #1/1C/1D with optional Quilting Seam Guide or optional Seam Guides with Rulers bernette Presser Foot: Zigzag/Universal Foot Fold each piece of fabric in half lengthwise to be 2" x 6". Stitch one or both of the exercises below depending on the features of your model. Exercise 1: Straight Stitch/Reverse Find the ⅝" guide line on the stitch plate. Fold one piece of fabric in half lengthwise. Place it under the presser foot and align one 6" edge with the ⅝" guide line. Select the straight stitch. Sew a few stitches forward, then press or lift the Quick Reverse Button/Lever; sew a few stitches backward; the machine will sew in reverse until the Quick Reverse Button/Lever is released. Continue stitching the seam; secure the end in the same way. Exercise 2: Securing Stitch Fold the second piece of fabric; align the raw edges with the guide. Place it under the presser foot and align one 6" edge with the ⅝" guide line. Select the Securing Stitch. Begin to sew; machine will automatically secure the stitching, then continue stitching forward. At the end of the seam, press and release the Quick Reverse button. The machine will automatically secure the stitching, then stop. Reverse stitching Securing stitches Securing Stitch: Five straight stitches forward and back at beginning; five stitches backward and forward at end. Quilter's Securing Stitch: Several very short stitches at the beginning and end. Do you know how to: ▪ Select straight stitch? ▪ Sew in reverse? ▪ End a seam with the Securing Stitch? 12/13/10 8
-
 1
1 -
2
-
 3
3 -
 4
4 -
 5
5 -
 6
6 -
 7
7 -
 8
8 -
 9
9 -
 10
10 -
 11
11 -
 12
12 -
 13
13 -
14
-
15
-
16
-
17
-
18
-
19
-
20
-
21
-
22
-
23
 |
 |