Black & Decker B6000C User Manual - Page 7
How to Use - bread maker
 |
View all Black & Decker B6000C manuals
Add to My Manuals
Save this manual to your list of manuals |
Page 7 highlights
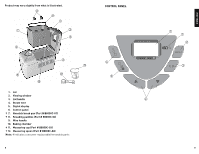
How to Use This product is for household use only. HELPFUL HINTS FOR USING YOUR BREADMAKER 1. Follow the directions: The liquid is always the first ingredient to be placed in bread pan. Dry ingredients follow and the yeast is added last. Make a small indentation in the center of the flour and place the yeast there. This is especially important when using the delay-bake function to avoid activating the yeast too soon. 2. Measure carefully: Use the appropriate measuring tools and measure carefully. The measuring cup included should be used for dry measurement only. Spoon dry ingredients into the measuring cup and level off with the straight edge of a metal spatula or the back of a knife. Measure liquids in a glass or plastic measuring cup designed for liquids. Use measuring spoons for liquid and dry ingredients. Level off with a metal spatula or the back of a knife. 3. Keep it fresh: Use fresh ingredients at room temperature. In Canada, use All-Purpose Flour or Bread Flour; in the USA, use Bread Flour. Use yeast that has an expiration date of at least 6 months in the future. Avoid using perishable ingredients (such as milk, butter or margarine, eggs and cheese, fruit or fresh herbs) when using the delay-bake function. 4. Perfect dough: In very humid weather, bread may require a little more flour. Check the bread toward the end of the first rise. If it seems sticky, add 1 or 2 tablespoons of flour to the second kneading cycle until the dough forms a smooth ball. If the bread seems very dry or knocks in the kneading cycle, sprinkle room temperature water into the bowl, 1 teaspoon at a time, until dough forms a smooth ball. 5. Look but don't open: The glass in the cover is there to monitor the process. Do not open the lid during the baking process. In the initial mixing you may open the cover to use a rubber spatula to blend in any ingredients that have stuck to the sides of the bread pan or to add ingredients at the "add ingredient" beep. 6. Patience: Wait at least 20 minutes before slicing freshly baked bread; it will still be deliciously warm but easier to slice. If you like a crisp crust, remove the bread as soon as the baking cycle is complete. To make another loaf of bread, let the unit cool completely. 7. Save it for another day: To freeze freshly baked bread, cool completely on a wire rack. Wrap securely in plastic wrap and then foil. To serve, remove from foil and defrost. For that freshly baked flavor, reheat in the oven. 8. Adding ingredients: All functions allow for the addition of ingredients, such as dried fruits and nuts; the beep sounds just before kneading is complete. This happens about 25 minutes (8 minutes for Rapid White) into the program. 9. Avoid delay: The delay-bake function cannot be used for Rapid White or the Dough setting. It is not recommended for Whole Wheat, Quick Bread or Jam. 12 10. Test the water: For most breads, use water that is 80° to 90°F (26.6 °C to 32.2 °C); for Rapid White breads, use water at 110°F to 120°F (43.3 °C to 48.8 °C). 11. Choosing crust color: The first time bread is baked, select the light setting. If you like a darker crust, make a note and select a darker crust for future breads on that cycle. 12. There is a 30-minute delay on the whole wheat program. 13. Some noteworthy solutions: If bread is: ❏ too brown - select a lighter crust. ❏ too light - select a darker crust and do not open the unit during the baking cycle. ❏ too coarse - make sure you add salt. ❏ too heavy - use less flour (1 tsp. at a time). ❏ too low - use less flour or more yeast or water that is not too hot, or check the date on your yeast. ❏ too high - try less yeast (¼ tsp. at a time). ❏ collapses in the center - dough is too wet or flour is not strong enough or amount is too great for the unit. MENU Note: If at any time during bread making process you need to turn bread maker off, press and hold the MENU button for approximately 5 seconds, then unplug the unit. Note: If bread is not removed immediately after baking and STOP button is not pressed, a controlled 60-minute Keep Warm cycle will begin (except during Quick Breads, Doughs and Jam). For best results, remove bread immediately after baking process is complete. White Bread Used for breads that primarily include white bread flour, although some recipes may include smaller amounts of whole wheat flour. Whole Wheat Bread Used for recipes with significant amounts of whole wheat or rye flour, oats, or bran. Whole wheat course begins with rest period during which flours or grains absorb liquid ingredients. Soaking causes flour or grain to soften and helps ingredients to combine. Generally, whole wheat and multi-grain breads are shorter and denser than white, French or sweet. French Bread Traditionally, French bread has crispier crust and lighter texture than white bread. Recipes usually do not include butter, margarine or milk. Sweet Used for recipes that contain eggs, fruit juice, additional sugar or added sweet ingredients such as coconut flakes, raisins, dried fruit or chocolate. Baking temperature is reduced to prevent burning. 13 ENGLISH
-
 1
1 -
 2
2 -
 3
3 -
 4
4 -
 5
5 -
 6
6 -
 7
7 -
 8
8 -
 9
9 -
 10
10 -
 11
11 -
 12
12 -
13
-
14
-
15
-
16
-
17
-
18
-
19
-
20
-
21
-
22
-
23
-
24
-
25
-
26
-
27
-
28
-
29
-
30
-
31
-
32
-
33
-
34
-
35
-
36
-
37
-
38
-
39
-
40
-
41
-
42
-
43
-
44
-
45
 |
 |
