Bose A20 Aviation Owner's guide - Page 28
Replacing parts - replacement cushions
 |
View all Bose A20 Aviation manuals
Add to My Manuals
Save this manual to your list of manuals |
Page 28 highlights
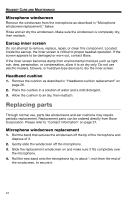
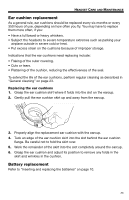
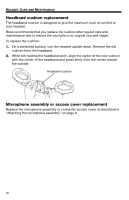
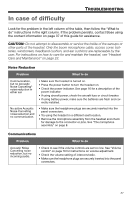
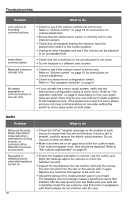
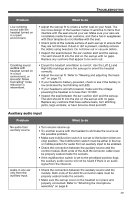
Tab 8, 16 Tab 7, 15 Tab 6, 14 Tab 5, 13 Tab 4, 12 Tab 3, 11 Tab2, 10 English HEADSET CARE AND MAINTENANCE Microphone windscreen Remove the windscreen from the microphone as described in "Microphone windscreen replacement," below. Rinse and air dry the windscreen. Make sure the windscreen is completely dry, then reattach. Earcup inner screen Do not attempt to remove, replace, repair, or clean this component. Located inside the earcup, the inner screen is critical to proper headset operation. If the screen appears to be damaged or worn out, contact Bose. If the inner screen becomes damp from environmental moisture such as light rain, dew, perspiration, or condensation, allow it to air dry only. Do not use electric heaters, blowers, or hairdryer-type devices to dry the inner screen. Headband cushion 1. Remove the cushion as described in "Headband cushion replacement" on page 26. 2. Place the cushion in a solution of water and a mild detergent. 3. Allow the cushion to air dry, then reattach. Replacing parts Through normal use, parts like windscreens and ear cushions may require periodic replacement. Replacement parts can be ordered directly from Bose Corporation. Please refer to "Contact information" on page 37. Microphone windscreen replacement 1. Roll the band that secures the windscreen off the tip of the microphone and dispose of it. 2. Gently slide the windscreen off the microphone. 3. Slide the replacement windscreen on and make sure it fits completely over the microphone. 4. Roll the new band onto the microphone tip, to about /1 4 inch from the end of the windscreen, to secure it. 24
-
 1
1 -
2
-
3
-
4
-
5
-
6
-
7
-
8
-
9
-
10
-
11
-
12
-
13
-
14
-
15
-
16
-
17
-
18
-
19
-
20
-
21
-
22
-
 23
23 -
 24
24 -
 25
25 -
 26
26 -
 27
27 -
 28
28 -
 29
29 -
 30
30 -
 31
31 -
 32
32 -
 33
33 -
34
-
35
-
36
-
37
-
38
-
39
-
40
-
41
-
42
-
43
-
44
 |
 |
