Brother International HL 2700CN Quick Setup Guide - English - Page 21
For LPR Users, For Windows NT
 |
UPC - 840356824994
View all Brother International HL 2700CN manuals
Add to My Manuals
Save this manual to your list of manuals |
Page 21 highlights
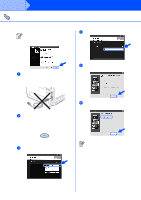
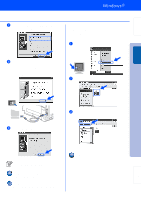
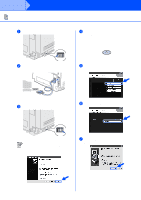
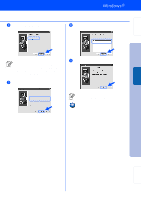
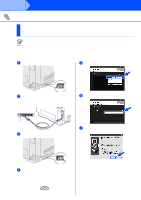
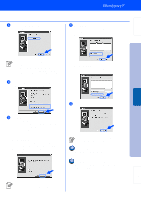
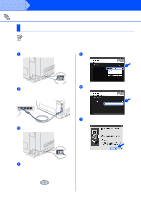
Setting Up Your Printer 8 Select Standard Installation, and then click the Next button. A For LPR Users: Select your printer and LPR (Recommended), and then click the Next button. Installing the Driver Windows® Network If you want to install the PS driver, select Custom and then follow the on-screen instructions. When the Select Components screen appears, check PS Printer Driver, and then continue following the on-screen instructions. 9 Select Brother Peer-to-Peer Network Printer, and then click the Next button. For NetBIOS Users: Select your printer and NetBIOS, and then click the Next button. B Click the Finish button. 0 For LPR Users: Select Search the network for devices and choose from a list of discovered divices (Recommended). Or enter your printer's IP address or its node name. Click the Next button. For NetBIOS Users: Select Search the network for devices and choose from a list of discovered devices (Recommended). Click the Next button. If you want to register your product on-line, check On-Line Registration. For Windows NT® 4.0 and Windows® 2000/XP users: Setup is now complete. For Windows® 95 / 98 / Me users: After your PC has restarted, setup will be complete. Contact your Administrator about the printer's IP Address or node name. 19 Fo r Administrators
-
 1
1 -
2
-
3
-
4
-
5
-
6
-
7
-
8
-
9
-
10
-
11
-
12
-
13
-
14
-
15
-
 16
16 -
 17
17 -
 18
18 -
 19
19 -
 20
20 -
 21
21 -
 22
22 -
 23
23 -
 24
24 -
 25
25 -
 26
26 -
27
-
28
-
29
-
30
-
31
-
32
-
33
-
34
-
35
-
36
 |
 |
