Brother International HL-3075CW Network Users Manual - English - Page 103
Using E-mail notification with user authentication, Advanced Setting
 |
View all Brother International HL-3075CW manuals
Add to My Manuals
Save this manual to your list of manuals |
Page 103 highlights
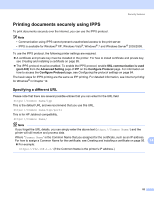
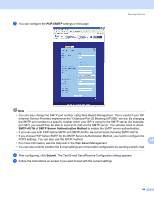
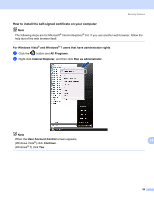
Security features Using E-mail notification with user authentication 14 To use the E-mail notification function via secure SMTP server that requires a user authentication, you need to use POP before SMTP or SMTP-AUTH method. These methods prevent an unauthorized user from accessing the mail server. You can use Web Based Management (web browser), BRAdmin Professional 3 and Web BRAdmin to configure these settings. Note You need to match the settings of POP3/SMTP authentication with one of the E-mail servers. Contact your network administrator or your internet service provider about the configuration before using. How to configure the POP3/SMTP settings using Web Based Management (web browser). 14 a Start your web browser. b Type "http://printer's IP address/" into your browser (where "printer's IP address" is the printer's IP address). „ For example: http://192.168.1.2/ Note • If you have edited the hosts file on your computer or are using a Domain Name System, you can also enter the DNS name of the print server. • For Windows® users, as the print server supports TCP/IP and NetBIOS names, you can also enter the NetBIOS name of the print server. The NetBIOS name can be seen on the Network Configuration page. To learn how to print the Network Configuration page, see Printing the Network Configuration page on page 60. The NetBIOS name assigned is the first 15 characters of the node name and by default it will appear as "BRNxxxxxxxxxxxx" for a wired network or "BRWxxxxxxxxxxxx" for a wireless network. c Click Network Configuration. d Enter a user name and a password. The default User Name is "admin" and the default Password is "access". e Click Configure Protocol. 14 f Make sure that the POP3/SMTP setting is enable, and then click Advanced Setting of POP3/SMTP. 93
-
 1
1 -
2
-
3
-
4
-
5
-
6
-
7
-
8
-
9
-
10
-
11
-
12
-
13
-
14
-
15
-
16
-
17
-
18
-
19
-
20
-
21
-
22
-
23
-
24
-
25
-
26
-
27
-
28
-
29
-
30
-
31
-
32
-
33
-
34
-
35
-
36
-
37
-
38
-
39
-
40
-
41
-
42
-
43
-
44
-
45
-
46
-
47
-
48
-
49
-
50
-
51
-
52
-
53
-
54
-
55
-
56
-
57
-
58
-
59
-
60
-
61
-
62
-
63
-
64
-
65
-
66
-
67
-
68
-
69
-
70
-
71
-
72
-
73
-
74
-
75
-
76
-
77
-
78
-
79
-
80
-
81
-
82
-
83
-
84
-
85
-
86
-
87
-
88
-
89
-
90
-
91
-
92
-
93
-
94
-
95
-
96
-
97
-
 98
98 -
 99
99 -
 100
100 -
 101
101 -
 102
102 -
 103
103 -
 104
104 -
 105
105 -
 106
106 -
 107
107 -
 108
108 -
109
-
110
-
111
-
112
-
113
-
114
-
115
-
116
-
117
-
118
-
119
-
120
-
121
-
122
-
123
-
124
-
125
-
126
-
127
-
128
-
129
-
130
-
131
-
132
-
133
-
134
-
135
-
136
-
137
-
138
-
139
-
140
-
141
-
142
-
143
 |
 |