Brother International KE-430F Basic Instruction Manual - English - Page 41
Inserting the button (BE-438F), 5-9. Installing the accessory spring (BE-438F)
 |
View all Brother International KE-430F manuals
Add to My Manuals
Save this manual to your list of manuals |
Page 41 highlights
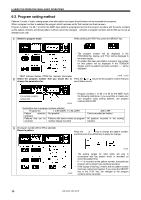
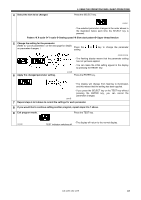
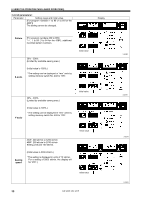
5-7. Inserting the button (BE-438F) 5. PREPARATION BEFORE SEWING 1. Press the button clamp plate cam (1) to open the button holder (2). 2. Insert the button, making sure that the button is facing the directing shown in the illustration, then release the button clamp plate cam (1). 4115M 5-8. Adjusting the button clamp (BE-438F) 0.5 - 1.0mm 1. Insert the button in the button clamp, and then confirm that the button is securely held by the clamp and that the button can be turned by hand. 2. Loosen the shoulder screw (1), while the button is held by the clamp. Move the adjusting plate (2) so that the space between the adjusting plate (2) and screw (3) is approximately 0.5 - 1.0 mm, then tighten the shoulder screw (1). 2660Q 5-9. Installing the accessory spring (BE-438F) If you would like the button to be raised up more after it is sewn, install the accessory spring. 1. Install the spring support (1) with the bolt (2). 2. Install the spring (3) with the washer (4) and the screw (5). * Adjust so that the spring (3) is in the middle of the button. 2308B KE-430F, BE-438F 33
-
 1
1 -
2
-
3
-
4
-
5
-
6
-
7
-
8
-
9
-
10
-
11
-
12
-
13
-
14
-
15
-
16
-
17
-
18
-
19
-
20
-
21
-
22
-
23
-
24
-
25
-
26
-
27
-
28
-
29
-
30
-
31
-
32
-
33
-
34
-
35
-
 36
36 -
 37
37 -
 38
38 -
 39
39 -
 40
40 -
 41
41 -
 42
42 -
 43
43 -
 44
44 -
 45
45 -
 46
46 -
47
-
48
-
49
-
50
-
51
-
52
-
53
-
54
 |
 |
