Brother International KE-436C Instruction Manual - English - Page 26
Setting the floppy disk, How to use the cleaning disk
 |
View all Brother International KE-436C manuals
Add to My Manuals
Save this manual to your list of manuals |
Page 26 highlights
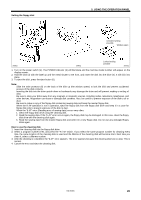
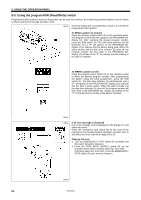
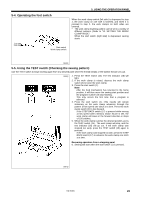
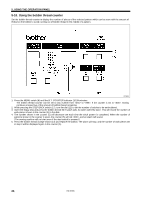
Setting the floppy disk 5. USING THE OPERATION PANEL Unlocked writing possible Window open 2689Q 2690Q Locked writing possible 2691Q 1. Turn on the power switch (1). The POWER indicator (2) will illuminate and the machine model number will appear on the display screen. 2. Hold the disk (3) with the label up and the metal shutter to the front, and insert the disk into the drive (4). It will click into place. 3. To eject the disk, press the eject button (5). Note: • Slide the write protector (6) on the back of the disk up (the window opens) to lock the disk and prevent accidental erasure of the disk contents. • Inserting the disk into the drive upside down or backwards may damage the drive and will prevent reading or writing of data. • Be sure to store your disks away from any magnets or magnetic sources, including radios, televisions, telephones, and other devices. Magnetism can erase or damage disk contents. Also, be careful to prevent exposure of the disk to oil or dust. • Be sure to make a copy of the floppy disk containing sewing data and keep the master floppy disk. • When the R /W operation is not in operation, eject the floppy disk from the floppy disk drive and keep it in a case for floppy disk only to prevent exposure of the disk to dust. • When the "E.4F" error (Reading error of sewing data) occurs very often; 1. Clean the floppy disk drive using the cleaning disk. 2. Read the sewing data. If the "E.4F" error occurs again, the floppy disk may be damaged. In this case, clean the floppy disk drive with the cleaning disk again. 3. Read the sewing data from the master floppy disk and write it in a new floppy disk. Do not use any damaged floppy disks again. How to use the cleaning disk 1. Insert the cleaning disk into the floppy disk drive. 2. Select a program number (0-9), and press the "R / W" switch. If you select the same program number for cleaning every time, the same location of the cleaning disk is used and the lifetime of the cleaning disk will become short. Next time you clean it, select a different number. 3. After the cleaning is completed, the "E.4F" error appears. The error appears because the cleaning disk has no data. This is normal. 4. Cancel the error and eject the cleaning disk. KE-436C 20
-
 1
1 -
2
-
3
-
4
-
5
-
6
-
7
-
8
-
9
-
10
-
11
-
12
-
13
-
14
-
15
-
16
-
17
-
18
-
19
-
20
-
 21
21 -
 22
22 -
 23
23 -
 24
24 -
 25
25 -
 26
26 -
 27
27 -
 28
28 -
 29
29 -
 30
30 -
 31
31 -
32
-
33
-
34
-
35
-
36
-
37
-
38
-
39
-
40
-
41
-
42
-
43
-
44
-
45
-
46
-
47
-
48
-
49
-
50
-
51
-
52
-
53
-
54
-
55
-
56
-
57
-
58
-
59
-
60
-
61
-
62
-
63
-
64
-
65
-
66
-
67
-
68
-
69
-
70
-
71
-
72
-
73
 |
 |
