Brother International KE-436C Instruction Manual - English - Page 28
Operating the foot switch, 5-5. Using the TEST switch (Checking the sewing pattern)
 |
View all Brother International KE-436C manuals
Add to My Manuals
Save this manual to your list of manuals |
Page 28 highlights
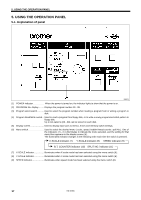
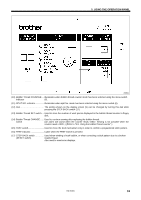
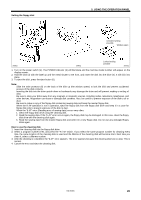
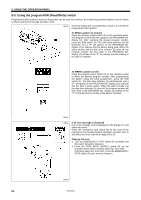
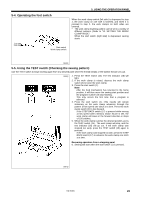
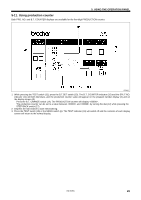
5-4. Operating the foot switch 1st step 2nd step Start switch Work clamp switch 5. USING THE OPERATION PANEL When the work clamp switch (left side) is depressed to step 1, the work clamp on one side is lowered, and when it is pressed to step 2, the work clamps on both sides are lowered. * The work clamp lowering pattern can be set to a variety of different patterns. (Refer to "12. SETTING THE WORK CLAMP MODE". When the start switch (right side) is depressed, sewing starts. 0330Q 5-5. Using the TEST switch (Checking the sewing pattern) Use the TEST switch to begin sewing again from any desired point when the thread breaks or the bobbin thread runs out. 2696Q 1. Press the TEST switch (15). The test indicator (16) will light. 2. If the work clamp is raised, depress the work clamp switch (2) to lower the work clamp. 3. Press the start switch (1). Note: After the feed mechanism has returned to the home position, it will then move the sewing start position and the program number will stop flashing. This only occurs the first time that a program is selected. 4. Press the start switch (1). (The needle will remain stationary as the work clamp advances through the pattern at low speed one stitch at a time. Press the work clamp switch (2) to fast forward. • If the STEP BACK switch (17) is pressed while moving at low speed when memory switch No.20 is ON, the work clamp will move in the forward direction in steps of 100 stitches. 5. When the work clamp reaches the desired position, press the TEST switch (15) . The work clamp will stop, and the test indicator (16) will go out. If the work clamp was stopped too early, press the TEST switch (15) again to proceed. • If the work clamp was stopped too late, press the STEP BACK switch (17) to advance the work clamp one stitch at a time. Resuming operation from a stopping point 6. Sewing will start when the start switch (1) is pressed. 2697Q KE-436C 22
-
 1
1 -
2
-
3
-
4
-
5
-
6
-
7
-
8
-
9
-
10
-
11
-
12
-
13
-
14
-
15
-
16
-
17
-
18
-
19
-
20
-
21
-
22
-
 23
23 -
 24
24 -
 25
25 -
 26
26 -
 27
27 -
 28
28 -
 29
29 -
 30
30 -
 31
31 -
 32
32 -
 33
33 -
34
-
35
-
36
-
37
-
38
-
39
-
40
-
41
-
42
-
43
-
44
-
45
-
46
-
47
-
48
-
49
-
50
-
51
-
52
-
53
-
54
-
55
-
56
-
57
-
58
-
59
-
60
-
61
-
62
-
63
-
64
-
65
-
66
-
67
-
68
-
69
-
70
-
71
-
72
-
73
 |
 |
