Brother International LT2-B847 MKII Instruction Manual - Multi - Page 83
Changement
 |
View all Brother International LT2-B847 MKII manuals
Add to My Manuals
Save this manual to your list of manuals |
Page 83 highlights
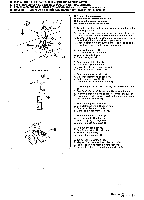
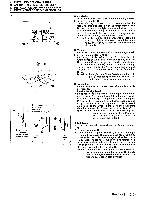
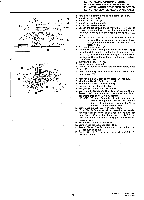
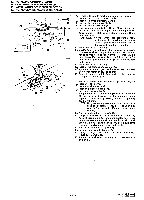
12. REPLACING GAUGE PARTS (CHANGING THE NEEDLE WIDTH) 12. ERSETZEN VERSCHIEDENER TEILE (ANDERN DER NADELBREITE) 12. REMPLACEMENT DES JAUGES (CHANGEMENT DE LA LARGEUR D'AIGUILLE) 12. CAMBIO DE LAS PIEZAS CALIBRADAS (CAMBIO DEL ANCHO DE LA AGUJA) 1 b 8841 8842 12.4 mm 8872 B847 - 2.0 mm } B845 B875 2.4 mm B848 - 2.0 mm Down position Tiefstellung Position basse Posici6n inferior Needle center Nadelmitte Centre de l'aiguille Centro de las agujas 1-1.5 mm 841 842 845 2.4 mm 872 875 847 848 12 '0 mm 7. Adjust the needle bar lift amount. 1) Set the stitch length to either 2 (approx. 2 mm) or 3 (approx. 3 mm) on the scale, depending on the model and specifications of the machine. (Refer to the tables on pages 57 and 59.) 2) Turn the machine pulley to move the needle bar to its lowest position and adjust so that reference line (b) is aligned as shown in the illustration. Check that the rotary hook tip 0 is aligned with the center of the needle and that the distance from the upper edge of the needle hole to the rotary hook tip 0 is 1-1.5 mm at this time. (Refer to pages 57 and 59 for the adjustment procedures.) 8. Return the head to its original position. 9. Attach the needle plate. 10. Attach the presser foot. 7. Einstellen des Nadelstangenhubs 1) Stellen Sie die Stichlange je nach dem Modell und der Ausfuhrung der Maschine auf der Skala auf 2 (2 mm) bzw. 3 (3 mm) ein. (Siehe nachstehende Tabelle auf Seite 57 und 59.) 2) Drehen Sie die Riemenscheibe, urn die Nadelstange in die unterste Position zu stellen, so dell die Bezugslinie 6 wie in der Abbildung gezeigt ausgerichtet ist. Kontrollieren Sie, ob die Greiferspitze 0 auf die Nadelmitte ausgerichtet ist und ob der Abstand zwischen der oberen Kante des Nadellochs und der Greiferspitze 0 1-1,5 mm betragt. (Fur die Einstellung wird auf die Seite 57 und 59 verwiesen.) 8. Das Maschinenoberteil wieder zuruckstellen. 9. Die Stichplatte anbringen. 10. Den Stoffdriickerfuf3 anbringen. 7. Ragler la quantite de relevement de la barre a aiguille. 1) Regler la longueur de point a 2 (environ 2 mm) ou a 3 (environ 3 mm) sur l'echelle, en fonction du modele et des specifications de la machine. (Se reporter aux tableaux des pages 57 et 59.) 2) Tourner la poulie de machine pour abaisser la barre a aiguille jusqu'a sa position la plus basse, puis regler de maniere que la ligne de reference ICD soit alignee comme indique sur ('illustration. Verifier que l'extremite du crochet rotatif 0 soit alignee avec le centre de l'aiguille et que l'ecart entre le bord superieur de ('orifice d'aiguille et l'extremite du crochet rotatif 0 soit de 1-1,5 mm a ce moment. (Se reporter aux pages 57 et 59 pour ce qui concerne les procedures de reglage.) 8. Remettre Ia tete en place. 9. Fixer Ia plaque a aiguille. 10. Fixer le pied de biche. 7. Ajustar la elevaciOn de la barra de agujas. 1) Ajustar el largo de puntada a 2 (aprox. 2 mm) o 3 (aprox. 3 mm) en la escala, dependiendo del modelo y especificaciones de la maquina. (Consulter los cuadros en la pagina 57 y 59.) 2) Girar la polea de la maquina para mover la barra de agujas a su posici6n inferior y ajustar de manera que la lima de referencia 6 quede alineada de la manera indicada en la figura. Verificar que la punta del cangrejo 0 quede alineada con el centro de la aguja y al mismo tiempo que la distancia desde el borde superior del orificio de aguja a la punta del cangrejo 0 sea 1-1,5 mm. (Consulter las paginas 57 y 59 por el procedimiento de ajuste.) 8. Volver a colocar la cabeza en su position original. 9. Colocar Ia place de agujas. 10. Colocar el prensatelas. - 68 - Model No. LT2-8840 Mark II LT2-8870 Mark II
-
 1
1 -
2
-
3
-
4
-
5
-
6
-
7
-
8
-
9
-
10
-
11
-
12
-
13
-
14
-
15
-
16
-
17
-
18
-
19
-
20
-
21
-
22
-
23
-
24
-
25
-
26
-
27
-
28
-
29
-
30
-
31
-
32
-
33
-
34
-
35
-
36
-
37
-
38
-
39
-
40
-
41
-
42
-
43
-
44
-
45
-
46
-
47
-
48
-
49
-
50
-
51
-
52
-
53
-
54
-
55
-
56
-
57
-
58
-
59
-
60
-
61
-
62
-
63
-
64
-
65
-
66
-
67
-
68
-
69
-
70
-
71
-
72
-
73
-
74
-
75
-
76
-
77
-
 78
78 -
 79
79 -
 80
80 -
 81
81 -
 82
82 -
 83
83 -
 84
84 -
 85
85 -
 86
86 -
 87
87 -
 88
88 -
89
-
90
-
91
-
92
-
93
-
94
-
95
-
96
-
97
-
98
 |
 |
