Brother International MFC 640CW Network Users Manual - English - Page 75
Important Notice, Menu/Set, Stop/Exit, Network I/F, Wired LAN
 |
UPC - 012502614036
View all Brother International MFC 640CW manuals
Add to My Manuals
Save this manual to your list of manuals |
Page 75 highlights
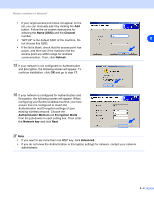
Wireless installation for Windows® 9 Read the Important Notice. For MFC-640CW: Press Menu/Set, 5, 6 on the control panel, and then press ▲ or ▼ to choose Wired LAN. Press Menu/Set. If Reboot OK? is displayed, press 1.Yes. The wireless network 8 interface will become inactive with this setting. The machine will restart automatically. After it restarts, check the box on the screen and click Next. For MFC-820CW: Press Menu on the control panel. Press ▲ or ▼ for LAN and press OK. Press ▲ or ▼ for Network I/F and press OK. Press ▲ or ▼ for Wired LAN and press OK. If Reboot OK? is displayed, press 1 for Yes. The wireless network interface will become inactive with this setting. The machine will restart automatically. After it restarts, check the box on the screen and click Next. If Accepted is displayed, press Stop/Exit. Check the box and click Next. Note It will take approximately one minute for the LAN menu on the LCD to become available after the machine restarts or is turned on. For configuration, you must temporarily connect your Brother wireless device directly to a free port on your access point, hub or router using a network cable. When the following screen appears, open the scanner cover to its open position. Insert the network cable to the access point and then to the machine. You will find the LAN socket above and to the left of the ink cartridge slots, as shown. Click Next and go to step 13. 8 - 4
-
 1
1 -
2
-
3
-
4
-
5
-
6
-
7
-
8
-
9
-
10
-
11
-
12
-
13
-
14
-
15
-
16
-
17
-
18
-
19
-
20
-
21
-
22
-
23
-
24
-
25
-
26
-
27
-
28
-
29
-
30
-
31
-
32
-
33
-
34
-
35
-
36
-
37
-
38
-
39
-
40
-
41
-
42
-
43
-
44
-
45
-
46
-
47
-
48
-
49
-
50
-
51
-
52
-
53
-
54
-
55
-
56
-
57
-
58
-
59
-
60
-
61
-
62
-
63
-
64
-
65
-
66
-
67
-
68
-
69
-
 70
70 -
 71
71 -
 72
72 -
 73
73 -
 74
74 -
 75
75 -
 76
76 -
 77
77 -
 78
78 -
 79
79 -
 80
80 -
81
-
82
-
83
-
84
-
85
-
86
-
87
-
88
-
89
-
90
-
91
-
92
-
93
-
94
-
95
-
96
-
97
-
98
-
99
-
100
-
101
-
102
-
103
-
104
-
105
-
106
-
107
-
108
-
109
-
110
-
111
-
112
-
113
-
114
-
115
-
116
-
117
-
118
-
119
-
120
-
121
-
122
-
123
-
124
-
125
-
126
-
127
-
128
-
129
-
130
-
131
-
132
-
133
-
134
-
135
-
136
-
137
-
138
-
139
-
140
-
141
-
142
-
143
-
144
-
145
-
146
-
147
-
148
-
149
-
150
-
151
-
152
-
153
-
154
-
155
-
156
-
157
-
158
-
159
-
160
-
161
-
162
-
163
-
164
 |
 |
