Brother International MFC-J4710DW Network Users Manual - English - Page 28
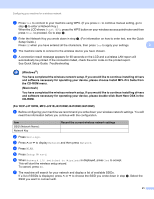
and software necessary for operating your device, please double-click Start Here OSX in
 |
View all Brother International MFC-J4710DW manuals
Add to My Manuals
Save this manual to your list of manuals |
Page 28 highlights
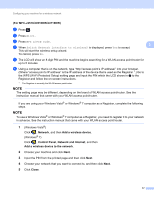
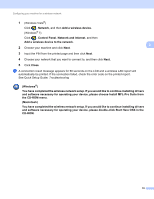
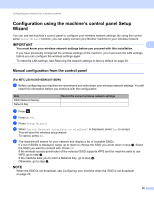
Configuring your machine for a wireless network If the wireless access point/router of the selected SSID supports WPS and the machine asks to use WPS, go to step h. If the machine asks you to enter a Network Key, go to step i. Otherwise, go to step j. NOTE When the SSID is not broadcast, see Configuring your machine when the SSID is not broadcast on page 23. 3 h Press Yes to connect to your machine using WPS. (If you choose No (Manual) to continue manual setting, go to step i to enter a Network Key.) When the LCD shows Start WPS, press the WPS button on your wireless access point/router, and then press Next to proceed. Go to step j. i Enter the Network Key you wrote down in step a. (For information on how to enter text, see the Quick Setup Guide.) Press OK when you have entered all the characters, then press Yes to apply your settings. j The machine starts to connect to the wireless device you have chosen. k A connection result message appears for 60 seconds on the LCD and a wireless LAN report will automatically be printed. If the connection failed, check the error code on the printed report. See Quick Setup Guide: Troubleshooting (Windows®) You have completed the wireless network setup. If you would like to continue installing drivers and software necessary for operating your device, please choose Install MFL-Pro Suite from the CD-ROM menu. (Macintosh) You have completed the wireless network setup. If you would like to continue installing drivers and software necessary for operating your device, please double-click Start Here OSX in the CD-ROM. 22
-
 1
1 -
2
-
3
-
4
-
5
-
6
-
7
-
8
-
9
-
10
-
11
-
12
-
13
-
14
-
15
-
16
-
17
-
18
-
19
-
20
-
21
-
22
-
 23
23 -
 24
24 -
 25
25 -
 26
26 -
 27
27 -
 28
28 -
 29
29 -
 30
30 -
 31
31 -
 32
32 -
 33
33 -
34
-
35
-
36
-
37
-
38
-
39
-
40
-
41
-
42
-
43
-
44
-
45
-
46
-
47
-
48
-
49
-
50
-
51
-
52
-
53
-
54
-
55
-
56
-
57
-
58
-
59
-
60
-
61
-
62
-
63
-
64
-
65
-
66
-
67
-
68
-
69
-
70
-
71
-
72
-
73
-
74
-
75
-
76
-
77
-
78
-
79
-
80
-
81
-
82
-
83
-
84
-
85
-
86
-
87
-
88
-
89
-
90
-
91
-
92
-
93
-
94
-
95
-
96
-
97
-
98
-
99
-
100
-
101
-
102
-
103
-
104
-
105
-
106
-
107
-
108
-
109
-
110
 |
 |