Brother International MFC-J895DW Reference Guide - Page 24
Paper Size, Mismatch, Paper Tray not, detected, Repetitive No, Paper Fed, Replace Ink
 |
View all Brother International MFC-J895DW manuals
Add to My Manuals
Save this manual to your list of manuals |
Page 24 highlights
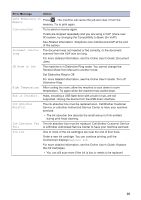
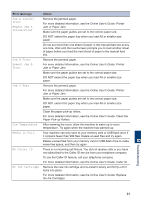
Error Message Action Paper Size Mismatch 1. Check that the paper size you selected on the machine's display matches the size of the paper in the tray. For more detailed information, see the Online User's Guide: Change the Paper Size and Paper Type. 2. Make sure you loaded the paper in the correct orientation and set the paper guides at the indicators for your paper size. For more detailed information, see the Online User's Guide: Load Paper. 3. After you have checked the paper size and the paper orientation, follow the LCD instructions. If printing from your computer, make sure the paper size you selected in the printer driver matches the size of paper in the tray. For more detailed information, see the Online User's Guide: Print Settings (Windows®) or Print Options (Mac). Paper Tray not detected Slowly push the paper tray completely into the machine. Paper or a foreign object has prevented the paper tray from being inserted correctly. Pull the paper tray out of the machine, and remove the jammed paper or foreign object. If you cannot find or remove the jammed paper, see the Online User's Guide: Printer Jam or Paper Jam. Repetitive No Paper Fed Clean the paper pick-up rollers. For more detailed information, see the Online User's Guide: Clean the Paper Pick-up Rollers. The photo bypass tray is in the wrong position. Return the photo bypass tray to the Normal printing position when you use cut sheet paper. Replace Ink One or more of the ink cartridges have reached the end of their lives. Replace the ink cartridges. For more detailed information, see the Online User's Guide: Replace the Ink Cartridges. • You can still scan even if the ink is low or needs to be replaced. Touchscreen Init. The touchscreen was pressed before the power on initialization was Failed completed. Make sure nothing is touching or resting on the touchscreen, especially when plugging the machine in. Debris may be stuck between the lower part of the touchscreen and its frame. Insert a piece of stiff paper between the lower part of the touchscreen and its frame and slide it back and forth to push out the debris. B Troubleshooting 23
-
 1
1 -
2
-
3
-
4
-
5
-
6
-
7
-
8
-
9
-
10
-
11
-
12
-
13
-
14
-
15
-
16
-
17
-
18
-
 19
19 -
 20
20 -
 21
21 -
 22
22 -
 23
23 -
 24
24 -
 25
25 -
 26
26 -
 27
27
 |
 |
