Brother International MFC-L8850CDW Advanced Users Guide
Brother International MFC-L8850CDW Manual
 |
View all Brother International MFC-L8850CDW manuals
Add to My Manuals
Save this manual to your list of manuals |
Brother International MFC-L8850CDW manual content summary:
- Brother International MFC-L8850CDW | Advanced Users Guide - Page 1
Advanced User's Guide MFC-L8600CDW MFC-L8850CDW MFC-L9550CDW Not all models are available in all countries. Version 0 USA/CAN - Brother International MFC-L8850CDW | Advanced Users Guide - Page 2
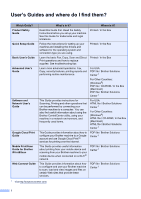
? Which Guide? Product Safety Guide Quick Setup Guide Basic User's Guide Advanced User's Guide Software and Network User's Guide Google Cloud Print Guide Mobile Print/Scan Guide for Brother iPrint&Scan Web Connect Guide What's in it? Read this Guide first. Read the Safety Instructions before you - Brother International MFC-L8850CDW | Advanced Users Guide - Page 3
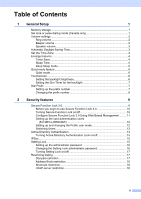
Setup 1 Memory storage...1 Set tone or pulse dialing mode (Canada only 1 Volume settings ...2 Ring volume...2 Beeper volume 2 Speaker volume 3 Automatic Daylight Saving Time 3 Set the Time Zone 4 Ecology features ...4 Toner the card authentication users (For MFC-L9550CDW 12 Setting up and - Brother International MFC-L8850CDW | Advanced Users Guide - Page 4
sending options 19 Sending faxes using multiple settings 19 Changing a 2-sided fax layout (MFC-L8850CDW and MFC-L9550CDW).....20 Contrast ...21 Changing Fax Resolution 21 Additional sending operations 22 Sending a fax manually 22 Sending a fax at the end of a conversation 22 Dual access 23 - Brother International MFC-L8850CDW | Advanced Users Guide - Page 5
5 Dialing and storing numbers 42 Telephone line services 42 Tone or Pulse (Canada only 42 1 ID Copy 59 Adjusting the Color Saturation 60 Making 2-sided N in 1 copies (MFC-L8850CDW and MFC-L9550CDW)...... 60 Removing Background Color 61 Saving copy options as a Shortcut 62 Saving paper 62 - Brother International MFC-L8850CDW | Advanced Users Guide - Page 6
wires 70 Cleaning the drum unit 74 Cleaning the toner cartridges 85 Checking the remaining life of parts 85 Replacing periodic maintenance parts 86 Packing and shipping the machine 87 B Options 90 Options ...90 Optional paper tray (For MFC-L8600CDW and MFC-L8850CDW (LT-320CL)) (For MFC - Brother International MFC-L8850CDW | Advanced Users Guide - Page 7
Setup 1 NOTE • This manual shows the LCD messages of the MFC-L9550CDW unless specified. • Most of the illustrations in this User's Guide show the MFC-L8850CDW 1 Your machine comes set for a Tone dialing service. If you have a Pulse dialing (rotary) service, you need to change the dialing mode. a - Brother International MFC-L8850CDW | Advanced Users Guide - Page 8
a range of ring volume levels, from High to Off. a Press . b Press All Settings. c Swipe up or down, or press a or b to display General Setup. d Press General Setup. e Swipe up or down, or press a or b to display Volume. f Press Volume. g Press Ring. h Press Off, Low, Med or High. i Press . Beeper - Brother International MFC-L8850CDW | Advanced Users Guide - Page 9
of speaker volume levels, from High to Off. a Press . b Press All Settings. c Swipe up or down, or press a or b to display General Setup. d Press General Setup. e Swipe up or down, or press a or b to display Volume. f Press Volume. g Press Speaker. h Press Off, Low, Med or High. i Press . General - Brother International MFC-L8850CDW | Advanced Users Guide - Page 10
lighter. The factory setting is Off. a Press . b Press All Settings. c Swipe up or down, or press a or b to display General Setup. d Press General Setup. e Swipe up or down, or press a or b to display Ecology. f Press Ecology. g Press Toner Save. h Press On or Off. i Press . NOTE We do not recommend - Brother International MFC-L8850CDW | Advanced Users Guide - Page 11
Sleep mode, the Touchscreen backlight turns off. a Press . b Press All Settings. c Swipe up or down, or press a or b to display General Setup. d Press General Setup. e Swipe up or down, or press a or b to display Ecology. f Press Ecology. g Press Sleep Time. h Using the Touchscreen's keyboard, enter - Brother International MFC-L8850CDW | Advanced Users Guide - Page 12
the Touchscreen, try changing the brightness setting. a Press . b Press All Settings. c Swipe up or down, or press a or b to display General Setup. d Press General Setup. e Swipe up or down, or press a or b to display LCD Settings. f Press LCD Settings. g Press Backlight. h Press Light, Med or Dark - Brother International MFC-L8850CDW | Advanced Users Guide - Page 13
on after you go back to your Home screen. a Press . b Press All Settings. c Swipe up or down, or press a or b to display General Setup. d Press General Setup. e Swipe up or down, or press a or b to display LCD Settings. f Press LCD Settings. g Press Dim Timer. h Press Off, 10Secs, 20Secs or 30Secs - Brother International MFC-L8850CDW | Advanced Users Guide - Page 14
Chapter 1 Changing the prefix number 1 a Press . b Press All Settings. c Swipe up or down, or press a or b to display Initial Setup. d Press Initial Setup. e Swipe up or down, or press a or b to display Dial Prefix. f Press Dial Prefix. g Press On (or Off). You can turn off the prefix number - Brother International MFC-L8850CDW | Advanced Users Guide - Page 15
about how to reset the password contact Brother Customer Service. NOTE • Secure Function Lock can be set by using Web Based Management or BRAdmin 2 Professional 3 (Windows® only). • Only administrators can set limitations and make changes for each user. • (For MFC-L9550CDW) Use card - Brother International MFC-L8850CDW | Advanced Users Guide - Page 16
bar (where "machine's IP address" is the IP address of the Brother machine). For example: v192.168.1.2/ NOTE You can find the machine's IP address in the Network Configuration List (see Software and Network User's Guide). c Type an Administrator password in the Login box. (This is a password - Brother International MFC-L8850CDW | Advanced Users Guide - Page 17
web browser. To set up the web page, see Before you begin to use Secure Function Lock 3.0 on page 10. Then follow these steps: 1 For MFC-L9550CDW a Click Administrator. b Click Restricted Functions xx-xx. c Type an alphanumeric Group name (up to 15 characters) in the User List / Restricted Functions - Brother International MFC-L8850CDW | Advanced Users Guide - Page 18
2 Setting up the card authentication users (For MFC-L9550CDW) 2 Before setting up the card authentication do it through Web Based Management or BRAdmin Professional 3 (Windows® only) (see Software and Network User's Guide). a Click Administrator. b Click Restricted Functions xx-xx. c In the Public - Brother International MFC-L8850CDW | Advanced Users Guide - Page 19
displays No Permission or Function Locked when you try to print colored documents. Changing to restricted user mode using the NFC Reader (For MFC-L9550CDW) 2 a Press to return to the Ready screen. 2 b Touch the card to the NFC Reader. c When you have successfully logged in, the Touchscreen - Brother International MFC-L8850CDW | Advanced Users Guide - Page 20
2 Active Directory Authentication restricts the use of the Brother machine. If Active Directory Authentication is enabled, the Windows®). For more information about Active Directory Authentication, see Software and Network User's Guide. Turning Active Directory Authentication Lock on/off 2 a - Brother International MFC-L8850CDW | Advanced Users Guide - Page 21
sent from computers to a printer. Because the data is supports the following operations: IPsec transmissions IPsec settings For more information about IPsec, see Software and Network User's Guide reset the passwords stored in the machine. Contact your administrator or Brother Customer Service - Brother International MFC-L8850CDW | Advanced Users Guide - Page 22
Chapter 2 Setting up the administrator password 2 a Press . b Press All Settings. c Swipe up or down, or press a or b to display General Setup. d Press General Setup. e Swipe up or down, or press a or b to display Setting Lock. f Press Setting Lock. g Enter a four-digit number for the new password - Brother International MFC-L8850CDW | Advanced Users Guide - Page 23
the correct password. Turning Setting Lock on 2 a Press . b Press All Settings. c Swipe up or down, or press a or b to display General Setup. d Press General Setup. e Swipe up or down, or press a or b to display Setting Lock. f Press Setting Lock. g Press Lock OffOn. h Enter the registered four - Brother International MFC-L8850CDW | Advanced Users Guide - Page 24
Chapter 2 Address Book restriction 2 a Press . b Press All Settings. c Swipe up or down, or press a or b to display Fax. d Press Fax. e Swipe up or down, or press a or b to display Dial Restriction. f Press Dial Restriction. g Press Address Book. h Press Enter # Twice, On or Off. i Press . - Brother International MFC-L8850CDW | Advanced Users Guide - Page 25
settings: 2-sided Fax 1 Contrast Fax Resolution Real Time TX Overseas Mode Delayed Fax Batch TX Coverpage Message Coverpage Setup Broadcasting 1 For MFC-L8850CDW and MFC-L9550CDW a Do one of the following: When Fax Preview is set to Off, press (Fax). When Fax Preview is - Brother International MFC-L8850CDW | Advanced Users Guide - Page 26
Chapter 3 Changing a 2-sided fax layout (MFC-L8850CDW and MFC-L9550CDW) 3 You must choose the 2-sided scanning format before you send a 2-sided fax. The format you choose will depend on the layout of your 2-sided - Brother International MFC-L8850CDW | Advanced Users Guide - Page 27
Sending a fax Contrast 3 For most documents the default setting of Auto will give the best results. Auto automatically chooses the appropriate contrast for your document. If your document is very light or very dark, changing the contrast may improve the quality of the fax. Select Dark to make the - Brother International MFC-L8850CDW | Advanced Users Guide - Page 28
Chapter 3 Additional sending operations 3 Sending a fax manually 3 Manual transmission 3 Manual transmission lets you hear the dialing, ringing and fax-receiving tones while sending a Fax Start. If you are using the scanner glass, press Send. d Replace the handset of an external telephone. 22 - Brother International MFC-L8850CDW | Advanced Users Guide - Page 29
fax number. You can include Groups, Address Book numbers and up to 50 manually dialed numbers in the same broadcast. You can broadcast up to 350 different memory before they can be used in a broadcast (see Basic User's Guide). Group numbers must also be stored in the machine's memory before they - Brother International MFC-L8850CDW | Advanced Users Guide - Page 30
an E-mail address, press , enter the E-mail address (see Basic User's Guide), and press OK. g You can add numbers to the broadcast in the Press Add Number and enter a number using the Touchscreen's keyboard (see Basic User's Guide). Press OK. Press Add from Address book. Swipe up or down, or press - Brother International MFC-L8850CDW | Advanced Users Guide - Page 31
Sending a fax Real Time Transmission 3 When you are sending a fax, the machine will scan the document into the memory before sending it. As soon as the telephone line is free, the machine will start dialing and sending. Sometimes, you may want to send an important document immediately without - Brother International MFC-L8850CDW | Advanced Users Guide - Page 32
. a Press . b Press All Settings. c Swipe up or down, or press a or b to display Fax. d Press Fax. e Swipe up or down, or press a or b to display Setup Send. f Press Setup Send. g Press Batch TX. h Press On (or Off). i Press . 26 - Brother International MFC-L8850CDW | Advanced Users Guide - Page 33
. Setting your changes as the new default 3 You can save the fax settings for Fax Resolution, Contrast, Glass Scan Size, Real Time TX, Coverpage Setup and Overseas Mode you use most often by setting them as the default. These settings will stay until you change them again. 3 a Do one of - Brother International MFC-L8850CDW | Advanced Users Guide - Page 34
last setting, swipe up or down, or press a or b to display Factory Reset. d Press Factory Reset. e The Touchscreen asks you to confirm to change back to the factory settings. To help you enter letters, see Basic User's Guide.) Press OK. k Press OK to confirm. 1 For MFC-L8850CDW and MFC-L9550CDW - Brother International MFC-L8850CDW | Advanced Users Guide - Page 35
Send. f Press Setup Send. g Press Coverpage Setting. h Press Coverpage Message. i Press 5. or 6. to store your own comment. j Enter your own comment using the Touchscreen's keyboard. Press OK. Press to choose numbers, letters or special characters (see Basic User's Guide). k Press . 29 - Brother International MFC-L8850CDW | Advanced Users Guide - Page 36
is set to On, press (Fax) and Sending Fax(es). b Press Options. c Swipe up or down, or press a or b to display Coverpage Setup. d Press Coverpage Setup. e Press Coverpage Setup. f Press On. g Press Coverpage Message. h Swipe up or down, or press a or b to choose the comment you want to use, and then - Brother International MFC-L8850CDW | Advanced Users Guide - Page 37
. a Press . b Press All Settings. c Swipe up or down, or press a or b to display Fax. d Press Fax. e Swipe up or down, or press a or b to display Setup Send. f Press Setup Send. g Press Destination. h Press Hidden (or Display). i Press . Sending a fax 3 31 - Brother International MFC-L8850CDW | Advanced Users Guide - Page 38
. f Press Setup Receive. g Swipe up or down, or press a or b to display Memory Receive. h Press Memory Receive. i Press Fax Forward. j Do one of the following: Press Manual to enter the forwarding fax number (up to 20 characters) using the Touchscreen's keyboard (see Basic User's Guide). Press OK - Brother International MFC-L8850CDW | Advanced Users Guide - Page 39
All Settings. c Swipe up or down, or press a or b to display Fax. d Press Fax. e Swipe up or down, or press a or b to display Setup Receive. f Press Setup Receive. g Swipe up or down, or press a or b to display Memory Receive. h Press Memory Receive. i Press Paging. j Enter your cell phone or pager - Brother International MFC-L8850CDW | Advanced Users Guide - Page 40
a or b to display Fax. d Press Fax. e Swipe up or down, or press a or b to display Setup Receive. f Press Setup Receive. g Swipe up or down, or press a or b to display Memory Receive. h Press Memory Receive. i is a power failure before the fax is forwarded or a problem at the receiving machine. 34 - Brother International MFC-L8850CDW | Advanced Users Guide - Page 41
All Settings. c Swipe up or down, or press a or b to display Fax. d Press Fax. e Swipe up or down, or press a or b to display Setup Receive. f Press Setup Receive. g Swipe up or down, or press a or b to display Memory Receive. h Press Memory Receive. i Press Off. NOTE The Touchscreen will give you - Brother International MFC-L8850CDW | Advanced Users Guide - Page 42
your Fax Receive Code (l51) or Telephone Answer Code (#51) (see Basic User's Guide). h Press . NOTE You can change your code at any time. To make your command. e Press 9 0 to reset the machine when you are finished. f Hang up. NOTE • If your machine is set to Manual mode and you want to use the - Brother International MFC-L8850CDW | Advanced Users Guide - Page 43
one long beep, your change has been accepted. 2 Fax/Tel 3 Fax Only 90 Exit Press 9 0 to stop remote retrieval. Wait for the long beep, then replace the handset. 37 - Brother International MFC-L8850CDW | Advanced Users Guide - Page 44
machine. Before you use this feature, you have to turn on Fax Storage or Fax Preview (see Fax Storage on page 34 or Basic User's Guide). a Dial your fax number. b When your machine answers, enter your Remote Access Code (3 digits followed by l). If you hear one long beep, you have messages - Brother International MFC-L8850CDW | Advanced Users Guide - Page 45
the page size of the fax and your Paper Size setting (see Basic User's Guide). a Press . b Press All Settings. c Swipe up or down, or press d Press Fax. e Swipe up or down, or press a or b to display Setup Receive. f Press Setup Receive. g Swipe up or down, or press a or b to display Auto Reduction - Brother International MFC-L8850CDW | Advanced Users Guide - Page 46
Setup Receive. g Swipe up or down, or press a or b to display Fax Rx Stamp. h Press Fax Rx Stamp. i Press On (or Off). j Press . NOTE • Make sure you have set the current date and time on the machine (see Basic User's Guide again. c Press Receive to receive a fax. d Replace the external handset. 40 - Brother International MFC-L8850CDW | Advanced Users Guide - Page 47
during fax reception, the Touchscreen displays No Paper and begins receiving faxes into the machine's memory. Load paper in the paper tray (see Basic User's Guide). Incoming faxes will continue to be stored in the memory until the memory becomes full or paper is loaded in the paper tray. When the - Brother International MFC-L8850CDW | Advanced Users Guide - Page 48
example, for telephone banking), follow these steps. If you have Touch Tone service, you will not need this feature to send tone signals. a Do . When you are finished with the call, the machine will return to the Pulse dialing service. For Fax/Tel mode only 5 When the machine is in Fax/Tel mode, it - Brother International MFC-L8850CDW | Advanced Users Guide - Page 49
Converting telephone wall outlets 5 There are three ways to convert to an RJ11 jack. The first two ways may require assistance from the telephone company. You can change the wall outlets from one RJ14 jack to two RJ11 jacks. Or, you can have an RJ11 wall outlet installed and slave or jump one of the - Brother International MFC-L8850CDW | Advanced Users Guide - Page 50
up as separate Address Book numbers in any combination. You can even include manual dialing using the dial pad (see Basic User's Guide). For example, you might have stored '555' on Address Book: Brother 1 and '7000' on Address Book: Brother 2. You can use them both to dial '555-7000' if you press - Brother International MFC-L8850CDW | Advanced Users Guide - Page 51
you must store each fax number in Address Book (see Basic User's Guide). Then you can include them as numbers in the Group. Each Group uses on page 23.) a Press (Fax). b Press Address Book. c Press Edit. d Press Setup Groups. e Press Name. f Enter the Group name (up to 15 characters) using the - Brother International MFC-L8850CDW | Advanced Users Guide - Page 52
character, press d or c to position the cursor to highlight the incorrect character, and then press . Enter the new character (see Basic User's Guide). i Press OK. j Press . Deleting a Group 5 a Press (Fax). b Press Address Book. c Press Edit. d Press Delete. e Swipe up or down, or press a or - Brother International MFC-L8850CDW | Advanced Users Guide - Page 53
Adding or deleting Group numbers 5 a Press (Fax). b Press Address Book. c Press Edit. d Press Change. e Swipe up or down, or press a or b to display the Group you want. f Press the Group name. g Swipe up or down, or press a or b to display Add/Delete. h Press Add/Delete. i Swipe up or down, or - Brother International MFC-L8850CDW | Advanced Users Guide - Page 54
and the Journal Period. Transmission Verification Report 6 You can use the Transmission Verification Report as proof that you sent a fax (see Basic User's Guide). Fax Journal (Activity Report) 6 You can set the machine to print a journal at specific intervals (every 50 faxes, 6, 12 or 24 hours, or - Brother International MFC-L8850CDW | Advanced Users Guide - Page 55
Settings Prints a list of your current printer settings. 6 Network Configuration Prints a list of your current network settings. 7 Drum Dot Print Prints the Drum Dot Check Sheet to troubleshoot a dotted print problem. 8 WLAN Report Prints the result of wireless LAN connectivity diagnosis. 49 - Brother International MFC-L8850CDW | Advanced Users Guide - Page 56
Chapter 6 How to print a report 6 a Press . b Press All Settings. c Swipe up or down, or press a or b to display Print Reports. d Press Print Reports. e Swipe up or down, or press a or b to display the report you want. f Press the report name. g Do one of the following: If you chose Transmission, - Brother International MFC-L8850CDW | Advanced Users Guide - Page 57
7 Making copies 7 Copy settings 7 You can change the copy settings for the next copy. These settings are temporary. The machine returns to its default settings one minute after copying. Press Copy and then press Options. Swipe up or down, or press a or b to scroll through the copy settings. When - Brother International MFC-L8850CDW | Advanced Users Guide - Page 58
Chapter 7 Enlarging or reducing copies 7 To enlarge or reduce the next copy follow these steps: a Load your document. b Press (Copy). c Enter the number of copies you want. d Press Options. e Swipe up or down, or press a or b to display Enlarge/Reduce. f Press Enlarge/Reduce. g Press 100%, - Brother International MFC-L8850CDW | Advanced Users Guide - Page 59
Long Edge Flip 1 1 2 2 1-sidedi2-sided Short Edge Flip 1 1 2 Landscape 1-sidedi2-sided Long Edge Flip 1 1 2 1-sidedi2-sided Short Edge Flip 1 1 2 2 (MFC-L8850CDW and MFC-L9550CDW) If you want to use the automatic 2-sided copy feature, load your document in the ADF. Portrait 2-sidedi2 - Brother International MFC-L8850CDW | Advanced Users Guide - Page 60
sided 1, 1-sided2-sided Long Edge Flip, 2-sided1-sided Long Edge Flip 1, 1-sided2-sided Short Edge Flip, 2-sided1-sided Short Edge Flip 1 1 MFC-L8850CDW and MFC-L9550CDW h Press the option you want. i If you do not want to change additional settings, press OK. j Press Color Start or Black Start - Brother International MFC-L8850CDW | Advanced Users Guide - Page 61
additional settings, press OK. i Press Color Start or Black Start. NOTE To change the default setting for Tray Use, see Basic User's Guide. Adjusting Density and Contrast 7 Density 7 Adjust the copy density to make copies darker or lighter. a Load your document. b Press (Copy). c Enter the - Brother International MFC-L8850CDW | Advanced Users Guide - Page 62
Chapter 7 Contrast 7 Adjust the contrast to help an image look sharper and more vivid. a Load your document. b Press (Copy). c Enter the number of copies. d Press Options. e Swipe up or down, or press a or b to display Contrast. f Press Contrast. g Press a level of contrast. h If you do not want - Brother International MFC-L8850CDW | Advanced Users Guide - Page 63
Making copies Making N in 1 copies (page layout) 7 You can reduce the amount of paper used when copying by using the N in 1 copy feature. This allows you to copy two or four pages onto one page. If you want to copy both sides of an ID card onto one page, see 2 in 1 ID Copy on page 59. IMPORTANT • - Brother International MFC-L8850CDW | Advanced Users Guide - Page 64
Chapter 7 If you are copying from the scanner glass: 7 Place your document face down in the direction shown in the illustration: 2in1(P) 2in1(L) 4in1(P) 4in1(L) 58 - Brother International MFC-L8850CDW | Advanced Users Guide - Page 65
one page, keeping the original card size. NOTE You can copy an identification card to the extent permitted under applicable laws (see Product Safety Guide). a Place your identification card face down near the left corner of the scanner glass. Making copies j Press Color Start or Black Start. The - Brother International MFC-L8850CDW | Advanced Users Guide - Page 66
the color settings, press . j If you do not want to change additional settings, press OK. k Press Color Start. Making 2-sided N in 1 copies (MFC-L8850CDW and MFC-L9550CDW) 7 When you make 2-sided N in 1 copies from a 2-sided document, you must choose a layout option in 2-sided Copy Page Layout. You - Brother International MFC-L8850CDW | Advanced Users Guide - Page 67
Background Color removes the background color of the document when copying. Using this setting will make the copy clearer to read and may save toner. NOTE This setting is for use only when making color copies. a Load your document. b Press (Copy). c Enter the number of copies. d Press Options - Brother International MFC-L8850CDW | Advanced Users Guide - Page 68
a Shortcut. i Enter a name for the Shortcut using the Touchscreen's keyboard. (To help you enter letters, see Basic User's Guide.) Press OK. j Press OK to save your Shortcut. 1 MFC-L8850CDW and MFC-L9550CDW Saving paper 7 You can use the Paper Save preset to reduce the amount of paper consumed for - Brother International MFC-L8850CDW | Advanced Users Guide - Page 69
with a dry, lint-free cloth. When you replace the toner cartridge or the drum unit, make sure you clean the inside of the machine. If printed pages are stained with toner, clean the inside of the machine with a shock. Instead, use only a dry, lint-free cloth. (See Product Safety Guide.) 63 - Brother International MFC-L8850CDW | Advanced Users Guide - Page 70
Cleaning the outside of the machine A IMPORTANT DO NOT use any type of liquid cleaners (including ethanol). Clean the Touchscreen as follows: a Press and hold down machine. to turn off the b Clean the Touchscreen with a dry, soft lint-free cloth. b Wipe the outside of the machine with a dry, - Brother International MFC-L8850CDW | Advanced Users Guide - Page 71
to turn on the machine. Routine maintenance Cleaning the scanner A a Press and hold down machine. to turn off the b (MFC-L8850CDW and MFC-L9550CDW) Unfold the ADF document support (1) and then open the ADF cover (2). Clean the white bar (3) and the scanner glass strip (4) underneath it with - Brother International MFC-L8850CDW | Advanced Users Guide - Page 72
c Lift the document cover (1). Clean the white plastic surface (2) and scanner glass (3) underneath it with a soft lint-free cloth moistened with water. 1 2 e Close the document cover. f Press to turn on the machine. 3 d In the ADF unit, clean the white bar (1) and the scanner glass strip (2) - Brother International MFC-L8850CDW | Advanced Users Guide - Page 73
Cleaning the laser scanner windows A a Press and hold down machine. to turn off the b Press the front cover release button and pull open the front cover. Routine maintenance c Hold the blue handle of the drum unit. Pull the drum unit out until it stops. A 67 - Brother International MFC-L8850CDW | Advanced Users Guide - Page 74
unit and remove it from the machine. 1 IMPORTANT • We recommend that you place the drum unit on a clean, flat surface with a sheet of disposable paper or cloth underneath it in case you accidentally spill or scatter toner. • To prevent damage to the machine from static electricity, DO NOT touch the - Brother International MFC-L8850CDW | Advanced Users Guide - Page 75
e Wipe the four scanner windows (1) with a dry, lint-free cloth. Routine maintenance g Gently slide the drum unit into the machine until it stops at the blue lock lever. 1 2 2 2 2 1 f Make sure the blue lock lever (1) is in the release position as shown - Brother International MFC-L8850CDW | Advanced Users Guide - Page 76
unit in until it stops. Cleaning the corona wires A If you have print quality problems or the Touchscreen displays Drum !, clean the corona wires as follows: a Make sure that the machine is turned on. b Press the front cover release button and pull open the front - Brother International MFC-L8850CDW | Advanced Users Guide - Page 77
cartridge and gently push it toward the machine to unlock it. Then pull it out of the drum unit. Repeat this for all the toner cartridges. IMPORTANT A • We recommend that you place the toner cartridges on a clean, flat surface with a sheet of disposable paper or cloth underneath it in case you - Brother International MFC-L8850CDW | Advanced Users Guide - Page 78
drum to clean only the corona wire of the color that caused the print quality problem, see the illustration below to identify the position of each of the corona wires BK: Black toner position label C: Cyan toner position label M: Magenta toner position label Y: Yellow toner position label The - Brother International MFC-L8850CDW | Advanced Users Guide - Page 79
toward you until you hear it lock into place. Make sure that you match the toner cartridge color to the same color label on the drum unit. Repeat this for all the toner cartridges. Routine maintenance h Push the drum unit in until it stops. A BK BK C M Y BK TN-BK TN-C TN-M TN-Y i Close the - Brother International MFC-L8850CDW | Advanced Users Guide - Page 80
has black or white dots or other repeating marks at 3.7 in. (94 mm) intervals, the drum may have foreign material, such as glue from a label, stuck on the drum surface. Follow these steps to solve the problem: a Make sure the machine is in the Ready mode. b Press . c Press All Settings. d Swipe up - Brother International MFC-L8850CDW | Advanced Users Guide - Page 81
l Hold the blue handle of the drum unit. Pull the drum unit out until it stops. Routine maintenance m Turn the blue lock lever (1) at the left of the machine counterclockwise to the release position. Holding the blue handles of the drum unit, lift the front of the drum unit and remove it from the - Brother International MFC-L8850CDW | Advanced Users Guide - Page 82
cartridge and gently push it forward to unlock it. Then pull it out of the drum unit. Repeat this for all the toner cartridges. IMPORTANT • We recommend that you place the toner cartridges on a clean, flat surface with a sheet of disposable paper or cloth underneath it in case you accidentally - Brother International MFC-L8850CDW | Advanced Users Guide - Page 83
, DO NOT touch the shaded parts shown in the illustrations. p Read following information from the drum dot check sheet. Dot color problem: The color of printed dots is the color of the drum you should clean. Dot location: The sheet has eight numbered columns. The number of the column with - Brother International MFC-L8850CDW | Advanced Users Guide - Page 84
area identified in step q for any marks or scratches. C BK Y M IMPORTANT • To avoid print quality problems, DO NOT touch the surface of the drum unit with your bare hands. • Handle the drum unit gear carefully. • The drum is photosensitive so DO NOT touch it with your fingers. • DO NOT clean the - Brother International MFC-L8850CDW | Advanced Users Guide - Page 85
it toward you until you hear it locks into place. Make sure that you match the toner cartridge color to the same color label on the drum unit. Repeat this for all the toner cartridges. t Turn the drum unit over by holding the blue handles. BK BK C M Y BK TN-BK TN-C TN-M TN-Y A BK - Brother International MFC-L8850CDW | Advanced Users Guide - Page 86
the release position as shown in the illustration. x Turn the blue lock lever (1) clockwise to the lock position. 2 2 2 1 1 y Push the drum unit in until it stops. w Gently slide the drum unit into the machine until it stops at the blue lock lever. 1 2 z Close the front cover and turn on the - Brother International MFC-L8850CDW | Advanced Users Guide - Page 87
-up rollers A Cleaning the paper pick-up roller periodically may prevent paper jams by insuring the proper feeding of paper. If you have paper feed problems, clean the pick-up rollers as follows: a Press and hold down machine. to turn off the b Pull the paper tray completely out of the machine - Brother International MFC-L8850CDW | Advanced Users Guide - Page 88
f Press . You can reset the calibration parameters back to those set at the factory. a Press . b Press Calibration. c Press Reset. d Press Yes to factory settings are on (see Software and Network User's Guide). • If you are using the Macintosh printer driver, you must perform the calibration - Brother International MFC-L8850CDW | Advanced Users Guide - Page 89
or yellow fringes, you can use the auto-registration feature to correct the problem. a Press . b Press Registration. c Press Yes to confirm. d consumes some of the toner. a Press . b Press All Settings. c Swipe up or down, or press a or b to display Printer. d Press Printer. e Swipe up or - Brother International MFC-L8850CDW | Advanced Users Guide - Page 90
Printing the Test Print A You can print a Test Print page to check your print quality. a Press . b Press Test Print. c The Touchsceen displays Press [OK]. Press OK. The machine will print the Test Print page. d Press . Checking the Page Counters A You can see the machine's Page Counters for - Brother International MFC-L8850CDW | Advanced Users Guide - Page 91
a or b to see the approximate remaining parts life of the Drum, Belt Unit, Fuser, Laser Unit, PF Kit MP, PF Kit 1 and PF reset the part counter when you install a new part. It will not be accurate if a part's life counter is reset during the life of the used part. • The remaining life of the toner - Brother International MFC-L8850CDW | Advanced Users Guide - Page 92
pages 1 for PF Kit 1, PF Kit 2 2, Fuser and Laser. Contact Brother Customer Service when these messages appear on the Touchscreen. Touchscreen message Description Replace Fuser Replace the fuser unit. Replace Laser Replace the laser unit. Replace PF Kit1 Replace the paper feeding kit for the - Brother International MFC-L8850CDW | Advanced Users Guide - Page 93
to avoid any damage during transit. The machine should be adequately insured with the carrier. • Unless you are returning the machine as part of the Brother Exchange Service, leave the toner cartridges and drum unit inside the machine when you pack and ship it. 87 - Brother International MFC-L8850CDW | Advanced Users Guide - Page 94
the illustration. FRONT LEFT 3 1 2 RIGHT NOTE If you are returning your machine to Brother as part of the Exchange Service, pack only the machine. Keep all separate parts, including the drum unit, toner cartridge, and printed materials to use with your 'Exchange' machine. f Close the carton and - Brother International MFC-L8850CDW | Advanced Users Guide - Page 95
g Repack the lower tray as shown in the illustration. Routine maintenance A 89 - Brother International MFC-L8850CDW | Advanced Users Guide - Page 96
B Options B Options B This machine has the following optional accessories. You can increase the capabilities of the machine with these items. Lower tray unit (For MFC-L8600CDW and MFC-L8850CDW) LT-320CL (For MFC-L9550CDW) LT-325CL SO-DIMM memory 90 - Brother International MFC-L8850CDW | Advanced Users Guide - Page 97
MFC-L8600CDW, MFC-L8850CDW and MFC-L9550CDW, and it can hold up to 500 sheets of 20 lb (80 g/m2) paper. When an optional tray is installed, the machine can hold up to 800 sheets of plain paper. For setup, see the instructions Brother machine please visit: http://www.brother-usa.com/support/memory - Brother International MFC-L8850CDW | Advanced Users Guide - Page 98
Installing extra memory B a Turn off the machine's power switch. Unplug the telephone line cord. b Disconnect the interface cable from the machine, and then unplug the power cord from the AC power outlet. NOTE Be sure to turn off the machine's power switch before you install or remove the SO-DIMM. - Brother International MFC-L8850CDW | Advanced Users Guide - Page 99
g Plug the machine's power cord back into the AC power outlet first, and then connect the interface cable. h Plug in the telephone line cord. Turn on the machine's power switch. NOTE To make sure that you have installed the SO-DIMM correctly, you can print the User Settings List that shows the - Brother International MFC-L8850CDW | Advanced Users Guide - Page 100
a comprehensive list of features and terms that appear in Brother manuals. Availability of these features depends on the model you purchased to tell the receiving machine that a fax machine is calling. Caller ID A service purchased from the telephone company that lets you see the number (or name) of - Brother International MFC-L8850CDW | Advanced Users Guide - Page 101
service purchased from the telephone company that gives you another telephone number on an existing telephone line. The Brother on demand without interrupting the cycle. Manual fax When you press Hook to hear PaperPort™ 12 SE or Presto! PageManager software application converts an image of text to - Brother International MFC-L8850CDW | Advanced Users Guide - Page 102
of a paper document into your computer. Search An alphabetical electronic listing of stored Address Book and Group numbers. Settings Tables At-a-glance instructions that show all the settings and options that are available for setting up your machine. Station ID The stored information that appears - Brother International MFC-L8850CDW | Advanced Users Guide - Page 103
Transmission The process of sending faxes over the telephone lines from your machine to the receiving fax machine. Transmission Verification Report A report for each transmission, that shows its date, time and number. User Settings List A printed report that shows the current settings of the machine - Brother International MFC-L8850CDW | Advanced Users Guide - Page 104
receive options 35 Cleaning corona wires 70 drum unit 74 scanner 65 Connecting two-line external TAD or telephone .......43 ControlCenter2 (for Macintosh) See Software and Network User's Guide. ControlCenter4 (for Windows®) See Software and Network User's Guide. Copy 2 in 1 ID Copy 59 2-sided - Brother International MFC-L8850CDW | Advanced Users Guide - Page 105
Machine information checking remaining life of parts 85 page counts 84 Macintosh See Software and Network User's Guide. Maintenance, routine 63 checking the remaining life of parts ...... 85 Manual transmission 22 Memory adding DIMM (option 91 installing 92 storage 1 N N in 1 (page layout - Brother International MFC-L8850CDW | Advanced Users Guide - Page 106
code 36 commands 37 getting your faxes 38 Remote setup See Software and Network User's Guide. Reports 48, 49 Address Book 49 Drum Dot Print 49 Fax Journal 48, 49 journal period 48 how to print 50 Network Configuration 49 Printer Setttings 49 Transmission Verification 48 User Settings 49 - Brother International MFC-L8850CDW | Advanced Users Guide - Page 107
copy settings 51 Toner Save 4 Touchscreen backlight brightness 6 Two-line telephone system 42, 43 V Volume, setting beeper 2 ring 2 speaker 3 W Warranties are in the box Windows® See Software and Network User's Guide. Wireless Network See Quick Setup Guide and Software and Network User - Brother International MFC-L8850CDW | Advanced Users Guide - Page 108
tel de Ville, Dollard-des-Ormeaux, QC, Canada H9B 3H6 Visit us on the World Wide Web http://www.brother.com/ These machines are approved for use in the country of purchase only. Local Brother companies or their dealers will only support machines purchased in their own countries. www.brotherearth.com
-
 1
1 -
 2
2 -
 3
3 -
 4
4 -
 5
5 -
 6
6 -
 7
7 -
8
-
9
-
10
-
11
-
12
-
13
-
14
-
15
-
16
-
17
-
18
-
19
-
20
-
21
-
22
-
23
-
24
-
25
-
26
-
27
-
28
-
29
-
30
-
31
-
32
-
33
-
34
-
35
-
36
-
37
-
38
-
39
-
40
-
41
-
42
-
43
-
44
-
45
-
46
-
47
-
48
-
49
-
50
-
51
-
52
-
53
-
54
-
55
-
56
-
57
-
58
-
59
-
60
-
61
-
62
-
63
-
64
-
65
-
66
-
67
-
68
-
69
-
70
-
71
-
72
-
73
-
74
-
75
-
76
-
77
-
78
-
79
-
80
-
81
-
82
-
83
-
84
-
85
-
86
-
87
-
88
-
89
-
90
-
91
-
92
-
93
-
94
-
95
-
96
-
97
-
98
-
99
-
100
-
101
-
102
-
103
-
104
-
105
-
106
-
107
-
108
 |
 |

Advanced User’s Guide
MFC-L8600CDW
MFC-L8850CDW
MFC-L9550CDW
Not all models are available in all countries.
Version 0
USA/CAN