Brother International PE-DESIGN Ver.4 3 2 PE-DESIGN Ver.3.0 CD-BOOK - Page 11
Using the Tab-key
 |
View all Brother International PE-DESIGN Ver.4 3 2 manuals
Add to My Manuals
Save this manual to your list of manuals |
Page 11 highlights
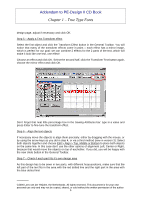
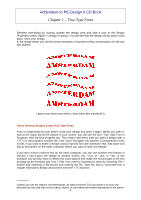
Addendum to PE-Design II CD Book Chapter 3 - Using the Tab-key CHAPTER 3 - Using the Tab Key This chapter will show you how to use the Tab key of your keyboard to quickly select the various objects in the order they were digitized and to change the sewing order or position. Exercise 4 - Using the Tab Key Step 1 - Open a design and import another design Open the design you made in the previous exercises and import another design, via File - Import from File, select the file-format to show "All Files" and select drive and folder where the desired design is located. (In this example I used a design from Embroidery Card no. 12 - Transport). Click Import. The imported design is placed in the center of the design page, on top of the other objects digitized before. Step 2 - Set the imported design to sew first While this design is still selected, set it to sew first by clicking the Sew First button in the General Toolbar (see image above, red oval). I resized this design to 80% (via Edit > Numerical Setting > Size > 80%). This will not change the stitch count, but since this is only a rescaling of 20% the design will sew out fine. Step 3 - Use the tab key to select and move each object Sometimes you will notice that design parts are hard to select, because they are covered by other parts. Not with the version 3 anymore: Activate the Select tool and use the tab-key to 2000 Loes van der Heijden, the Netherlands. All rights reserved. This document is for your own personal use only and may not be copied, shared, or sold without the written permission of the author 10
-
 1
1 -
2
-
3
-
4
-
5
-
 6
6 -
 7
7 -
 8
8 -
 9
9 -
 10
10 -
 11
11 -
 12
12 -
 13
13 -
 14
14 -
 15
15 -
 16
16
 |
 |
