Brother International PE-DESIGN Ver.4 3 2 PE-DESIGN Ver.3.0 CD-BOOK - Page 9
Two, text objects to path
 |
View all Brother International PE-DESIGN Ver.4 3 2 manuals
Add to My Manuals
Save this manual to your list of manuals |
Page 9 highlights
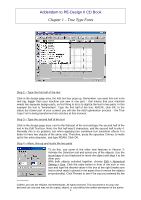
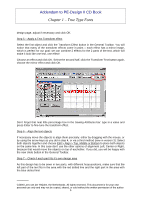
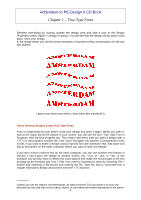
Addendum to PE-Design II CD Book Chapter 2 -Two text objects to path CHAPTER 2 - Two Text Objects to Path This chapter will teach you how to create a large text design, set on a path, for the jumbohoop. This text is, like in the first exercise, also larger than the embroidery area of your machine and has to be sewn in two parts. So, first thing to do is to let your computer know this text consists of two parts by... yep, digitizing it as two separate text objects. At the end of this chapter you will find an exercise to use the vertical text-alignment, also new in this version 3 of the software. Exercise 2 - Fit two text objects to Path Step 1 - Digitize the text objects Click the A-button in the Tool Box, select a color and font of your choice (I used font no. 35) and click in the design page. In this example the text is "Come and Join Sail 2000". Type the first half of the text "Come and Join", click OK. Click in the design page next to the first half, type "Sail 2000" and click OK. Step 2 - Digitize the path Activate the Curve tool, select Open Path, and turn both Line Sew and Region Sew buttons "off". Draw the path for the text with a few clicks. Step 3 - Fit the first text to path Select the first text object, hold down shift and select the path, click the button Fit Text to Path, choose the left alignment in the box "Horizontal Alignment" (ABC ) and click OK. Step 4 - Copy the path for the second text object Deselect the text by clicking outside the design page and select the path only. Copy the path by clicking the Copy-button in the general Toolbar and paste it by clicking the Paste 2 button. An exact copy is placed precisely on top of the original. _________ ©2000 Loes van der Heijden, the Netherlands. All rights reserved. This document is for your own personal use only and may not be copied, shared, or sold without the written permission of the author 8
-
 1
1 -
2
-
3
-
 4
4 -
 5
5 -
 6
6 -
 7
7 -
 8
8 -
 9
9 -
 10
10 -
 11
11 -
 12
12 -
 13
13 -
 14
14 -
15
-
16
 |
 |
