Brother International PE-DESIGN Ver.4 3 2 PE-DESIGN Ver.3.0 CD-BOOK - Page 12
on the Internet to digitize the anchor. Resized it and done
 |
View all Brother International PE-DESIGN Ver.4 3 2 manuals
Add to My Manuals
Save this manual to your list of manuals |
Page 12 highlights
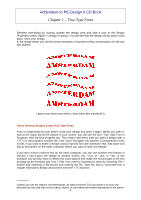
Addendum to PE-Design II CD Book Chapter 3 - Using the Tab-key toggle through the various digitized parts, in the sewing order. Check the Sewing Attributes bar to see if the selected part is the one you want to change (move, or set to sew first or last, etc.). The text objects AMSTE and RDAM have to move up, to prevent double layers of stitches. So press the Tab key of your keyboard till you see the first text object selected AMSTE (text attribute settings in the Sewing Attributes bar are visible). Use the arrows of your keyboard to move the text to the top of the design page. Press the tab key again and move the next text object RDAM to the top. Zoom in for better precision. Press the tab key again. This will select the text Come and Join, set to the first path. You will notice that you cannot move this text. To move this text object, you have to select the path, so press the tab key again till the path is selected (Sewing Attributes bar shows only "Open Path", no line color or stitches). Use the arrow keys to move this object to the bottom of the design page - the text will move, together with the path. Press the tab key again till the path of the text Sail 2000 is selected and use the arrow keys to move text and path together to lign up with the first path. Step 4 - The finishing touch As a last object I used a True Type Font called GE Nautica (a so called dingbat font I found on the Internet) to digitize the anchor. Resized it and done! That's it, you just finished a nice logo for a major event taking place in Amsterdam in the second half of August. So, if you want to see the most beautiful Tall Ships of the world, Amsterdam is the place to be in August 2000 J (about copyrights and stuff: this is not the official logo of the Sail2000 event - this logo is just my imagination). The new Realistic Preview in the software is awesome. You can see what the design will look like when it's embroidered. You can even change the Preview settings while you're in this Realistic Preview mode via the menu Display > Realistic Preview Attribute Setting (this option is grayed out when you're in normal design mode 2000 Loes van der Heijden, the Netherlands. All rights reserved. This document is for your own personal use only and may not be copied, shared, or sold without the written permission of the author 11
-
 1
1 -
2
-
3
-
4
-
5
-
6
-
 7
7 -
 8
8 -
 9
9 -
 10
10 -
 11
11 -
 12
12 -
 13
13 -
 14
14 -
 15
15 -
 16
16
 |
 |
