Brother International PE535 Operation Manual - Page 18
pressed and the machine starts.
 |
View all Brother International PE535 manuals
Add to My Manuals
Save this manual to your list of manuals |
Page 18 highlights
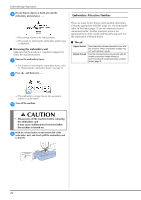
Upper Threading Press . g The screen changes, and all keys and operation buttons are locked (except ). • If the needle threader cannot be used, insert the thread through the eye of the needle from front to back by hand. At this time, be sure to lock all keys and operation buttons described in step g. CAUTION • When threading the needle, be sure to press on the operation panel to lock all keys and buttons, otherwise injuries may occur if the "Start/Stop" button or any other button is pressed and the machine starts. Pass the thread through the thread channel in the order h shown below. Pull the end of the thread, which has been passed l through the needle bar thread guide, to the left, then pass the thread through the notch of the threader thread guide, and then firmly pull the thread from the front and insert it into the slit of the threader thread guide disk marked "7" all the way. Make sure that the thread is passed into the thread i take-up lever as shown below. 21 1 Notch of the threader thread guide 2 Threader thread guide disk Cut the thread with the thread cutter on the left side of m the machine. Slide the thread behind the needle bar thread guide. j The thread can easily be slid behind the needle bar thread guide by holding the thread in your left hand, then feeding the thread with your right hand, as shown. Make sure that the thread is passed through to the left of the tab of the needle bar thread guide. 1 Needle bar thread 2 guide 2 Tab Note • If the thread is pulled through and cannot be cut correctly, lower the presser foot lever so that the thread is held in place before cutting the thread. If this operation is performed, proceed to step o. • When using thread that quickly winds off the spool, such as metallic thread, it may be difficult to thread the needle if the thread is cut. Therefore, instead of using the thread cutter, pull out about 8 cm (approx. 3 inches) of thread after passing it through the threader thread guide disk (marked "7"). Lower the presser foot lever to lower the presser foot. n 1 Check that the needle and thread are compatible with k the needle threader. If they are compatible, continue with the next step. • The needle threader can be used with machine needles 75/11 through 90/14. • When thread such as metallic thread or specialty threads are used, it is not recommended to use the needle threader. 16
-
 1
1 -
2
-
3
-
4
-
5
-
6
-
7
-
8
-
9
-
10
-
11
-
12
-
 13
13 -
 14
14 -
 15
15 -
 16
16 -
 17
17 -
 18
18 -
 19
19 -
 20
20 -
 21
21 -
 22
22 -
 23
23 -
24
-
25
-
26
-
27
-
28
-
29
-
30
-
31
-
32
-
33
-
34
-
35
-
36
-
37
-
38
-
39
-
40
-
41
-
42
-
43
-
44
-
45
-
46
-
47
-
48
-
49
-
50
-
51
-
52
 |
 |
