Brother International PE535 Operation Manual - Page 42
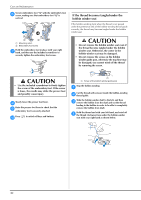
If the thread becomes tangled under the, bobbin winder seat
 |
View all Brother International PE535 manuals
Add to My Manuals
Save this manual to your list of manuals |
Page 42 highlights
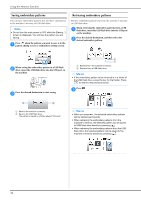
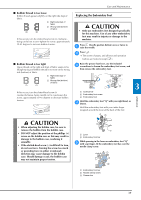
Care and Maintenance Secure embroidery foot "Q" with the embroidery foot f screw, making sure that embroidery foot "Q" is vertical. If the thread becomes tangled under the bobbin winder seat If the bobbin winding starts when the thread is not passed under the pretension disk of the bobbin-winding thread guide correctly, the thread may become tangled under the bobbin winder seat. a b 1 Mounting notch 2 Embroidery foot screw Hold the embroidery foot in place with your right g hand, and then use the included screwdriver to securely tighten the embroidery foot screw. CAUTION • Do not remove the bobbin winder seat even if the thread become tangled under the bobbin winder seat. Otherwise, the cutter in the bobbin winder seat may be damaged. • Do not remove the screw on the bobbin winder guide post, otherwise the machine may be damaged; you cannot wind off the thread by removing the screw. CAUTION • Use the included screwdriver to firmly tighten the screw of the embroidery foot. If the screw is loose, the needle may strike the presser foot and possibly cause injury. Slowly lower the presser foot lever. h Raise the presser foot lever to check that the i embroidery foot is securely attached. Press j to unlock all keys and buttons. a 1 Screw of the bobbin winder guide post Stop the bobbin winding. a Cut the thread with scissors beside the bobbin-winding b thread guide. Slide the bobbin winder shaft to the left, and then c remove the bobbin from the shaft and cut the thread leading to the bobbin in order to be able to completely remove the bobbin from shaft. Hold the thread end with your left hand, and wind off d the thread clockwise from under the bobbin winder seat with your right hand as shown below. 40
-
 1
1 -
2
-
3
-
4
-
5
-
6
-
7
-
8
-
9
-
10
-
11
-
12
-
13
-
14
-
15
-
16
-
17
-
18
-
19
-
20
-
21
-
22
-
23
-
24
-
25
-
26
-
27
-
28
-
29
-
30
-
31
-
32
-
33
-
34
-
35
-
36
-
 37
37 -
 38
38 -
 39
39 -
 40
40 -
 41
41 -
 42
42 -
 43
43 -
 44
44 -
 45
45 -
 46
46 -
 47
47 -
48
-
49
-
50
-
51
-
52
 |
 |
