Brother International PE535 Operation Manual - Page 41
Replacing the Embroidery Foot
 |
View all Brother International PE535 manuals
Add to My Manuals
Save this manual to your list of manuals |
Page 41 highlights
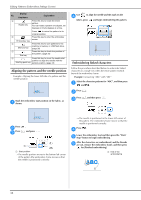
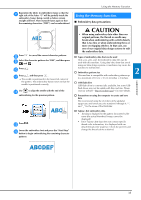
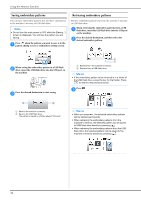
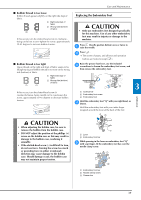
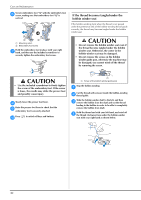
■ Bobbin thread is too loose Bobbin thread appears slightly on the right side (top) of fabric. 1 Right side (top) of fabric 2 Wrong side (bottom) of fabric If this occurs, turn the slotted-head screw (-) clockwise, being careful not to over-tighten the screw, approximately 30-45 degrees to increase bobbin tension. ■ Bobbin thread is too tight Upper thread on the right side (top) of fabric seems to be lifting/looping and bobbin thread is not seen on the wrong side (bottom) of fabric. 1 Right side (top) of fabric 2 Wrong side (bottom) of fabric If this occurs, turn the slotted-head screw (-) counterclockwise, being careful not to over-loosen the screw, approximately 30-45 degrees to decrease bobbin tension. Care and Maintenance Replacing the Embroidery Foot CAUTION • Only use embroidery feet designed specifically for this machine. Use of any other embroidery foot may result in injuries or damage to the machine. Press (Needle position button) once or twice to a raise the needle. Press . b The screen changes, and all keys and operation buttons are locked (except ). Raise the presser foot lever, use the included c screwdriver to loosen the embroidery foot screw, and then remove the embroidery foot. ab c 1 Screwdriver 2 Embroidery foot screw 3 Embroidery foot Hold the embroidery foot "Q" with your right hand, as d shown. Hold the embroidery foot with your index finger wrapped around the lever at the back of the foot. b APPENDIX 3 CAUTION • When adjusting the bobbin case, be sure to remove the bobbin from the bobbin case. • DO NOT adjust the position of the phillips (+) screw on the bobbin case as this may result in damage to the bobbin case, rendering it unusable. • If the slotted-head screw (-) is difficult to turn, do not use force. Turning the screw too much or providing force in either (rotational) direction may cause damage to the bobbin case. Should damage occur, the bobbin case may not maintain proper tension. a 1 Lever 2 Embroidery foot bar While pressing in the lever on embroidery foot "Q" e with your finger, fit the embroidery foot bar over the needle clamp screw. a b c 1 Embroidery foot bar 2 Needle clamp screw 3 Presser bar 39
-
 1
1 -
2
-
3
-
4
-
5
-
6
-
7
-
8
-
9
-
10
-
11
-
12
-
13
-
14
-
15
-
16
-
17
-
18
-
19
-
20
-
21
-
22
-
23
-
24
-
25
-
26
-
27
-
28
-
29
-
30
-
31
-
32
-
33
-
34
-
35
-
 36
36 -
 37
37 -
 38
38 -
 39
39 -
 40
40 -
 41
41 -
 42
42 -
 43
43 -
 44
44 -
 45
45 -
 46
46 -
47
-
48
-
49
-
50
-
51
-
52
 |
 |
