Brother International PE535 Operation Manual - Page 28
Embroidering a pattern
 |
View all Brother International PE535 manuals
Add to My Manuals
Save this manual to your list of manuals |
Page 28 highlights
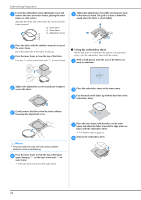
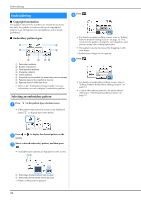
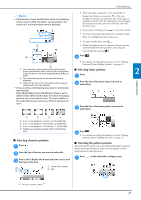
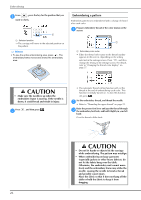
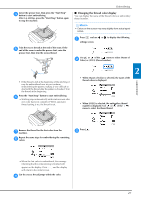
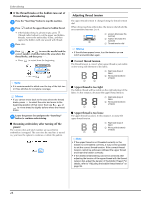
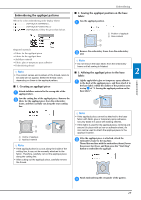
Embroidering From b , press the key for the position that you want to check. 1 1 Selected position The carriage will move to the selected position on the pattern. Memo • To see the entire embroidering area, press . The embroidery frame moves and shows the embroidery area. Embroidering a pattern Embroidery patterns are embroidered with a change of thread after each color. Prepare embroidery thread of the color shown on the a screen. 1 1 Embroidery color order • Either the thread color name or the thread number appears in this screen, depending on the setting selected in the settings screen. Press , and then change the setting in the settings screen. For details, refer to "Changing the thread color display" on page 27. CAUTION • Make sure the needle is up when the embroidery frame is moving. If the needle is down, it could break and result in injury. Press , and then press . c • The automatic thread cutting function will cut the thread at the end of embroidering each color. This function is initially turned on. To turn this function off, press . Set the embroidery thread, and thread the needle. b • Refer to "Threading the upper thread" on page 15. Raise the presser foot lever and pass the thread through c the embroidery foot hole, and hold it lightly in your left hand. Give the thread a little slack. CAUTION • Do not let hands or objects hit the carriage while embroidering. The pattern may misalign. • When embroidering on large garments (especially jackets or other heavy fabrics), do not let the fabric hang over the table. Otherwise, the embroidery unit cannot move freely and the embroidery frame may strike the needle, causing the needle to bend or break and possibly cause injury. Place the fabric so that it does not hang off the table or hold the fabric to keep it from dragging. 26
-
 1
1 -
2
-
3
-
4
-
5
-
6
-
7
-
8
-
9
-
10
-
11
-
12
-
13
-
14
-
15
-
16
-
17
-
18
-
19
-
20
-
21
-
22
-
 23
23 -
 24
24 -
 25
25 -
 26
26 -
 27
27 -
 28
28 -
 29
29 -
 30
30 -
 31
31 -
 32
32 -
 33
33 -
34
-
35
-
36
-
37
-
38
-
39
-
40
-
41
-
42
-
43
-
44
-
45
-
46
-
47
-
48
-
49
-
50
-
51
-
52
 |
 |
