Brother International SE625 Operation Manual - Page 54
Shell tuck stitching, Joining, Using the twin needle
 |
View all Brother International SE625 manuals
Add to My Manuals
Save this manual to your list of manuals |
Page 54 highlights
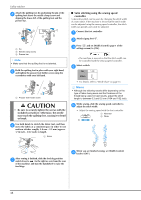
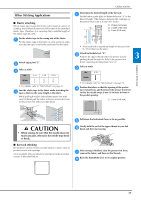
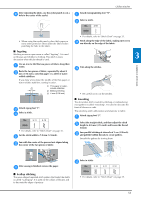
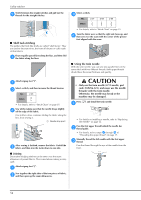
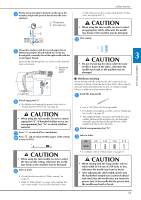
Utility stitches Stitch between the straight stitches and pull out the e threads for the straight stitches. ■ Shell tuck stitching The gathers that look like shells are called "shell tucks". They are used to decorate trims, the front of blouses or cuffs made of thin fabrics. Draw equally spaced lines along the bias, and then fold a the fabric along the lines. Select a stitch. c No. 2-07 2-08 2-09 Stitch • For details, refer to "Stitch Chart" on page 35. Turn the fabric over so that the right side faces up, and d then sew over the seam with the center of the presser foot aligned with the seam. ■ Using the twin needle With the twin needle, you can sew two parallel lines of the same stitch with two different threads. Both upper threads should have the same thickness and quality. Attach zigzag foot "J". b Select a stitch, and then increase the thread tension. c No. 2-05 Stitch • For details, refer to "Stitch Chart" on page 35. Sew while making sure that the needle drops slightly d off the edge of the fabric. One fold at a time, continue folding the fabric along the line, then sewing it. 1 Needle drop point a After sewing is finished, remove the fabric. Unfold the e fabric, and then iron the tucks down to one side. ■ Joining Decorative bridging stitches can be sewn over the seam allowance of joined fabrics. This is used when making a crazy quilt. Attach zigzag foot "J". a Sew together the right sides of the two pieces of fabric, b and then open up the seam allowances. CAUTION • Only use the twin needle (2/11 needle, part code: X59296-121), and never use the needle threader with the twin needle. Otherwise, the needle may break or the machine may be damaged. Press a and install the twin needle. • For details on installing a needle, refer to "Replacing the Needle" on page 22. Pass the first upper thread behind the needle bar b thread guide. • For details, refer to steps a through j of "Threading the upper thread" on page 17. Manually thread the left needle with the first upper c thread. Pass the thread through the eye of the needle from the front. 52
-
 1
1 -
2
-
3
-
4
-
5
-
6
-
7
-
8
-
9
-
10
-
11
-
12
-
13
-
14
-
15
-
16
-
17
-
18
-
19
-
20
-
21
-
22
-
23
-
24
-
25
-
26
-
27
-
28
-
29
-
30
-
31
-
32
-
33
-
34
-
35
-
36
-
37
-
38
-
39
-
40
-
41
-
42
-
43
-
44
-
45
-
46
-
47
-
48
-
 49
49 -
 50
50 -
 51
51 -
 52
52 -
 53
53 -
 54
54 -
 55
55 -
 56
56 -
 57
57 -
 58
58 -
 59
59 -
60
-
61
-
62
-
63
-
64
-
65
-
66
-
67
-
68
-
69
-
70
-
71
-
72
-
73
-
74
-
75
-
76
-
77
-
78
-
79
-
80
-
81
-
82
-
83
-
84
-
85
-
86
-
87
-
88
-
89
-
90
-
91
-
92
-
93
-
94
-
95
-
96
-
97
-
98
-
99
-
100
 |
 |
